RADIO ANTENNA CORD INSTALLATION
PROCEDURE
-
INSTALL NO. 2 ANTENNA CORD SUB-ASSEMBLY
-
Align the locating tape of the No. 2 antenna cord sub-assembly as shown in the illustration, and then engage the 2 clamps.
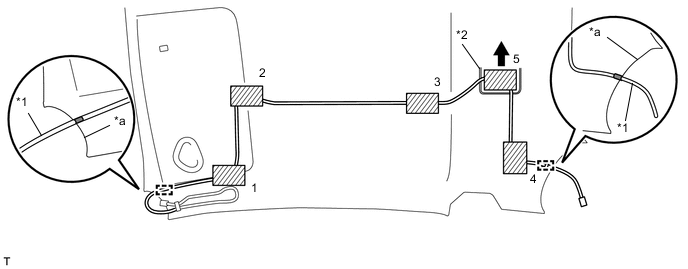
Text in Illustration *1 No. 2 Antenna Cord Sub-assembly *2 Marking Line *a End of Roof Headlining Assembly - - 
Adhesive Tape 
Locating Tape -
Fix the No. 2 antenna cord sub-assembly on the roof headlining assembly with adhesive tape as shown in the illustration.
Tech Tips
-
Fix the No. 2 antenna cord sub-assembly in the order shown in the illustration.
-
When applying the 5th tape, remove the looseness of the No. 2 antenna cord sub-assembly by pulling it in the direction indicated by the arrow in the illustration.
-
-
-
INSTALL ROOF HEADLINING ASSEMBLY
-
INSTALL ANTENNA CORD SUB-ASSEMBLY
-
Engage the 10 clamps and install the antenna cord sub-assembly.
-
Connect the connector.
-
Install the floor mat.
-
-
INSTALL AIR CONDITIONING RADIATOR ASSEMBLY (for Automatic Air Conditioning System)
-
INSTALL AIR CONDITIONING RADIATOR ASSEMBLY (for Manual Air Conditioning System)
-
INSTALL AIR CONDITIONING RADIATOR ASSEMBLY (w/o Air Conditioning System)
Tech Tips
Use the same procedure as for the manual air conditioning system.