VEHICLE STABILITY CONTROL SYSTEM, Diagnostic DTC:C1273, C1274, C1332, C1333, C1466, C1467
| DTC Code | DTC Name |
|---|---|
| C1273 | Low Output Signal of Rear Speed Sensor RH (Test Mode DTC) |
| C1274 | Low Output Signal of Rear Speed Sensor LH (Test Mode DTC) |
| C1332 | Open in Rear Speed Sensor RH |
| C1333 | Open in Rear Speed Sensor LH |
| C1466 | Rear Speed Sensor RH |
| C1467 | Rear Speed Sensor LH |
DESCRIPTION
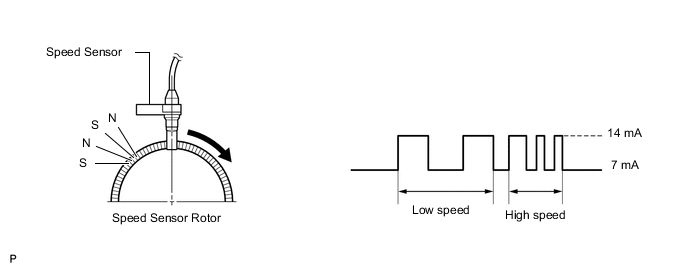
Each speed sensor detects the wheel speed and sends the appropriate signals to the skid control ECU (brake actuator assembly). These signals are used by the brake control system.
Speed sensor rotors have row of alternating N and S magnetic poles, and their magnetic fields change when the rotors turn.
Each speed sensor detects that magnetic field change and sends a pulse signal to the skid control ECU (brake actuator assembly).
DTCs C1273 and C1274 are cleared when the speed sensor sends a vehicle speed signal or when Test Mode ends. DTCs C1273 and C1274 are output only in Test Mode.
| DTC No. | DTC Detection Condition | Trouble Area |
|---|---|---|
| C1332 C1333 |
An open or short in the speed sensor signal circuit. |
|
| C1466 C1467 |
An abnormal signal is received from a wheel speed sensor. |
|
| C1273 C1274 |
Detected only during Test Mode. |
|
Tech Tips
-
DTCs C1273, C1332 and C1466 are for the rear speed sensor RH.
-
DTCs C1274, C1333 and C1467 are for the rear speed sensor LH.
WIRING DIAGRAM
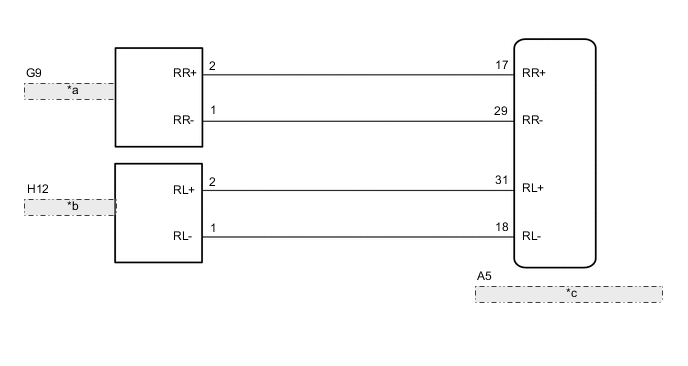
| *a | Rear Speed Sensor RH |
| *b | Rear Speed Sensor LH |
| *c | Skid Control ECU (Brake Actuator Assembly) |
CAUTION / NOTICE / HINT
Note
When replacing the skid control ECU (brake actuator assembly), perform VSC sensor neutral memorization Click here.
PROCEDURE
-
READ VALUE USING GTS (REAR SPEED SENSOR)
-
Connect the GTS to the DLC3.
-
Start the engine.
-
Select the Data List using the GTS Click here.
ABS/VSC/TRC Tester Display Measurement Item/Range Normal Condition Diagnostic Note RR Wheel Speed Rear wheel speed sensor RH reading / Min.: 0 km/h (0 mph), Max.: 326.4 km/h (202 mph) Vehicle stopped: 0 km/h (0 mph) When driving at constant speed: No large fluctuations RL Wheel Speed Rear wheel speed sensor LH reading / Min.: 0 km/h (0 mph), Max.: 326.4 km/h (202 mph) Vehicle stopped: 0 km/h (0 mph) When driving at constant speed: No large fluctuations -
Check the speed value output from the speed sensor displayed on the GTS.
Tech Tips
Factors that affect the indicated vehicle speed include tire size, tire pressure, and tire wear. The speed indicated on the speedometer has an allowable margin of error. This can be tested using a speedometer tester (calibrated chassis dynamometer). For details about testing and the margin of error, see the reference chart Click here.
OK The speed value output from the speed sensor displayed on the GTS is similar to the speed indicated on the speedometer.
NG 
CHECK REAR SPEED SENSOR INSTALLATION Click here
OK 
-
-
PERFORM TEST MODE INSPECTION (SIGNAL CHECK)
-
Turn the ignition switch off.
-
Perform the sensor check using the Test Mode procedure Click here.
OK All Test Mode DTCs are not output.
NG
CHECK REAR SPEED SENSOR INSTALLATION Click here
OK
-
-
RECONFIRM DTC
-
Clear the DTCs Click here.
-
Turn the ignition switch off.
-
Start the engine.
-
Drive the vehicle at a speed of 45 km/h (28 mph) or more for at least 120 seconds.
-
Check if the same DTC is output Click here.
Result Result Proceed to DTCs C1332, C1333, C1466 and C1467 are not output. A DTCs C1332, C1333, C1466 and/or C1467 are output. B
A 
CHECK FOR INTERMITTENT PROBLEMS Click here
B
REPLACE REAR SPEED SENSOR Click here
-
-
CHECK REAR SPEED SENSOR INSTALLATION
-
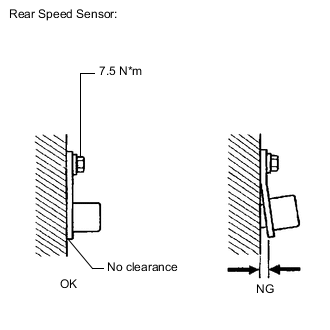
Turn the ignition switch off.
-
Check the speed sensor installation.
OK There is no clearance between the sensor and the rear axle carrier sub-assembly. The installation bolt is tightened properly. Torque 7.5 N*m (76 kgf*cm, 66 in.*lbf)
NG
INSTALL REAR SPEED SENSOR CORRECTLY Click here
OK
-
-
CHECK REAR SPEED SENSOR TIP
-
Remove the rear speed sensor Click here.
-
Check the speed sensor tip.
OK No scratches or foreign matter on the sensor tip. Note
Check the speed sensor signal after cleaning or replacement Click here.
NG
CLEAN OR REPLACE REAR SPEED SENSOR
OK
-
-
CHECK HARNESS AND CONNECTOR (BRAKE ACTUATOR ASSEMBLY - REAR SPEED SENSOR)
-
Install the rear speed sensor Click here.
-
Make sure that there is no looseness at the locking part and the connecting part of the connector.
-
Disconnect the skid control ECU (brake actuator assembly) connector and the rear speed sensor connector.
-
Measure the resistance according to the value(s) in the table below.
Standard Resistance for RH Tester Connection Condition Specified Condition A5-17 (RR+) - G9-2 (RR+) Always Below 1 Ω A5-17 (RR+) - Body ground Always 10 kΩ or higher A5-29 (RR-) - G9-1 (RR-) Always Below 1 Ω A5-29 (RR-) - Body ground Always 10 kΩ or higher for LH Tester Connection Condition Specified Condition A5-31 (RL+) - H12-2 (RL+) Always Below 1 Ω A5-31 (RL+) - Body ground Always 10 kΩ or higher A5-18 (RL-) - H12-1 (RL-) Always Below 1 Ω A5-18 (RL-) - Body ground Always 10 kΩ or higher
NG
REPAIR OR REPLACE HARNESS OR CONNECTOR
OK
-
-
INSPECT BRAKE ACTUATOR ASSEMBLY (REAR SPEED SENSOR POWER SOURCE TERMINAL)
-
Reconnect the skid control ECU (brake actuator assembly) connector.
-
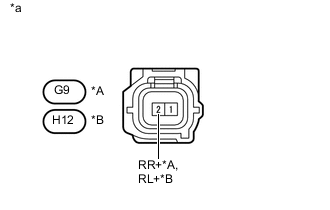
Text in Illustration *A for RH *B for LH *a Front view of wire harness connector
(to Rear Speed Sensor)
Measure the voltage according to the value(s) in the table below.
Standard Voltage for RH Tester Connection Condition Specified Condition G9-2 (RR+) - Body ground Ignition switch ON 8 to 14 V for LH Tester Connection Condition Specified Condition H12-2 (RL+) - Body ground Ignition switch ON 8 to 14 V
NG
REPLACE BRAKE ACTUATOR ASSEMBLY Click here
OK
-
-
RECONFIRM DTC
-
Reconnect the rear speed sensor connector.
-
Clear the DTCs Click here.
-
Turn the ignition switch off.
-
Start the engine.
-
Drive the vehicle at a speed of 45 km/h (28 mph) or more for at least 120 seconds.
-
Check if the same DTC is output Click here.
Result Result Proceed to DTCs C1332, C1333, C1466 and/or C1467 are output. A DTCs C1332, C1333, C1466 and C1467 are not output. B
B
CHECK FOR INTERMITTENT PROBLEMS Click here
A
-
-
REPLACE REAR SPEED SENSOR
-
Turn the ignition switch off.
-
Replace the rear speed sensor Click here.
Note
Check the speed sensor signal after replacement Click here.
NEXT
-
-
RECONFIRM DTC
-
Clear the DTCs Click here.
-
Turn the ignition switch off.
-
Start the engine.
-
Drive the vehicle at a speed of 45 km/h (28 mph) or more for at least 120 seconds.
-
Check if the same DTC is output Click here.
Result Result Proceed to DTCs C1332, C1333, C1466 and/or C1467 are output. A DTCs C1332, C1333, C1466 and C1467 are not output. B
B
END
A
-
-
REPLACE REAR SPEED SENSOR ROTOR
-
Turn the ignition switch off.
-
Replace the rear speed sensor rotor Click here.
Tech Tips
If the rear speed sensor rotor needs to be replaced, replace the rear axle hub and bearing assembly.
Note
Check the speed sensor signal after replacement Click here.
NEXT
-
-
RECONFIRM DTC
-
Clear the DTCs Click here.
-
Turn the ignition switch off.
-
Start the engine.
-
Drive the vehicle at a speed of 45 km/h (28 mph) or more for at least 120 seconds.
-
Check if the same DTC is output Click here.
Result Result Proceed to DTCs C1332, C1333, C1466 and/or C1467 are output. A DTCs C1332, C1333, C1466 and C1467 are not output. B Tech Tips
If troubleshooting has been carried out according to Problem Symptoms Table, refer back to the table and proceed to the next step before replacing parts Click here.
A
REPLACE BRAKE ACTUATOR ASSEMBLY Click here
B
END
-