REAR SHOCK ABSORBER DISASSEMBLY

CAUTION / NOTICE / HINT
Tech Tips
-
Use the same procedure for the RH and LH sides.
-
The procedure listed below is for the LH side.
PROCEDURE
-
REMOVE REAR SUPPORT TO REAR SHOCK ABSORBER NUT LH
-
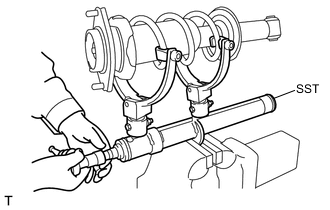
Secure the SST in a vise.
- SST
- 09727-30021 ( 09727-00010, 09727-00021, 09727-00031 )
-
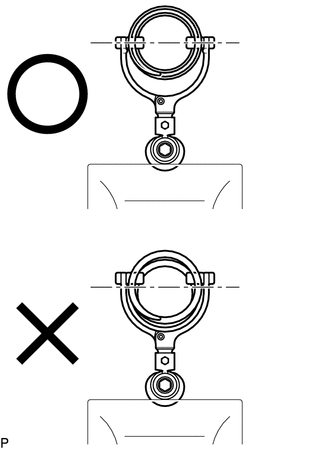
Set the arm hooks of SST on the middle line on the spring outer circumference.
CAUTION:
-
Install SST to the rear coil spring LH so that the distance between the upper and lower hooks is as wide as possible within the installation area.
-
Check that the claws of the hooks are attached securely.
-
-
Using SST, compress the rear coil spring LH.
CAUTION:
-
During the work, if the rear coil spring LH is arched, immediately stop the work and reset SST.
-
Do not compress the spring until each coil contacts each other.
-
Do not use an impact wrench.
-
-
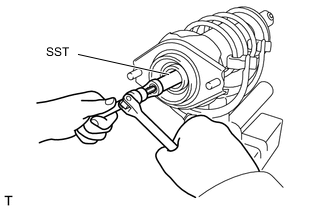
After the rear coil spring LH becomes free of load, install SST to the rear support to rear shock absorber nut LH. And then, using a long socket hexagon 5 mm, hold the piston rod of the rear shock absorber assembly and remove the rear support to rear shock absorber nut LH.
- SST
- 09729-18010
CAUTION:
When the rear coil spring LH is still applied with load, do not remove the rear support to rear shock absorber nut LH.
Note
-
Be careful not to damage or deform the threads.
-
Securely set the long socket hexagon 5 mm.
-
-
REMOVE REAR SUSPENSION SUPPORT ASSEMBLY LH
-
Remove the rear suspension support assembly LH from rear shock absorber assembly LH.
-
-
REMOVE REAR UPPER SPRING SEAT LH
-
Remove the rear upper spring seat LH from the rear suspension support assembly LH.
-
-
REMOVE REAR COIL SPRING LH
-
Remove the rear coil spring from the rear shock absorber assembly LH. Release the SST and remove the rear coil spring.
CAUTION:
Do not use an impact wrench. It will damage.
-
-
REMOVE REAR NO. 1 SHOCK ABSORBER DUST COVER LH
-
Remove the rear No. 1 shock absorber dust cover LH form the rear shock absorber assembly LH.
-
-
REMOVE REAR NO. 1 SPRING BUMPER LH
-
Remove the rear No. 1 spring bumper LH from the rear shock absorber assembly LH.
-