REAR AXLE CARRIER INSTALLATION

CAUTION / NOTICE / HINT
Tech Tips
-
Use the same procedure for the RH and LH sides.
-
The procedure listed below is for the LH side.
PROCEDURE
-
INSTALL REAR AXLE CARRIER SUB-ASSEMBLY LH
-
Using a jack and wooden block, jack up the rear axle carrier sub-assembly LH to replicate the standard vehicle height conditions.
-
-
TEMPORARILY TIGHTEN REAR UPPER CONTROL ARM ASSEMBLY LH
-
Temporarily tighten the rear upper control arm assembly LH to the rear axle carrier sub-assembly with the bolt and new nut.
-
-
TEMPORARILY TIGHTEN REAR NO. 1 SUSPENSION ARM ASSEMBLY LH
-
Temporarily tighten the rear No. 1 suspension arm assembly LH to the rear axle carrier sub-assembly with the bolt and new nut.
-
-
TEMPORARILY TIGHTEN REAR NO. 2 SUSPENSION ARM ASSEMBLY LH
-
Temporarily tighten the rear No. 2 suspension arm assembly LH to the rear axle carrier sub-assembly with the bolt and new nut.
-
-
INSTALL TOE CONTROL LINK SUB-ASSEMBLY LH
-
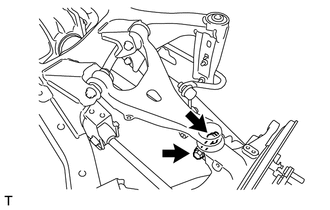
Install the nut and the toe control link sub-assembly LH to the rear axle carrier sub-assembly.
- Torque:
- 60 N*m { 612 kgf*cm, 44 ft.*lbf }
-
Install the cotter pin.
-
-
TEMPORARILY TIGHTEN STABILIZER LINK SUB-ASSEMBLY (for LH Side)
-
INSTALL REAR HEIGHT CONTROL SENSOR SUB-ASSEMBLY LH (w/ HID Headlight System)
-
REMOVE NO. 3 PARKING BRAKE CABLE ASSEMBLY
-
Install the clip and the No. 3 parking brake cable assembly to the parking brake plate sub-assembly.
-
-
REASSEMBLY PARKING BRAKE ASSEMBLY
-
STABILIZE SUSPENSION
-
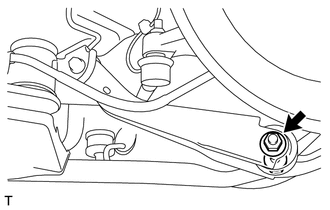
FULLY TIGHTEN REAR UPPER CONTROL ARM ASSEMBLY LH
-
Fully tighten the bolt.
- Torque:
- 80 N*m { 816 kgf*cm, 59 ft.*lbf }
Tech Tips
Hold the bolt and tighten the nut.
-
-
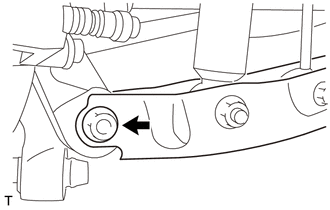
REMOVE REAR NO. 1 SUSPENSION ARM ASSEMBLY LH
-
Fully tighten the bolt.
- Torque:
- 110 N*m { 1122 kgf*cm, 81 ft.*lbf }
Tech Tips
Hold the bolt and tighten the nut.
-
-
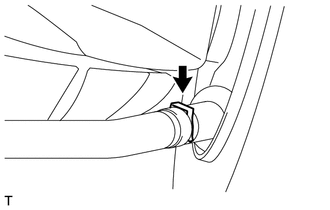
INSTALL REAR NO. 2 SUSPENSION ARM ASSEMBLY LH
-
Fully tighten the bolt.
- Torque:
- 80 N*m { 816 kgf*cm, 59 ft.*lbf }
Tech Tips
Hold the bolt and tighten the nut.
-
-
INSTALL REAR AXLE HUB AND BEARING ASSEMBLY LH
-
INSPECT AND ADJUST REAR WHEEL ALIGNMENT
-
VSC SENSOR NEUTRAL MEMORIZATION
-
HEIGHT CONTROL SENSOR SIGNAL INITIALIZE (w/ HID Headlight System)
-
ADJUST HID Headlight System (w/ HID Headlight System)