SHIFT LEVER ASSEMBLY ADJUSTMENT
PROCEDURE
-
ADJUST SHIFT LEVER POSITION
-
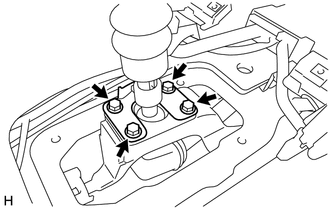
Loosen the 4 bolts of the shift lever cap. [*1]
-
Move the shift lever to 2nd. [*2]
-
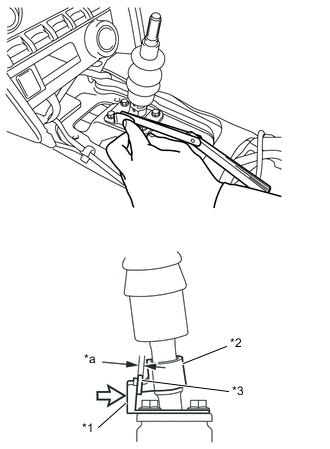
Text in Illustration *1 Shift Lever Cap *2 Stopper *3 Feeler Gauge *a 1.0 mm (0.03937 in.) 
Push Insert a 1 mm (0.03937 in.) feeler gauge between the stopper and the shift lever cap, and push the shift lever cap against the stopper. [*3]
-
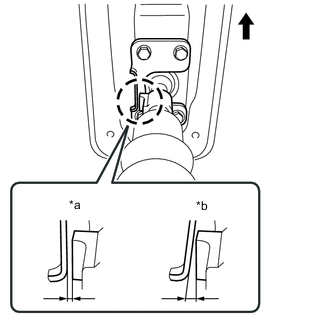
Text in Illustration *a Correct *b Incorrect 
Front of vehicle While keeping the clearance gap between the stopper and the shift lever cap parallel, tighten the 4 bolts to the specified torque. [*4]
- Torque:
- 7.5 N*m { 76 kgf*cm, 66 in.*lbf }
Note
After tightening the bolts, check that there is an equal amount of clearance gap between the stopper and the shift lever cap.
-
Depress the clutch pedal and check that the shift lever can be moved to 1st and 2nd.
-
If the shift lever cannot be moved to 1st and 2nd, repeat steps [*1] to [*4] , decreasing the thickness of the feeler gauge in increments of 0.2 mm (0.00787 in.) until the shift lever can be moved to 1st and 2nd.
-
Depress the clutch pedal and check that the shift lever can be moved to 1st and 2nd.
-
After adjusting the position of the shift lever, apply MP grease to the stopper and shift lever cap.
-