COUNTER GEAR DISASSEMBLY

PROCEDURE
-
INSPECT THRUST CLEARANCE
-
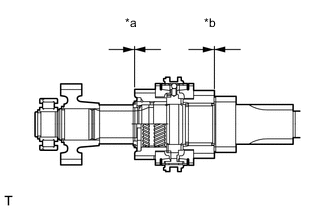
Text in Illustration *a Counter shaft 4th gear thrust clearance *b Counter shaft 3rd gear thrust clearance Using a feeler gauge, measure the thrust clearance of the counter shaft 3rd gear and counter shaft 4th gear.
Standard Clearance Gear Standard clearance mm (in.) Maximum clearance mm (in.) Counter shaft 3rd gear 0.10 to 0.35 (0.00393 to 0.0138) 0.35 (0.0138) Counter shaft 4th gear 0.10 to 0.35 (0.00393 to 0.0138) 0.35 (0.0138) Tech Tips
If the clearance exceeds the maximum, adjust it with the 4th inner race thrust washer.
-
-
INSPECT RADIAL CLEARANCE
-
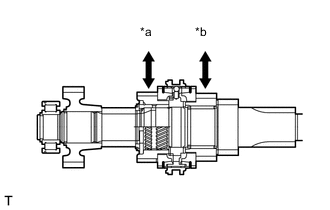
Text in Illustration *a Counter shaft 4th gear radial clearance *b Counter shaft 3rd gear radial clearance Using a feeler gauge, measure the radial clearance of the counter shaft 3rd gear and counter shaft 4th gear.
Standard Clearance Gear Standard clearance mm (in.) Maximum clearance mm (in.) Counter shaft 3rd gear 0.015 to 0.068 (0.000590 to 0.00268) 0.068 (0.00268) Counter shaft 4th gear 0.065 to 0.115 (0.002559 to 0.00453) 0.115 (0.00453) Tech Tips
If the clearance exceeds the maximum, replace the corresponding gear and needle roller bearing or 4th gear bearing inner race all together with a new ones.
-
-
REMOVE FRONT COUNTER GEAR BEARING
-
Using a snap ring expander, remove the shaft snap ring.
-
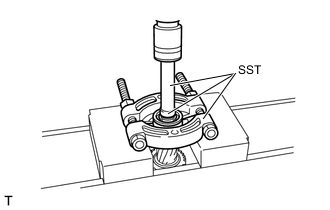
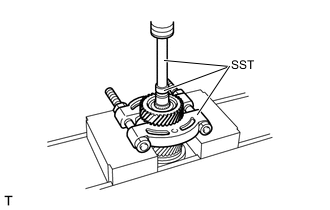
Using SST and a press, remove the front counter gear bearing.
- SST
- 09950-00020
- 09950-60010 ( 09951-00230 )
- 09950-70010
-
-
REMOVE COUNTER DRIVE GEAR
-

Using a snap ring expander, remove the shaft snap ring.
-
Using SST and a press, remove the counter drive gear.
- SST
- 09950-00020
- 09950-60010 ( 09951-00230 )
- 09950-70010 ( 09951-07100 )
-
-
REMOVE COUNTER SHAFT 4TH GEAR
-
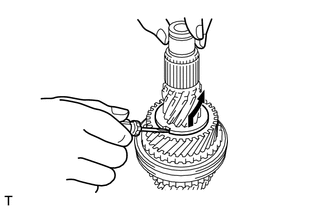
Using a snap ring expander, remove the shaft snap ring, and then remove the 4th washer retaining ring and 4th inner race thrust washer.
-
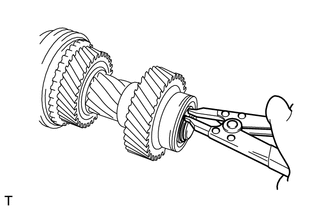
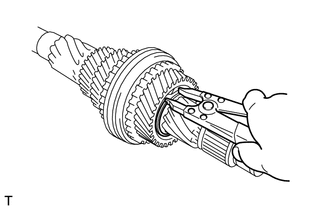
Using a screwdriver, pry the 4th gear bearing inner race and turn it counterclockwise along the gear, and remove the 4th gear bearing inner race.
-
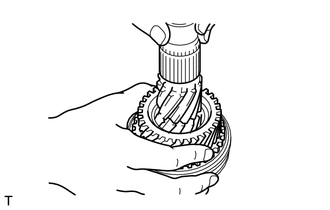
Remove the counter shaft 4th gear and No. 1 synchronizer ring.
-
-
REMOVE COUNTER SHAFT 3RD GEAR
-

Using SST and a press, remove the No. 2 transmission clutch hub, counter shaft 3rd gear, No. 3 synchronizer ring set and needle roller bearing.
- SST
- 09950-00020
-
-
REMOVE NO. 2 TRANSMISSION HUB SLEEVE
-

Remove the No. 2 transmission hub sleeve, and then remove the 3 No. 1 synchromesh shifting keys, 3 No. 1 synchromesh shifting key springs and 3 balls from the transmission clutch hub.
Note
-
Use a cloth to prevent the No. 1 synchromesh shifting keys, No. 1 synchromesh shifting key springs and balls from popping out.
-
Do not deform the No. 1 synchromesh shifting key spring.
Tech Tips
During this operation, keep the No. 2 transmission clutch hub and No. 1 synchromesh shifting key intact.
-
-