RADIATOR INSTALLATION
PROCEDURE
-
INSTALL RADIATOR PACKING (LOWER)
-
Install the new radiator packing.
-
-
INSTALL NO. 2 RADIATOR PACKING
-
Install the new No. 2 radiator packing.
-
-
INSTALL NO. 1 RADIATOR PACKING
-
Install the new No. 1 radiator packing.
-
-
INSTALL RADIATOR PACKING (UPPER)
-
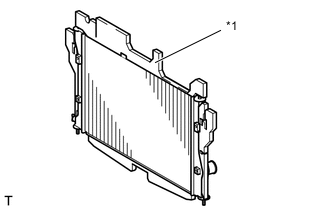
Text in Illustration *1 Radiator Packing Install the new radiator packing.
Tech Tips
Cut the radiator packing at the same position in the removal.
-
-
INSTALL OUTLET RADIATOR HOSE
-
Since the radiator hose must be attached in the correct position, apply match marks before removing it.
-
Install the outlet radiator hose to the radiator assembly and secure it with the clamp.
-
-
INSTALL NO. 1 RADIATOR HOSE
-
Since the radiator hose must be attached in the correct position, apply match marks before removing it.
-
Install the No. 1 radiator hose to the water filler sub-assembly and secure it with the clamp.
-
-
INSTALL INLET RADIATOR HOSE
-
Since the radiator hose must be attached in the correct position, apply match marks before removing it.
-
Install the inlet radiator hose to the radiator assembly and secure it with the clamp.
-
-
INSTALL RADIATOR ASSEMBLY
-
Install the 2 radiator support cushions to the radiator assembly.
-
While lifting the outlet radiator hose, install the radiator assembly.
Note
Push a blanket or a cardboard against the cooler condenser assembly to protect it.
-
Attach the claw and install the thermistor assembly.
-
Install the radiator support RH with the 2 bolts.
- Torque:
- 7.5 N*m { 76 kgf*cm, 66 in.*lbf }
-
Install the radiator support LH with the 2 bolts.
- Torque:
- 7.5 N*m { 76 kgf*cm, 66 in.*lbf }
-
-
INSTALL FAN SHROUD
-
INSTALL COOLER CONDENSER ASSEMBLY
-
Install the cooler condenser assembly to the radiator assembly with the 5 bolts.
- Torque:
- 6.0 N*m { 61 kgf*cm, 53 in.*lbf }
-
-
INSTALL RADIATOR SUPPORT SUB-ASSEMBLY
-
Install the 6 bolts and radiator support sub-assembly.
- Torque:
- 18 N*m { 184 kgf*cm, 13 ft.*lbf }
-
-
INSTALL HOOD LOCK ASSEMBLY (for LHD)
-
INSTALL HOOD LOCK ASSEMBLY (for RHD)
-
INSTALL WATER FILLER SUB-ASSEMBLY
-
Install the water filler sub-assembly and water filler bracket with the 4 bolts.
- Torque:
- 7.5 N*m { 76 kgf*cm, 66 in.*lbf }
-
Connect the inlet radiator hose and No. 1 radiator hose to the radiator assembly with the 2 clamps.
-
Connect the radiator cap hose to the water filler sub-assembly.
-
-
INSTALL RADIATOR COVER PLATE
-
Install the radiator cover plate with the 6 clips.
-
-
INSTALL AIR CLEANER DUCT
-
Install the air cleaner duct with the 2 bolts.
- Torque:
- 6.0 N*m { 61 kgf*cm, 53 in.*lbf }
-
-
INSTALL RADIATOR RESERVE TANK ASSEMBLY
-
Install the radiator reserve tank assembly with the 2 bolts.
- Torque:
- 7.5 N*m { 76 kgf*cm, 66 in.*lbf }
-
-
CONNECT OUTLET RADIATOR HOSE
-
ADD ENGINE COOLANT
-
INSPECT FOR COOLANT LEAK
-
INSTALL NO. 1 ENGINE UNDER COVER
-
INSTALL FRONT BUMPER COVER
-
INSTALL AIR CLEANER CASE SUB-ASSEMBLY
-
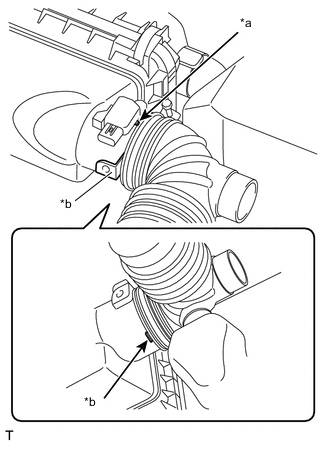
Text in Illustration *a match marks *b Stopper Connect the hose.
- Torque:
- 3.0 N*m { 31 kgf*cm, 27 in.*lbf }
Tech Tips
When connecting the hose, align the protrusion of the air cleaner case sub-assembly with the cutout of the hose, and push in the hose until it contacts the stopper of the air cleaner case sub-assembly.
-