EXHAUST PIPE INSTALLATION

PROCEDURE
-
INSTALL FRONT EXHAUST PIPE SUB-ASSEMBLY
-
Rope up the front exhaust pipe sub-assembly to the front suspension crossmember.
Tech Tips
This operation is necessary in order to prevent the front exhaust pipe sub-assembly from falling off.
-
Remove the SST. Click here
- SST
- 09250-53010
-
-
INSTALL TAIL PIPE BAFFLE (w/ Rear Spoiler)
-
with knee airbag:
-

Text in Illustration *a Cutout Section *b Protrusion *c Stopper Align the cutout section of the tail pipe baffle with the protrusion of the exhaust pipe assembly tail as shown in the illustration.
-
Press in the tail pipe baffle until its stopper contacts that of the tail exhaust pipe assembly.
-
Install the 2 bolts and the 2 tail pipe baffles.
- Torque:
- 7.5 N*m { 76 kgf*cm, 66 in.*lbf }
-
-
without knee airbag:
-
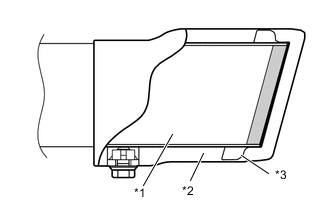
Text in Illustration *1 Tail Exhaust Pipe Assembly *2 Tail Pipe Baffle *3 Plate 
Contact area Press in the tail pipe baffle until the tail exhaust pipe assembly plate contact shown in the illustration.
-
Install the 2 bolts and the 2 tail pipe baffles.
- Torque:
- 7.5 N*m { 76 kgf*cm, 66 in.*lbf }
-
-
-
INSTALL TAIL EXHAUST PIPE ASSEMBLY
-
Install the 4 cushion rubbers and the tail exhaust pipe assembly.
-
-
INSTALL CENTER EXHAUST PIPE ASSEMBLY
-
Install the center exhaust pipe assembly with the cushion rubber.
-
Install the 2 new gaskets and the center exhaust pipe assembly with the 2 new nuts and the 2 bolts.
- Torque:
- 48 N*m { 490 kgf*cm, 35 ft.*lbf }
Note
-
Do not reuse the gaskets.
-
Do not reuse the nuts.
-
-
INSTALL FRONT EXHAUST PIPE ASSEMBLY
-
Temporarily install the front exhaust pipe assembly to the bracket with the bolt.
-
Install the new gaskets and the front exhaust pipe assembly to the center exhaust pipe assembly with the 2 nuts.
- Torque:
- 18 N*m { 184 kgf*cm, 13 ft.*lbf }
Note
-
Do not reuse the gaskets.
-
Do not reuse the nuts.
-
Install the new gaskets and the front exhaust pipe assembly to the front exhaust pipe sub-assembly with the 2 new nuts.
- Torque:
- 43 N*m { 439 kgf*cm, 32 ft.*lbf }
Note
-
Do not reuse the gaskets.
-
Do not reuse the nuts.
-
Fully tighten the bolt.
- Torque:
- 50 N*m { 510 kgf*cm, 37 ft.*lbf }
-
-
INSPECT FOR EXHAUST GAS LEAK
-
If gas is leaking, tighten the areas necessary to stop the leak. Replace the damaged parts as necessary.
-
-
INSTALL NO. 2 ENGINE UNDER COVER
-
Install the 7 bolts and the No. 2 engine under cover.
- Torque:
- 7.5 N*m { 76 kgf*cm, 66 in.*lbf }
-
-
INSTALL NO. 1 ENGINE UNDER COVER
-
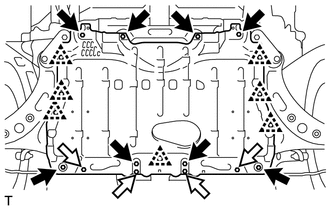
Install the No. 1 engine under cover with the 12 bolts and engage the 7 clips.

Bolt A 
Bolt B - Torque:
- Bolt A
- 30 N*m { 306 kgf*cm, 22 ft.*lbf }
- Bolt B
- 7.5 N*m { 76 kgf*cm, 66 in.*lbf }
-