CANISTER INSTALLATION
PROCEDURE
-
INSTALL CHARCOAL CANISTER ASSEMBLY (for Metal Type)
-
Install the canister base bracket to the charcoal canister assembly with 2 nuts.
- Torque:
- 18 N*m { 184 kgf*cm, 13 ft.*lbf }
-
Install the charcoal canister assembly with canister base bracket with the 2 bolts and the nut.
- Torque:
- Bolt
- 7.5 N*m { 76 kgf*cm, 66 in.*lbf }
- Nut
- 18 N*m { 184 kgf*cm, 13 ft.*lbf }
-
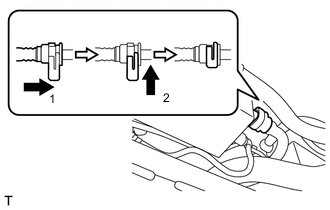
Connect the drain hose D as indicated by the arrows, in the order shown in the illustration.
-
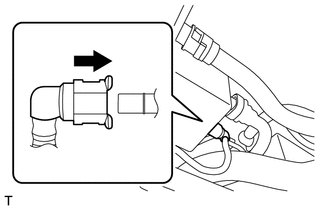
Connect the drain hose C as shown in the illustration.
-
-
INSTALL CANISTER PUMP MODULE (for Metal Type)
-
Install the drain hose E.
-
Connect the drain hose A and the drain hose B.
-
Engage the clamp.
-
Install the nuts and bracket B.
- Torque:
- 18 N*m { 184 kgf*cm, 13 ft.*lbf }
-
Install the 2 nuts and bracket A.
- Torque:
- 18 N*m { 184 kgf*cm, 13 ft.*lbf }
-
Engage the clip.
-
Install the check valve with 3 bolts.
- Torque:
- 7.5 N*m { 76 kgf*cm, 66 in.*lbf }
-
Connect the evaporation hose to the fuel pipe assembly.
-
Engage the clip.
-
Connect the drain hose A to the fuel filler pipe.
-
Connect the drain hose B to the charcoal canister assembly.
-
-
INSTALL CHARCOAL CANISTER ASSEMBLY (for Clamp Type)
-
Install the canister bracket A and canister bracket B to the charcoal canister assembly with 3 nuts.
- Torque:
- 18 N*m { 184 kgf*cm, 13 ft.*lbf }
-
Install the charcoal canister assembly with 2 bolts and nut.
- Torque:
- 7.5 N*m { 76 kgf*cm, 66 in.*lbf }
-
Connect the purge tube.
-
Connect the drain hose and drain tube.
-
-
INSTALL FUEL OUTLET VALVE ASSEMBLY (for Clamp Type)
-
Install the fuel outlet valve assembly to the canister bracket A.
-
Connect the 2 evaporation hoses and drain hose to the fuel outlet valve assembly.
-
-
INSTALL REAR SUSPENSION MEMBER SUB-ASSEMBLY
-
INSTALL REAR DIFFERENTIAL CARRIER ASSEMBLY