AUTOMATIC TRANSMISSION FLUID ADJUSTMENT

CAUTION / NOTICE / HINT
Note
-
This transmission requires Toyota Genuine ATF WS.
-
After servicing the transmission, you must follow the ATF adjustment procedure.
-
Maintain the vehicle in a horizontal position while adjusting the fluid level.
PROCEDURE
-
BEFORE FILLING TRANSMISSION
-
When you have replaced the entire automatic transmission, automatic transmission oil pan, drain plug, transmission valve body and/or torque converter, proceed to the "TRANSMISSION FILL" procedures.
-
When you have replaced the automatic transmission extension housing oil seal and/or repaired a fluid leak, proceed to the "FLUID TEMPERATURE CHECK" procedures.
-
-
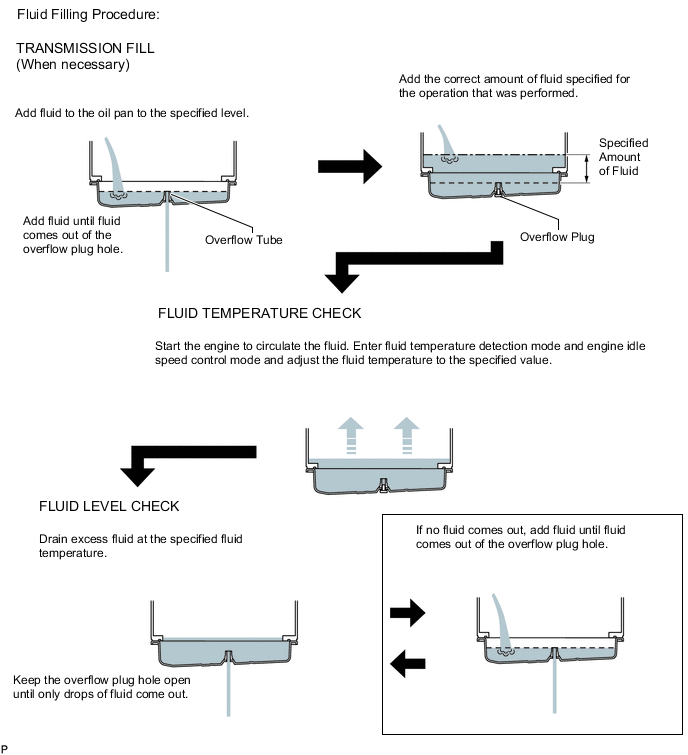
FILL TRANSMISSION PAN WITH FLUID
-
Lift the vehicle.
Note
Set the vehicle on a lift so that the vehicle is kept level when it is lifted up (make sure that the tilt angle from the front to rear of the vehicle is within +/- 1°).
-
Remove the No. 2 engine under cover Click here.
-
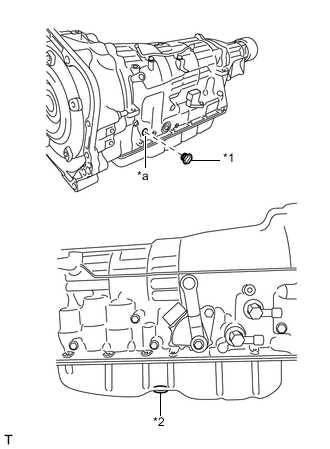
Text in Illustration *1 Refill Plug *2 Overflow Plug *a Refill Hole Remove the refill plug with O-ring, overflow plug and gasket.
-
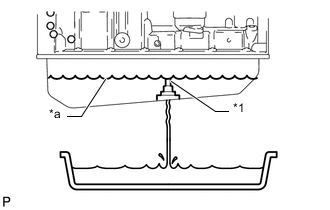
Text in Illustration *1 Overflow Tube *a Specified Fluid Level Fill the transmission through the refill hole until fluid begins to trickle out of the overflow tube.
-
Wait until the fluid flow slows and only drops come out.
-
Temporarily install the overflow plug and gasket.
Tech Tips
Reuse the old gasket. The overflow plug will be removed again to adjust the fluid level.
-
Fill the transmission with the amount of fluid listed in the table below.
Reference Capacity Performed Repair Fill Amount Automatic transmission oil pan and drain plug removal/installation 2.0 liters (2.1 US qts, 1.8 Imp. qts) Transmission valve body removal/installation 3.0 liters (3.2 US qts, 2.6 Imp. qts) Torque converter removal/installation 4.5 liters (4.8 US qts, 4.0 Imp. qts) Tech Tips
If you cannot fill the listed amount of fluid, perform the following:
-
Temporarily install the refill plug with O-ring.
Tech Tips
Reuse the old O-ring. The refill plug will be removed again to adjust the fluid level.
-
Start the engine and idle it.
Note
Check that electrical systems such as the air conditioning system, audio system and lighting system are off.
-
Slowly move the shift lever from P to M. Then return the shift lever to P.
Tech Tips
Slowly move the shift lever to circulate the fluid through each part of the transmission.
-
Wait for 30 seconds with the engine idling.
-
Stop the engine.
-
Remove the refill plug with O-ring.
-
Fill the transmission with the remaining fluid until the amount in the table has been filled.
-
-
Temporarily install the refill plug with O-ring.
Tech Tips
Reuse the old O-ring. The refill plug will be removed again to adjust the fluid level.
-
Lower the vehicle.
-
-
FLUID TEMPERATURE CHECK
Note
The ATF temperature can be confirmed by using the GTS.
-
Turn the ignition switch OFF.
-
Connect the GTS to the DLC3.
-
Turn the ignition switch to ON.
-
Enter the following menus: Powertrain / ECT / Data List / A/T Oil Temperature 1.
-
Check the ATF temperature.
Note
If the ATF temperature is higher than 43°C (109°F), turn the ignition switch OFF and wait until the fluid temperature drops to below 43°C (109°F).
-
-
FLUID LEVEL CHECK
CAUTION:
-
It is necessary to change to temperature detection mode in order to idle the vehicle appropriately.
-
The ATF temperature must be between 43 and 47°C (109 and 117°F) to accurately check the fluid level.
-
When using the GTS:
Enter the following menus: Powertrain / ECT / Active Test / Connect the TC and TE1.
Standard condition Indicator lights in the combination meter blink. -
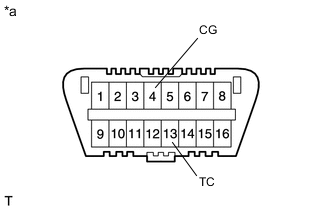
Text in Illustration *a Front view of DLC3 When not using the GTS:
Using SST, connect terminals 13 (TC) and 4 (CG) of the DLC3.
- SST
- 09843-18040
Standard condition Indicator lights in the combination meter blink. -
Start the engine and idle it.
Note
Check that electrical systems such as the air conditioning system, audio system and lighting system are off.
-
Slowly move the shift lever from P to M. Then return the shift lever to P.
Tech Tips
Slowly move the shift lever to circulate the fluid through each part of the transmission.
-
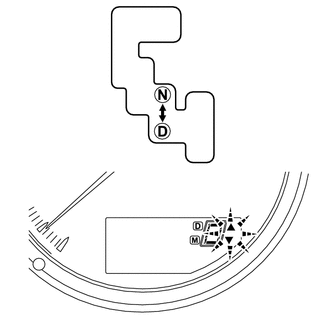
Move the shift lever to D, and then quickly move it back and forth between N and D (once within 1.5 seconds) for at least 6 seconds. This will activate the fluid temperature detection mode.
Standard condition When switching to the oil temperature detecting mode, regardless of the shift position, the indicator lights [▲] and [▼] turn on for 2 seconds, and then go off. -
When using the GTS:
Return the shift lever to P and terminate the Active Test on the GTS.
-
When not using the GTS:
Return the shift lever to P and disconnect SST from the DLC3.
-
While watching the state of the indicator lights [▲] and [▼], idle the engine to rise the oil temperature.
Note
If only the indicator light [▲] turns on or the indicator lights [▲] and [▼] turn on simultaneously, stop the operation. And then, wait until the fluid temperature is lowered and only the indicator light [▼] turns on in the oil temperature detecting mode.
-
Allow the engine to idle until the fluid temperature reaches 43 to 47°C (109 to 117°F).
Indicator [D] Indication of ATF Temperature Below Proper Temperature Proper Temperature Higher than Proper Temperature Below 43°C (109°F) 43 to 47°C (109 to 117°F) Higher than 47°C (117°F) Indicator lights [▼] turns on Indicator lights [▲] and [▼] turn on Indicator lights [▲] turns on -
Text in Illustration *1 Overflow Tube *a Specified Fluid Level Remove the overflow plug and gasket with the engine idling.
-
Wait until the overflow slows to a trickle.
Note
If the fluid does not overflow, perform the following:
-
Remove the refill plug with O-ring.
-
Refill the transmission through the refill hole until fluid begins to trickle out of the overflow tube.
-
Wait until the overflow slows to a trickle.
-
-
Install the overflow plug and a new gasket.
- Torque:
- 20 N*m { 204 kgf*cm, 15 ft.*lbf }
-
Coat a new O-ring with ATF and install it to the refill plug.
-
Install the refill plug with O-ring.
- Torque:
- 39 N*m { 400 kgf*cm, 29 ft.*lbf }
-
Install the No. 2 engine under cover Click here.
-
Lower the vehicle.
-
-
COMPLETE
-
Turn the ignition switch OFF.
-
When using the GTS:
Disconnect the GTS from the DLC3.
-
Inspect for automatic transmission fluid leak.
-