FRONT BUMPER (for Sport Package) INSTALLATION

Tech Tips
A bolt without a torque specification is shown in the standard bolt chart Click here.
-
INSTALL FRONT WHEEL OPENING EXTENSION PAD LH
-
Install the front wheel opening extension pad with the 4 screws.
-
-
INSTALL FRONT WHEEL OPENING EXTENSION PAD RH
Tech Tips
Use the same procedure described for the LH side.
-
INSTALL FRONT BUMPER SIDE RETAINER LH
-
Attach the claw to install the front bumper side retainer.
-
Install the screw.
-
-
INSTALL FRONT BUMPER SIDE RETAINER RH
Tech Tips
Use the same procedure described for the LH side.
-
INSTALL FRONT BUMPER REINFORCEMENT
-
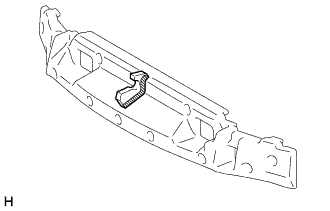
Install the front bumper reinforcement with the 6 bolts.
- Torque:
- 29 N*m { 300 kgf*cm, 22 ft.*lbf }
-
Install the 2 clips.
-
w/ Grille Shutter
Attach the clamp to install the thermistor.
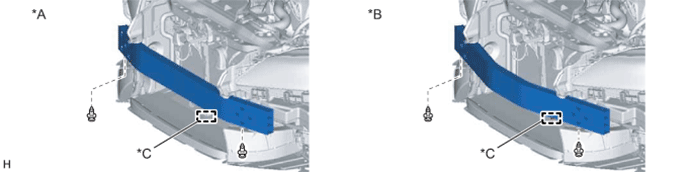
Text in Illustration *A for Type A *B for Type B *C w/ Grille Shutter - -
-
-
INSTALL HEADLIGHT WASHER HOSE (w/ Headlight Cleaner System)
-
Attach the 4 clamps to install the headlight washer hose.
-
Connect the headlight washer hose to the headlight washer tank.
Tech Tips
Make sure that the headlight cleaner hose is not twisted.
-
-
INSTALL RADIATOR SHUTTER SUB-ASSEMBLY (w/ Grille Shutter)
-
Attach the 2 clips to temporary install the radiator shutter.
-
Connect the connector of the radiator shutter.
-
Close the radiator shutter sub-assembly.
-
Connect the GTS to the DLC3 and turn the power switch on (IG).
-
Enter the following menus: Body Electrical / Grille Shutter / Active Test / Shutter Closing Operation Lock Detection. Then, perform Close or OFF.
Note
The radiator shutter sub-assembly cannot be installed if it has not been closed.
-
Turn the power switch off.
-
-
Install the radiator shutter of the 4 bolts.
- Torque:
- 5.5 N*m { 56 kgf*cm, 49 in.*lbf }
-
Attach the clamp to install the thermistor.
-
-
INSTALL RADIATOR SUPPORT OPENING COVER (w/ Grille Shutter)
-
Install the radiator support opening cover with the 2 bolts and 4 clips.
-
-
INSTALL ENGINE UNDER COVER (w/ Grille Shutter)
-
Install the engine under cover with the 13 screws and 3 clips.
-
-
INSTALL FRONT BUMPER PAD (for Type A)
Tech Tips
When installing the front bumper pad, heat the front bumper energy absorber using a heat light.
Standard Item Temperature Front Bumper Energy Absorber 20 to 30°C (68 to 86°F) Note
Do not heat the front bumper energy absorber excessively.
-
When using a new front bumper energy absorber:
-
Clean the surface of a new front bumper energy absorber.
-
Using a heat light, heat the front bumper energy absorber surface.
-
-
When reusing the front bumper energy absorber:
-
Using a heat light, heat the front bumper energy absorber surface.
-
Remove the double-sided tape from the front bumper energy absorber.
-
Wipe off any tape adhesive residue with cleaner.
-
-
Install a new front bumper pad.
-
Using a heat light, heat the front bumper energy absorber.
-
Remove the peeling paper from the face of the front bumper pad.
Tech Tips
After removing the peeling paper, keep the exposed adhesive free from foreign matter.
-
Install the front bumper pad as shown in the illustration.
Tech Tips
Press the front bumper pad firmly to install it.
-
-
-
INSTALL FRONT BUMPER ENERGY ABSORBER
-
Install the front bumper energy absorber.
-
-
INSTALL FRONT BUMPER COVER
-
w/ Fog Light:
-
Connect the 2 fog light connectors.
-
-
w/ Headlight Cleaner System:
-
Connect the 2 headlight washer hoses.
Tech Tips
Make sure that the headlight cleaner hose is not twisted.
-
-
w/ LEXUS Parking Assist-sensor System:
-
Connect the No. 4 engine room wire.
-
-
Attach the 10 claws to install the front bumper cover.
-
Install the 5 clips.
-

Text in Illustration *a CORRECT *b INCORRECT Install the 2 pin hold clips as shown in the illustration.
Tech Tips
Use the same procedure for the pin hold clips on the other side.
-
Install the 2 screws.
-
Install the 8 screws.
-
w/ Headlight Cleaner System:
-
Fill the washer jar with washer fluid.
-
-
-
INSTALL COOL AIR INTAKE DUCT SEAL
-
Install the cool air intake duct seal with the 7 clips.
-
-
INSTALL ENGINE ROOM SIDE COVER
-
Install the engine room side cover with the 4 clips.
-
-
ADJUST FOG LIGHT AIMING
-
CHECK LEXUS PARKING ASSIST-SENSOR SYSTEM (w/ LEXUS Parking Assist-sensor System)
-
CHANGE RADIATOR SHUTTER CONTROL STATE (w/ Grille Shutter)
Tech Tips
If the swing grille actuator assembly is replaced with a new one, perform the following procedure.
-
Drive the vehicle at a speed of 5 km/h (3 mph) or more.
Tech Tips
Once the speed signal is received normally, the state of the radiator shutter sub-assembly changes as follows to the normal control state.
-
Radiator shutter sub-assembly is operable
-
Cautions are not displayed
-
DTCs: none
-
Shutter state: open
-
-
-
CHECK RADIATOR SHUTTER (w/ Grille Shutter)