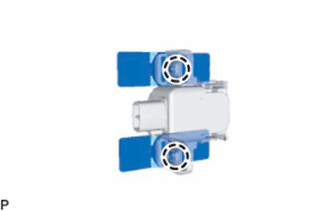
FRONT BUMPER (for Sport Package) REASSEMBLY

-
INSTALL FRONT BUMPER PAD
Tech Tips
When installing the front bumper pad, heat the front bumper cover using a heat light.
Standard Item Temperature Front Bumper Cover 20 to 30°C (68 to 86°F) Note
Do not heat the front bumper cover excessively.
-
When using a new front bumper cover:
-
Clean the surface of a new front bumper cover.
-
Using a heat light, heat the front bumper cover surface.
-
-
When reusing the front bumper cover:
-
Using a heat light, heat the front bumper cover surface.
-
Remove the double-sided tape from the front bumper cover.
-
Wipe off any tape adhesive residue with cleaner.
-
-
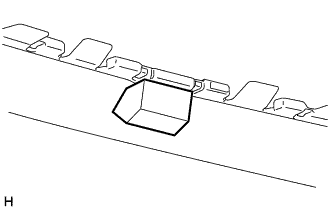
Install a new front bumper pad.
-
Using a heat light, heat the front bumper cover.
-
Remove the peeling paper from the face of the front bumper pad.
Tech Tips
After removing the peeling paper, keep the exposed adhesive free from foreign matter.
-
Install the front bumper pad.
Tech Tips
Press the front bumper pad firmly to install it.
-
-
-
INSTALL FRONT BUMPER LOWER COVER
-
Attach the 2 claws to install the front bumper lower cover.
-
-
INSTALL NO. 2 RADIATOR GRILLE GARNISH
-
Attach the 4 claws to install the No. 2 radiator grille garnish.
-
-
INSTALL RADIATOR GRILLE GARNISH
Tech Tips
Use the same procedure described for the No. 2 radiator grille garnish.
-
INSTALL LOWER NO. 1 RADIATOR GRILLE
-
Attach the 16 claws to install the lower No. 1 radiator grille.
-
-
INSTALL RADIATOR GRILLE
-
Attach the 10 claws to install the radiator grille.
-
Install the 2 screws and 2 clips.
-
-
INSTALL RADIATOR GRILLE PROTECTOR
-
Attach the 16 clips to install the radiator grille protector.
-
-
INSTALL FRONT BUMPER EXTENSION MOUNTING BRACKET
-
Install the front bumper extension mounting bracket with the 2 screws.
-
-
INSTALL HEADLIGHT WASHER ACTUATOR SUB-ASSEMBLY LH (w/ Headlight Cleaner System)
-
Install the spring nut to the headlight washer actuator sub-assembly LH.
-
Push the tab shown by allow (1) and attach the 2 claws as shown in the illustration.
-
Install the headlight washer actuator sub-assembly LH with the screw.
-
for Sport Package:
-
Install the clamp to the front bumper cover.
-
-
-
INSTALL HEADLIGHT WASHER ACTUATOR SUB-ASSEMBLY RH (w/ Headlight Cleaner System)
Tech Tips
Use the same procedure described for the LH side.
-
INSTALL HEADLIGHT CLEANER WASHER NOZZLE COVER (w/ Headlight Cleaner System)
Tech Tips
Use the same procedure for both headlight cleaner washer nozzle covers.
-
Attach the claw to install the headlight cleaner washer nozzle cover.
-
-
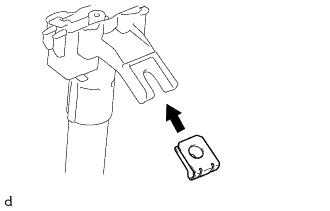
INSTALL ULTRASONIC SENSOR CLIP (w/ LEXUS Parking Assist-sensor System)
-
for LH Side:
Attach the claw to install the ultrasonic sensor clip to the No. 1 ultrasonic sensor.
-
-
INSTALL NO. 2 ULTRASONIC SENSOR RETAINER (w/ LEXUS Parking Assist-sensor System)
Tech Tips
-
Perform this step only when necessary.
-
If a No. 2 ultrasonic sensor retainer has been removed, replace it with a new one. Install the No. 1 ultrasonic sensor with a new No. 2 ultrasonic sensor retainer as a set to the front bumper assembly.
-
Use the same procedure for all No. 2 ultrasonic sensor retainers.
-
Attach the 2 claws and install 2 No. 2 ultrasonic sensor retainers to the No. 1 ultrasonic sensor.
-
Clean the front bumper cover surface.
-
Remove the double-sided tape from the front bumper cover.
-
Wipe off any tape adhesive residue with cleaner.
-
-
Text in Illustration *a Primer Using a brush or felt, apply primer or equivalent to the No. 2 ultrasonic sensor retainer installation area.
Note
-
Use a clean brush or felt.
-
Do not touch the front bumper assembly until the primer has dried.
-
-
Peel off the release paper from the 2 No. 2 ultrasonic sensor retainers.
-
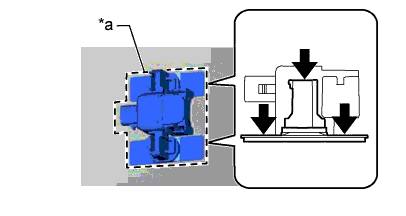
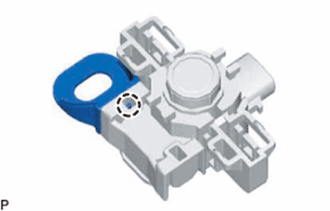
Text in Illustration *a Protrusion of the mark Align the No. 2 ultrasonic sensor retainer with No. 1 ultrasonic sensor with the mark on the front bumper cover and install it as shown in the illustration.
Note
The double sided tape of a No. 2 ultrasonic sensor retainer will deteriorate if it is detached. Make sure to replace the No. 2 ultrasonic sensor retainer with a new one when reattachment is necessary.
Tech Tips
-
Align the connector with the protrusion of the mark and connect it.
-
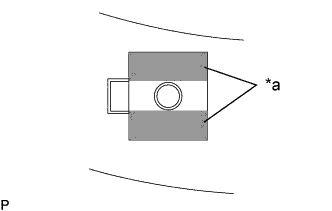
Press on the areas indicated by the arrows in the illustration with a force of 30 N (3.0 kgf) for 3 seconds and install the No. 2 ultrasonic sensor retainer firmly so that there is no clearance between the No. 2 ultrasonic sensor retainer and front bumper cover.
-
-
-
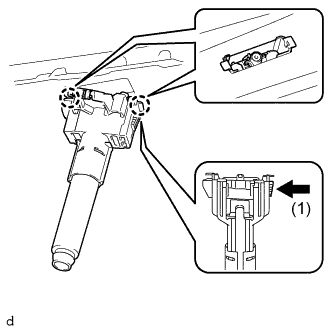
INSTALL NO. 1 ULTRASONIC SENSOR RETAINER (w/ LEXUS Parking Assist-sensor System)
Tech Tips
-
Perform this step only when necessary.
-
If a No. 1 ultrasonic sensor retainer has been removed, replace it with a new one. Install the No. 1 ultrasonic sensor with a new No. 1 ultrasonic sensor retainer as a set to the front bumper assembly.
-
Use the same procedure for all No. 1 ultrasonic sensor retainers.
-
Attach the 2 claws and install 2 No. 1 ultrasonic sensor retainers to the No. 1 ultrasonic sensor.
-
Clean the front bumper cover surface.
-
Remove the double-sided tape from the front bumper cover.
-
Wipe off any tape adhesive residue with cleaner.
-
-
Text in Illustration *a Primer Using a brush or felt, apply primer or equivalent to the No. 1 ultrasonic sensor retainer installation area.
Note
-
Use a clean brush or felt.
-
Do not touch the front bumper assembly until the primer has dried.
-
-
Peel off the release paper from the 2 No. 1 ultrasonic sensor retainers.
-
Text in Illustration *a Protrusion of the mark Align the No. 1 ultrasonic sensor retainer with No. 1 ultrasonic sensor with the mark on the front bumper cover and install it as shown in the illustration.
Note
The double sided tape of a No. 1 ultrasonic sensor retainer will deteriorate if it is detached. Make sure to replace the No. 1 ultrasonic sensor retainer with a new one when reattachment is necessary.
Tech Tips
-
Align the connector with the protrusion of the mark and connect it.
-
Press on the areas indicated by the arrows in the illustration with a force of 30 N (3.0 kgf) for 3 seconds and install the No. 1 ultrasonic sensor retainer firmly so that there is no clearance between the No. 1 ultrasonic sensor retainer and front bumper cover.
-
-
-
INSTALL NO. 1 ULTRASONIC SENSOR (w/ LEXUS Parking Assist-sensor System)
Tech Tips
-
Perform this step only when necessary.
-
If a No. 1 ultrasonic sensor retainer has been removed, replace it with a new one. Install the No. 1 ultrasonic sensor with a new No. 1 ultrasonic sensor retainer as a set to the front bumper assembly.
-
Use the same procedure for all No. 1 ultrasonic sensor retainers.
-
Attach the 2 claws and install 2 No. 1 ultrasonic sensor retainers to the No. 1 ultrasonic sensor.
-
Clean the front bumper cover surface.
-
Remove the double-sided tape from the front bumper cover.
-
Wipe off any tape adhesive residue with cleaner.
-
-
Text in Illustration *a Primer Using a brush or felt, apply primer or equivalent to the No. 1 ultrasonic sensor retainer installation area.
Note
-
Use a clean brush or felt.
-
Do not touch the front bumper assembly until the primer has dried.
-
-
Peel off the release paper from the 2 No. 1 ultrasonic sensor retainers.
-
Text in Illustration *a Protrusion of the mark Align the No. 1 ultrasonic sensor retainer with No. 1 ultrasonic sensor with the mark on the front bumper cover and install it as shown in the illustration.
Note
The double sided tape of a No. 1 ultrasonic sensor retainer will deteriorate if it is detached. Make sure to replace the No. 1 ultrasonic sensor retainer with a new one when reattachment is necessary.
Tech Tips
-
Align the connector with the protrusion of the mark and connect it.
-
Press on the areas indicated by the arrows in the illustration with a force of 30 N (3.0 kgf) for 3 seconds and install the No. 1 ultrasonic sensor retainer firmly so that there is no clearance between the No. 1 ultrasonic sensor retainer and front bumper cover.
-
-
-
INSTALL NO. 4 ENGINE ROOM WIRE (w/ LEXUS Parking Assist-sensor System)
-
for Sport Package:
Attach the 10 clamps to install the No. 4 engine room wire.
-
except Sport Package:
Attach the 11 clamps to install the No. 4 engine room wire.
-
Connect the 4 connectors.
-