NIGHT VIEW CAMERA INSTALLATION

-
INSTALL NIGHT VIEW CAMERA ASSEMBLY
Note
-
Do not touch the camera lens when removing or installing the camera.
-
Do not use a camera which has been dropped or subjected to an impact.
-
If the camera is not installed securely, the system may not operate properly. Therefore, be sure to install the camera securely.
-
Push the bracket to attach the clip.
-
Allow the wire harness to hang down.
-
Do not press the sensor, as it may become deformed.
-
Connect the connector.
-
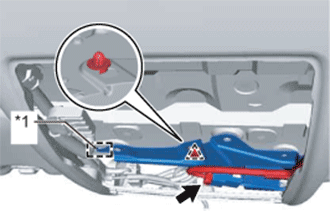
Text in Illustration *1 Guide Insert the guide and attach the clip to temporarily install the night view camera assembly.
-
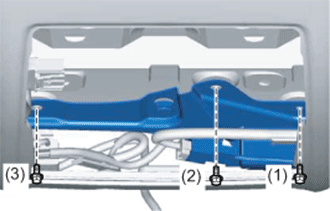
Install the 3 bolts.
-
Tighten the 3 bolts in the order shown in the illustration to install the night view camera assembly.
- Torque:
- 9.0 N*m { 92 kgf*cm, 80 in.*lbf }
-
-
INSTALL VISOR HOLDER
Tech Tips
Use the same procedure for both visor holders.
-
Attach the 2 claws.
-
Push in the visor holder to install it.
-
-
INSTALL VISOR ASSEMBLY LH
-
Install the visor assembly LH with the 2 screws.
-
Attach the guide.
-
-
INSTALL VISOR ASSEMBLY RH
Tech Tips
Use the same procedure described for the LH side.
-
INSTALL VISOR BRACKET COVER
Tech Tips
Use the same procedure for both visor bracket covers.
-
Attach the 4 claws to install the visor bracket cover.
-
-
INSTALL MAP LIGHT ASSEMBLY
-
Connect the 2 connectors.
-
Attach the 4 clips and 2 guides to install the map light assembly.
-
-
INSTALL INNER REAR VIEW MIRROR ASSEMBLY
-
ADJUST NIGHT VIEW CAMERA ASSEMBLY
-
When the night view camera assembly is replaced, perform adjust night view camera assembly Click here.
-