INSTRUMENT PANEL SPEAKER INSTALLATION

-
INSTALL FRONT NO. 3 SPEAKER ASSEMBLY
-
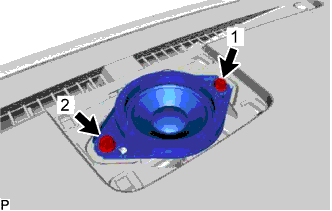
Connect the connector.
-
Align the guides of the speaker with the concave portions of the instrument panel and set the speaker on the panel.
-
Install the front No. 3 speaker assembly with the 2 screws.
Note
-
Do not touch the cone of the speaker.
-
When installing the speaker, make sure that the wire harness does not get caught between the speaker and instrument panel.
-
-
-
INSTALL NO. 1 SPEAKER OPENING COVER ASSEMBLY
-
Attach the claw, 4 clips and guide to install the No. 1 speaker opening cover assembly.
-
-
INSTALL FRONT NO. 2 SPEAKER ASSEMBLY
-
Connect the connector.
-
Align the guides of the speaker with the concave portions of the instrument panel and set the speaker on the panel.
-
Install the front No. 2 speaker assembly with the 2 screws.
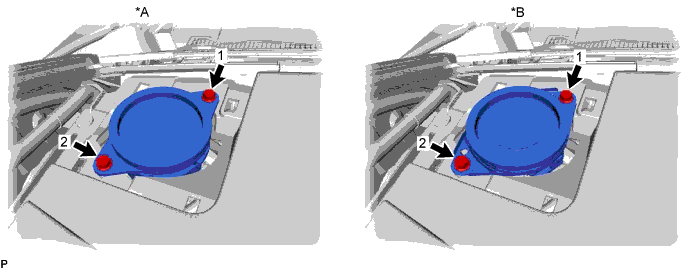
Text in Illustration *A w/o Mark Levinson Speaker System *B w/ Mark Levinson Speaker System Note
-
Do not touch the cone of the speaker.
-
When installing the speaker, make sure that the wire harness does not get caught between the speaker and instrument panel.
Tech Tips
-
Tighten the screws in the order shown in the illustration.
-
Use the same procedure for the RH and LH sides.
-
The procedure listed above is for the RH side.
-
-
-
INSTALL NO. 2 INSTRUMENT PANEL SPEAKER PANEL SUB-ASSEMBLY
-
Attach the 2 clips and 2 guides to install the No. 2 instrument panel speaker panel sub-assembly.
-
-
INSTALL FRONT PILLAR GARNISH LH
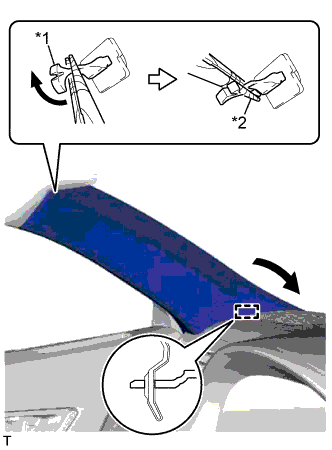
Text in Illustration *1 Front Pillar Garnish Clip *2 Protective Tape
-
Attach the guide.
-
Turn the end of the front pillar garnish clip 90° with needle-nose pliers and install it to the front pillar garnish LH.
Tech Tips
Tape the tips of the needle-nose pliers before use.
-
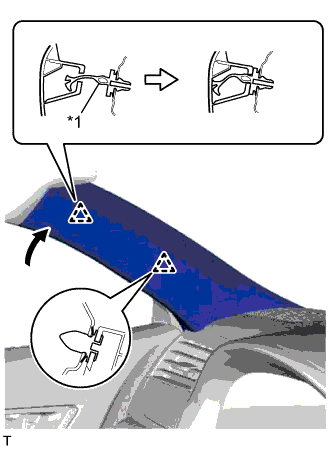
Text in Illustration *1 Front Pillar Garnish Clip Attach the 2 clips to install the front pillar garnish LH.
Note
After installing the front pillar garnish LH, make sure that the lip of the front door opening trim weatherstrip LH is not pinched.
-
-
INSTALL FRONT DOOR OPENING TRIM COVER LH
-
Attach the 5 claws to install the front door opening trim cover LH.
Note
After installing the front door opening trim cover LH, make sure that the lip of the front door opening trim weatherstrip LH is not pinched.
-
-
INSTALL REAR DOOR SCUFF PLATE LH
-
Attach the 10 claws and 4 clips to install the front door scuff plate LH.
-
-
CONNECT CABLE TO AUXILIARY BATTERY NEGATIVE TERMINAL
Note
When disconnecting the cable, some systems need to be initialized after the cable is reconnected Click here.
-
INSTALL LUGGAGE COMPARTMENT TRIM COVER LH
-
Install the luggage compartment trim cover LH.
-
-
INSTALL LUGGAGE COMPARTMENT FLOOR MAT
-
Install the luggage compartment floor mat.
-