FUEL PRESSURE SENSOR INSTALLATION

-
INSTALL FUEL PRESSURE SENSOR
-
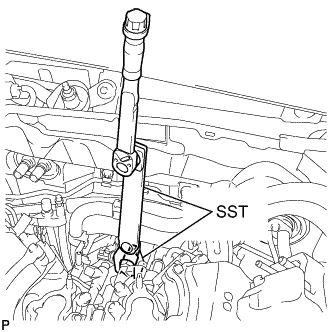
Using SST, install the fuel pressure sensor to the fuel delivery pipe.
- SST
- 09922-10240
- 09961-01270
- Torque:
- without SST
- 40 N*m { 408 kgf*cm, 30 ft.*lbf }
- with SST
- 17 N*m { 175 kgf*cm, 13 ft.*lbf }
Note
-
Be sure not to damage or allow any foreign matter on the threads and tip of the fuel pressure sensor.
-
Do not get any oil on the threads of the fuel pressure sensor and fuel delivery pipe.
-
Do not allow the fuel pressure sensor to be contaminated with foreign matter when assembling.
-
Do not adjust the torque in the loosening direction.
Tech Tips
-
This torque value is effective when SST is parallel to the torque wrench.
-
This torque value can be obtained by using a torque wrench with a fulcrum length of 300 mm (11.8 in.) and SST with a fulcrum length of 240 mm (9.45 in.).
-
If using a torque wrench with a length that is not 300 mm (11.8 in.), calculate the torque specification for the torque wrench and SST based on the "without SST" torque specification Click here.
-
Connect the connector.
Note
Do not pull the wire harness of the fuel pressure sensor excessively.
-
-
INSTALL NO. 2 FUEL PIPE SUB-ASSEMBLY
-
Temporarily install the 2 union nuts of the fuel delivery pipe to the No. 2 fuel pipe sub-assembly until they are completely fastened.
-
Use a 17 mm union nut wrench, tighten the 2 union nuts of the No. 2 fuel pipe sub-assembly.
- Torque:
- 35 N*m { 357 kgf*cm, 26 ft.*lbf }
Note
-
If the 2 union nuts cannot be fastened, loosen the nuts of the fuel delivery pipe RH and fuel delivery pipe LH, and then fasten both union nuts.
-
When a torque wrench is combined with a union nut wrench and used to tighten parts, if the reading from the torque wrench reaches the torque specification, the actual torque will be excessive due to the increase in the total length of the wrench Click here.
-
Do not adjust the torque in the loosening direction.
-
The No. 2 fuel pipe sub-assembly can be reused 10 times.
Tech Tips
-
This torque value is effective when the union nut wrench is parallel to the torque wrench.
-
Install the union nut wrench parallel with the torque wrench.
-
-
INSTALL NO. 3 WATER BY-PASS PIPE
-
Connect the 2 water by-pass hoses and install the No. 3 water by-pass pipe.
-
Install the bolt.
- Torque:
- 10 N*m { 102 kgf*cm, 7 ft.*lbf }
-
Attach the 2 wire harness clamps to the No. 3 water by-pass pipe.
-
Connect the 2 heater water hoses.
-
Install the 2 water hose sets.
-
-
INSTALL INTAKE MANIFOLD