LIGHTING SYSTEM CUSTOMIZE PARAMETERS

-
CUSTOMIZE LIGHTING SYSTEM (EXT)
Tech Tips
The following items can be customized.
Note
-
When the customer requests a change in a function, first make sure that the function can be customized.
-
Record the current settings before customizing.
-
Customizing with the GTS.
-
Connect the GTS to the DLC3.
-
Turn the engine switch on (IG).
-
Turn the GTS on.
-
Enter the following menus: Utility / Customize / (desired system).
-
Select the setting by referring to the table below.
Warning Display Default Content Setting Relevant ECU Flasher Sound Volume Adjustment Large Function to change the flasher sound volume adjustment. Large, Medium or Small Combination meter assembly Light Control Display Default Content Setting Relevant ECU Disp Ex ON Sen Normal Changes the level of ambient light at which the system dims lights such as the indicator lights of the combination meter, the A/ C indicator light and the clock.*3 LIGHT2, LIGHT1, NORMAL, DARK1 or DARK2 Main body ECU (Multiplex network body ECU) Disp Ex OFF Sen Normal Changes the level of ambient light at which the system cancels the dimming of lights such as the indicator lights of the combination meter, the A/C indicator light and the clock.*4 LIGHT2, LIGHT1, NORMAL, DARK1 or DARK2 Main body ECU (Multiplex network body ECU) Light Auto OFF Delay*1 30 s Function to continue illuminating the headlights and taillights for a certain period of time after closing the driver door after the engine switch is turned from on (IG) to off with the headlight dimmer switch in the AUTO position and the headlights and taillights on. OFF, 30 s, 60 s or 90 s Main body ECU (Multiplex network body ECU) Sensitivity Normal Adjusts the ambient light sensitivity of the automatic light control system.*5 Light2, Light1, Normal, Dark1 or Dark2 Main body ECU (Multiplex network body ECU) DRL Function*6 ON A function that enables or disables the DRL. ON or OFF Main body ECU (Multiplex network body ECU) Follow Me Home Lighting Time*2 30 s Changes the low beam headlight lighting time when engine switch is off and headlight dimmer switch is pulled to flash headlights once. 30 s, 60 s, 90 s, or 120 s Main body ECU (Multiplex network body ECU)
-
*1: w/ Light Auto Turn-off Delay Function
-
*2: w/ Follow Me Home System
-
*6: w/o Automatic Recirculation Control
Tech Tips
The sensitivity adjustment may be difficult to confirm. Check by driving the customer's vehicle.
*3 System Setting 
Setting DARK2 DARK1 NORMAL LIGHT1 LIGHT2 Tech Tips
When the setting is closer to the "Light" side, the system dims the indicator lights even when the surrounding area is relatively bright. When the setting is closer to the "Dark" side, the system waits until the surrounding area is darker before dimming the indicator lights.
*4 System Setting Setting DARK2 DARK1 NORMAL LIGHT1 LIGHT2 Tech Tips
When the setting is closer to the "Dark" side, the system cancels the dimming of the indicator lights even when the surrounding area is relatively dark. When the setting is closer to the "Light" side, the system waits until the surrounding area is brighter before canceling the dimming of the indicator lights.
*5 System Setting Setting Dark2 Dark1 Normal Light1 Light2 Tech Tips
When the setting is closer to the "Light" side, the system turns the lights on even when the surrounding area is relatively bright. When the setting is closer to the "Dark" side, the system waits until the surrounding area is darker before turning on the lights.
-
-
-
Customizing with Multi-display.
-
Turn the engine switch on (IG).
-
Enter the following menus: Setup / Vehicle / Vehicle Settings / Vehicle Customization / Light Settings.
-
Select the setting by referring to the table below.
Display Default Content Setting Relevant ECU Light Sensor Sensitivity 0
(middle bar)
Adjusts the ambient light sensitivity of the automatic light control system.*2 -2, -1, 0, +1 or +2 Main body ECU (Multiplex network body ECU) Headlights Off Time*1 30 s Function to continue illuminating headlights and taillights for a certain period of time after closing driver door with the engine switch turned from on (IG) to off under the condition that the headlight dimmer switch is in the AUTO position with the headlights and taillights on. Off, 30 s, 60 s or 90 s Daytime Running Lights On A function that enables or disables the DRL. On or Off
-
*1: w/ Light Auto Turn-off Delay Function
Tech Tips
The sensitivity adjustment may be difficult to confirm. Check by driving the customer's vehicle.
*2 System Setting Setting -2 -1 0 +1 +2 Tech Tips
When the setting is closer to the "Light" side, the system turns the lights on even when the surrounding area is relatively bright. When the setting is closer to the "Dark" side, the system waits until the surrounding area is darker before turning on the lights.
-
-
-
Customization of lane change flasher and turn cancel functions
-
Customize the lane change flasher and turn cancel functions by following the procedures shown below.
Step Operation Remark 1
-
Turn the engine switch off.
-
Move the windshield wiper switch assembly and headlight dimmer switch assembly to the NEUTRAL position.
- 2
-
Set the number of blinks for the lane change flasher control.
-
Refer to the following items and select wiper speed switch position P1, P2 or P3.
-
Blinks 3 times: P1
-
Blinks 5 times: P2
-
Blinks 7 times: P3
When setting the lane change flasher control to on:
-
Select wiper speed switch position P4.
When setting the lane change flasher control to off:
Do not operate the wiper speed switch after step 3. 3
-
Move the windshield wiper switch assembly from the NEUTRAL position to the OFF position and hold it there.
-
Steps 3, 4 and 5 are operations for changing to lane change flasher setting mode.
-
If operations other than those described in steps 3, 4 or 5 are performed, the control will change to normal mode. Start from step 1 again.
4
-
Turn the engine switch on (IG).
5
-
Keep the windshield wiper switch assembly in the OFF position for 5 seconds or more.
-
Move the windshield wiper switch assembly from the OFF position to the WPDN position.
-
Keep the windshield wiper switch assembly in the WPDN position for 5 seconds or more.
-
Move the windshield wiper switch assembly from the WPDN position to the OFF position.
-
Perform operations 1 to 3 again.
-
Move the windshield wiper switch assembly from the WPDN position to the NEUTRAL position.
Perform the following operations:
6
-
Check that the mode has changed to lane change flasher control setting mode.
OK The right turn signal lights blink once.
While changing to lane change flasher control setting mode, wiper control and turn signal light control cannot be performed. 7
-
Confirm the selected setting (number of blinks) by performing the following operations:
-
Move the headlight dimmer switch assembly from the NEUTRAL position to the left lane change position.
-
Move the headlight dimmer switch assembly to the NEUTRAL position.
-
Set and confirm the canceling method by performing the following operations:
-
Canceling by operating the lever in the opposite direction
-
Move the headlight dimmer switch assembly from the NEUTRAL position to the left lane change position.
-
Move the headlight dimmer switch assembly to the NEUTRAL position.
-
Canceling by operating the lever in the same direction
-
Move the headlight dimmer switch assembly from the NEUTRAL position to the right lane change position.
-
Move the headlight dimmer switch assembly to the NEUTRAL position.
-
If operations other than those described in step 7 are performed, the control will change to normal mode. Start from step 1 again.
-
Make sure to finish step 7 within approximately 20 seconds.
8
-
Check the answer back for completion of setting the number of blinks of the lane change flasher control.
-
Blinks 3 times
OK The left turn signal lights blink once. -
Blinks 5 times
OK The left turn signal lights blink twice. -
Blinks 7 times
OK The left turn signal lights blink 3 times.
-
Check the answer back for completion of changing the turn cancel function.
-
Canceling by operating the lever in the opposite direction
OK Canceling by operating the lever in the opposite direction -
Canceling by operating the lever in the same direction
OK The left turn signal lights blink 5 times.
-
If 20 seconds or more had elapsed while performing step 7, the control will have changed to normal mode. Start from step 1 again.
If the answer back cannot be confirmed:
9 Setting is complete. Lane change flasher control setting mode changes to normal mode. -
-
for LHD
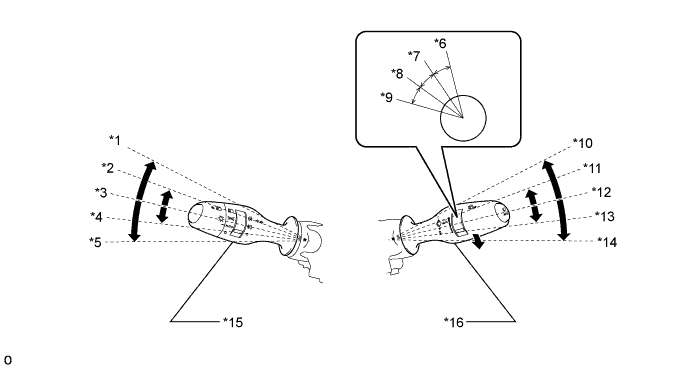
Text in Illustration *1 Right Turn *2 Right Lane Change *3 NEUTRAL *4 Left Lane Change *5 Left Turn *6 Wiper Speed Setting P4 *7 Wiper Speed Setting P3 *8 Wiper Speed Setting P2 *9 Wiper Speed Setting P1 *10 Off *11 WPDN *12 NEUTRAL *13 WPUP *14 HI *15 Headlight Dimmer Switch Assembly *16 Windshield Wiper Switch Assembly -
for RHD (Dimmer Switch RH Side)
Text in Illustration *1 Wiper Speed Setting P4 *2 Wiper Speed Setting P3 *3 Wiper Speed Setting P2 *4 Wiper Speed Setting P1 *5 Off *6 WPDN *7 NEUTRAL *8 WPUP *9 HI *10 Left Turn *11 Left Lane Change *12 NEUTRAL *13 Right Lane Change *14 Right Turn *15 Windshield Wiper Switch Assembly (for LH Side) *16 Headlight Dimmer Switch Assembly (for RH Side) -
for RHD (Dimmer Switch LH Side)
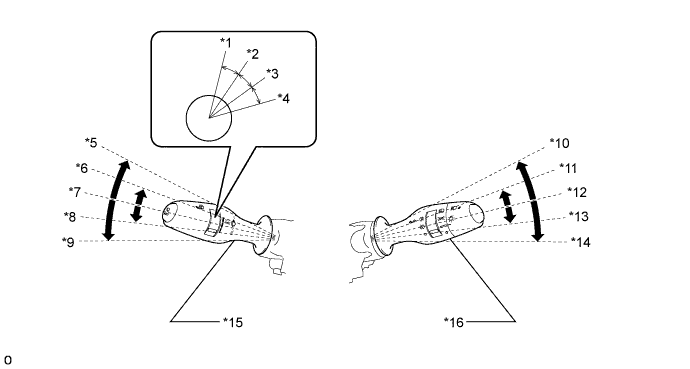
Text in Illustration *1 Right Turn *2 Right Lane Change *3 NEUTRAL *4 Left Lane Change *5 Left Turn *6 Wiper Speed Setting P4 *7 Wiper Speed Setting P3 *8 Wiper Speed Setting P2 *9 Wiper Speed Setting P1 *10 Off *11 WPDN *12 NEUTRAL *13 WPUP *14 HI *15 Headlight Dimmer Switch Assembly (for LH Side) *16 Windshield Wiper Switch Assembly (for RH Side)
-
-