FRONT SEAT ASSEMBLY (for Sports Seat Type) DISASSEMBLY

CAUTION:
Wear protective gloves. Sharp areas on the parts may injure your hands.
Tech Tips
-
Use the same procedure for RHD and LHD vehicles.
-
The procedure listed below is for LHD vehicles.
-
Use the same procedure for the RH and LH sides.
-
The procedure listed below is for the LH side.
-
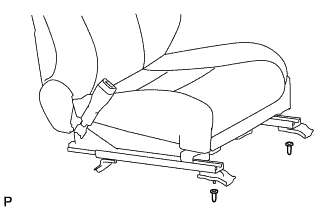
REMOVE SEAT ADJUSTER COVER CAP LH
-
Remove the 2 seat adjuster cover caps.
-
-
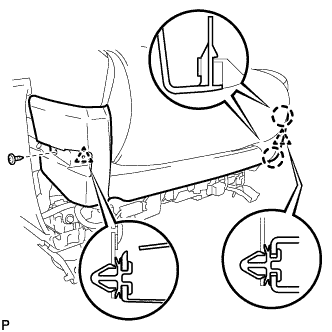
REMOVE FRONT SEAT INNER NO. 1 CUSHION SHIELD LH (for Driver Side)
-
Remove the screw.
-
Detach the 2 claws and 2 clips and remove the front seat inner No. 1 cushion shield LH.
-
-
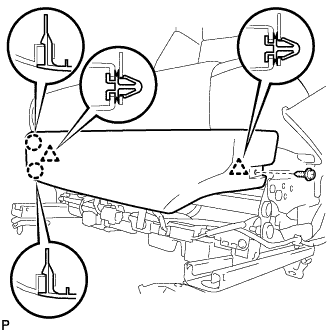
REMOVE FRONT SEAT INNER NO. 1 CUSHION SHIELD RH (for Front Passenger Side)
-
Remove the screw.
-
Detach the 2 claws and 2 clips and remove the front seat inner No. 1 cushion shield RH.
-
-
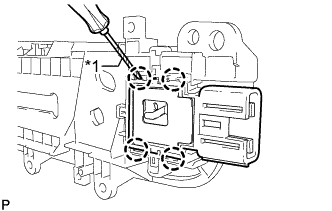
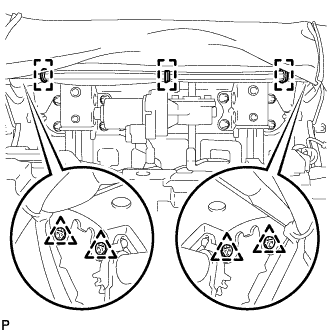
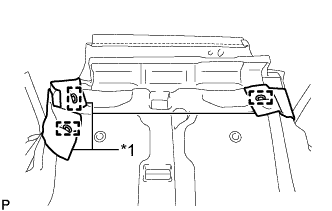
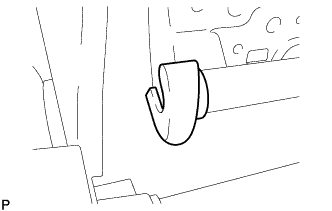
REMOVE FRONT SEAT CUSHION SHIELD LH
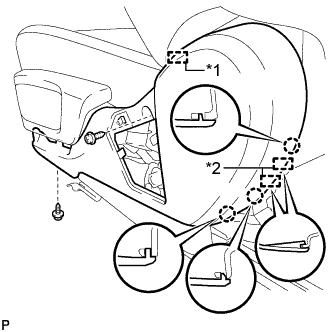
Text in Illustration *1 Hook *2 Guide
-
Remove the 2 screws.
-
Detach the 3 claws and 2 guides.
-
Detach the hook and remove the front seat cushion shield LH.
-
-
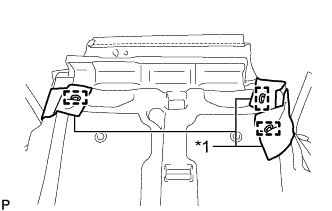
REMOVE FRONT SEAT INNER CUSHION SHIELD LH
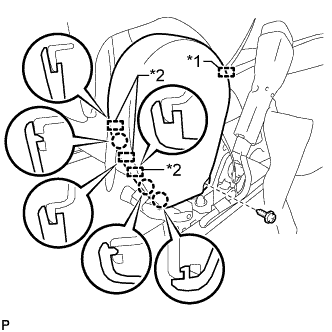
Text in Illustration *1 Hook *2 Guide
-
Remove the screw.
-
Detach the 3 claws and 3 guides.
-
Detach the hook and remove the front seat inner cushion shield LH.
-
-
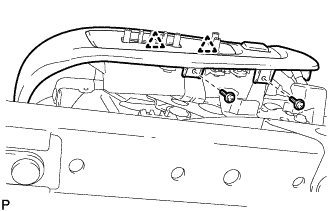
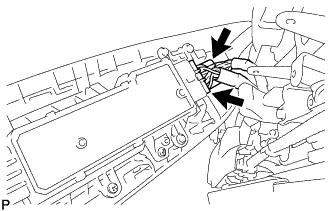
REMOVE POWER SEAT SWITCH KNOB LH (for Slide)
Text in Illustration *1 Protective Tape
-
Apply protective tape as shown in the illustration.
-
Using moulding remover A, detach the 4 claws and remove the power seat switch knob LH.
-
-
REMOVE POWER SEAT SWITCH KNOB LH (for Reclining)

Text in Illustration *1 Protective Tape
-
Apply protective tape as shown in the illustration.
-
Using moulding remover A, detach the 3 claws and remove the power seat switch knob LH.
-
-
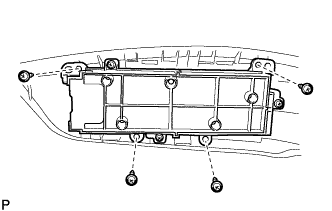
REMOVE FRONT POWER ADJUSTER SHIELD LH
-
Remove the 2 screws.
-
Detach the 2 clips and remove the front power adjuster shield LH.
-
for Driver Side:
Disconnect the connector.
-
for Front Passenger Side:
Disconnect the 2 connectors.
-
Remove the 4 screws and switch bezel from the front power adjuster shield LH.
-
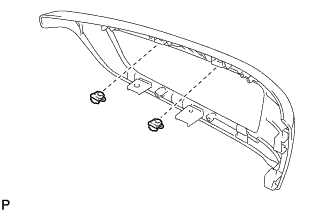
Remove the 2 clips from the front power adjuster shield LH.
-
-
REMOVE POWER SEAT SWITCH ASSEMBLY
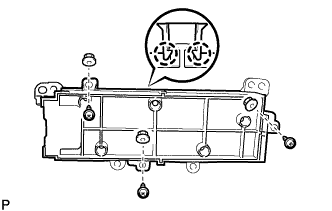
-
Remove the 3 screws and 3 nuts.
-
Detach the 2 claws and remove the power seat switch assembly from the switch bezel.
-
-
REMOVE FRONT LUMBAR POWER SEAT SWITCH (for Front Passenger Side)
Text in Illustration *1 Protective Tape
-
Using a screwdriver, detach the 4 claws and remove the front lumbar power seat switch.
Tech Tips
Tape the screwdriver tip before use.
-
-
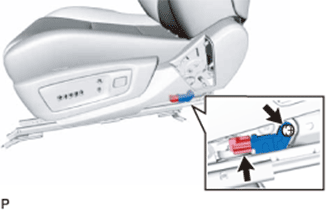
REMOVE UPPER SEAT TRACK RAIL COVER LH
-
Remove the screw.
-
Detach the clip and remove the upper seat track rail cover LH.
-
-
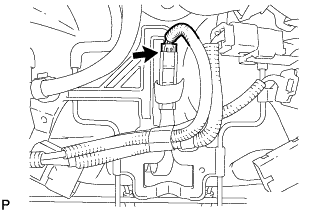
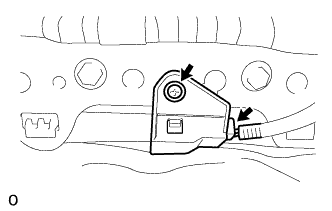
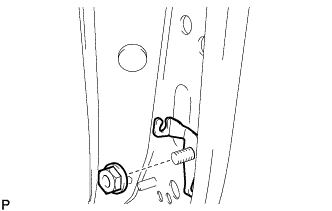
REMOVE SEAT POSITION AIRBAG SENSOR (for Driver Side)
-
Disconnect the connector from the seat position airbag sensor.
-
Using a T30 "TORX" socket wrench, remove the "TORX" screw and seat position airbag sensor.
-
-
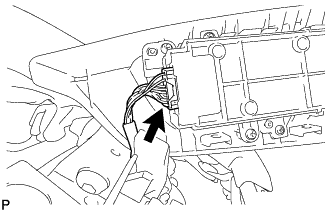
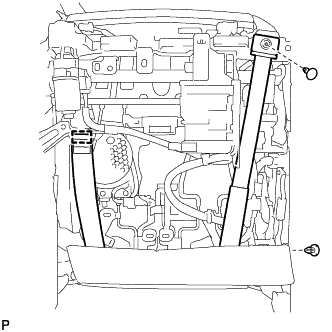
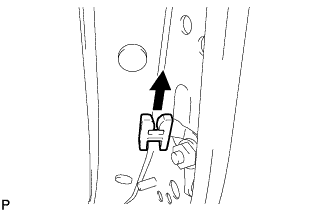
REMOVE FRONT SEAT INNER BELT ASSEMBLY LH
-
Disconnect each connector and each clamp.
-
Remove the nut and front seat inner belt assembly LH.
-
-
REMOVE FRONT SEATBACK BOARD SUB-ASSEMBLY LH
-
Using a clip remover, remove the clip and disconnect the rubber band.
-
Detach the hook and disconnect the rubber band.
-
Using a clip remover, remove the clip.
-

Open the lower part of the front seatback board sub-assembly LH and remove the 2 screws.
-
Push and slide the front seatback board subassembly LH to detach the claw.
Tech Tips
Use the same procedure to detach the claw on the other side.
-
Slide the front seatback board sub-assembly LH downward to detach the 2 hooks and remove it.
-
-
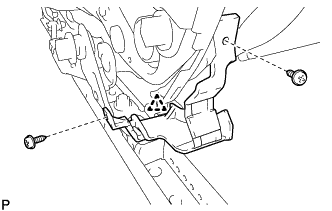
REMOVE FRONT SEAT LEG COVER LH
-
Remove the 2 screws.
-
Detach the clip and remove the front seat leg cover LH.
-
-
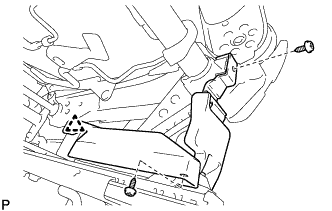
REMOVE FRONT SEAT LOWER CUSHION SHIELD LH
-
Remove the 2 screws.
-
Detach the clip and remove the front seat lower cushion shield LH.
-
-
REMOVE SEAT CUSHION COVER WITH PAD (for Driver Side)
Text in Illustration *1 Connector Lock - -
-
Disconnect the 2 connectors.
-
Remove the connector lock from the seat heater control sub-assembly LH connector and disconnect the connector.
-
Using a clip remover, remove the 4 clips.
-
Using a clip remover, remove the 2 clips and open the front part of the separate type front seat cushion cover.
-
Remove the hog rings.
-
Using a clip remover, detach the 4 clips and disconnect the front part of the separate type front seat cushion cover.
-
Detach the hooks and remove the seat cushion cover with pad.
-
-
REMOVE SEAT CUSHION COVER WITH PAD (for Front Passenger Side)
-
Disconnect the 2 connectors.
-
Remove the connector lock from the seat heater control sub-assembly RH connector and disconnect the connector.
Text in Illustration *1 Connector Lock -
Using a clip remover, remove the 4 clips.
-
Disconnect the connector.
-
Detach the hooks and remove the seat cushion cover with pad.
-
-
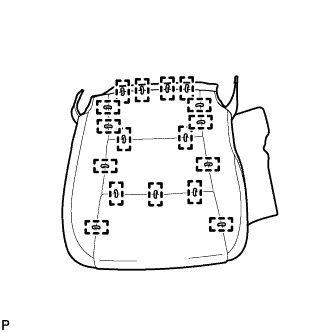
REMOVE SEPARATE TYPE FRONT SEAT CUSHION COVER (for Driver Side)
-
Text in Illustration *1 Strap Remove the hog rings and disconnect the 3 straps from the separate type front seat cushion pad.
-

Remove the hog rings and separate type front seat cushion cover from the separate type front seat cushion pad.
-
-
REMOVE SEPARATE TYPE FRONT SEAT CUSHION COVER (for Front Passenger Side)
-
Text in Illustration *1 Strap Remove the hog rings and disconnect the 3 straps from the separate type front seat cushion pad.
-
Remove the hog rings and separate type front seat cushion cover from the separate type front seat cushion pad.
-
-
REMOVE SEAT CUSHION SPRING DAMPER
-
Remove the 2 nuts and seat cushion spring damper.
-
-
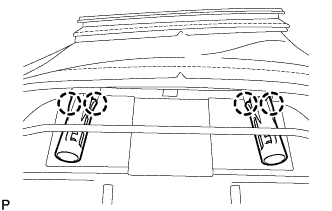
REMOVE SEATBACK COVER WITH PAD (for Driver Side)
-
Detach the hooks.
-
Detach the wire harness clamp.
-

Detach the 4 claws and remove the 2 front seat headrest supports.
-

Detach the wire harness clamp.
-
Remove the 2 nuts and detach the seatback cover bracket.
Text in Illustration *1 Seatback Cover Bracket -
Remove the seatback cover with pad.
-
-
REMOVE SEATBACK COVER WITH PAD (for Front Passenger Side)
-
Detach the hooks.
-
Detach the 4 claws and remove the 2 front seat headrest supports.
-
Detach the wire harness clamp.
-
Remove the 2 nuts and detach the 2 seatback cover brackets.
Text in Illustration *1 Seatback Cover Bracket -
Remove the seatback cover with pad.
-
-
REMOVE SEPARATE TYPE FRONT SEATBACK COVER (for Driver Side)
-
Remove the hog rings and separate type front seatback cover from the separate type front seatback pad.
-
-
REMOVE SEPARATE TYPE FRONT SEATBACK COVER (for Front Passenger Side)
-
Pass the 2 seatback cover brackets through the 2 holes of the separate type front seatback pad.
-
Remove the hog rings and separate type front seatback cover from the separate type front seatback pad.
-
-
REMOVE NO. 1 INTERIOR ILLUMINATION LIGHT ASSEMBLY
-
Remove the screw and No. 1 interior illumination light assembly.
-
Disconnect the connector.
-
-
REMOVE SEATBACK CLIMATE CONTROL BLOWER LH
-
Disconnect the connector.
-
Detach the 2 claws and disconnect the rear air duct LH from the lumbar support adjuster assembly LH.
-
Remove the 2 screws.
-
Detach the hook and remove the seatback climate control blower LH together with the rear air duct LH.
-
-
REMOVE REAR AIR DUCT LH
-
Detach the 2 claws and remove the rear air duct LH from the seatback climate control blower LH.
-
-
REMOVE LUMBAR SUPPORT ADJUSTER ASSEMBLY LH (for Driver Side)
-
Disconnect the 2 connectors.
-
Detach the 2 cable clamps.
-
Remove the 2 springs and detach the 2 clips.
-
Remove the 2 bolts.
-
Slide the lumbar support adjuster assembly LH upward to detach the 2 hooks and remove it.
-
-
REMOVE LUMBAR SUPPORT ADJUSTER ASSEMBLY RH (for Front Passenger Side)
-
Disconnect the connector.
-
Remove the 2 springs and detach the 2 clips.
-
Remove the 2 bolts.
-
Slide the lumbar support adjuster assembly RH upward to detach the 2 hooks and remove it.
-
-
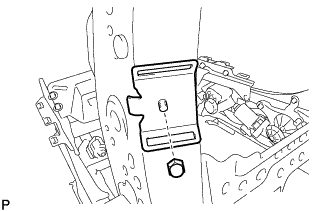
REMOVE FRONT SEATBACK INSIDE SPRING SET PLATE LH (for Front Passenger Side)
-
Remove the front seatback inside spring set plate LH from the front seat bracket LH.
-
-
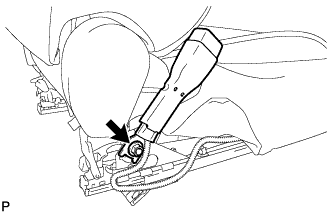
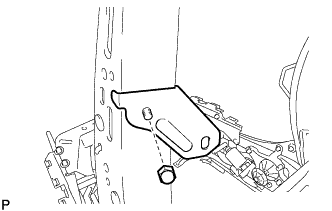
REMOVE FRONT SEAT BRACKET LH (for Front Passenger Side)
-
Remove the nut and front seat bracket LH.
-
-
REMOVE FRONT SEATBACK INSIDE SPRING SET PLATE RH (for Front Passenger Side)
Tech Tips
Use the same procedure described for the LH side.
-
REMOVE FRONT SEAT BRACKET RH (for Front Passenger Side)
Tech Tips
Use the same procedure described for the LH side.
-
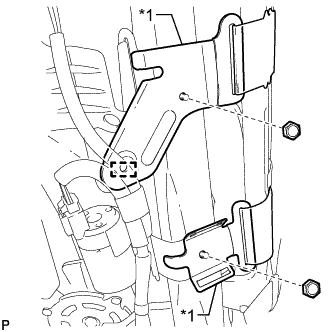
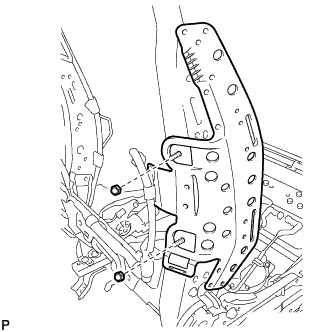
REMOVE FRONT SEATBACK SUPPORT LH (for Driver Side)
-
Disconnect the connector.
-
Remove the 4 nuts and both paddles of the front seatback support LH.
Text in Illustration *1 Paddle -

Remove the nut and front seatback support LH.
-
-
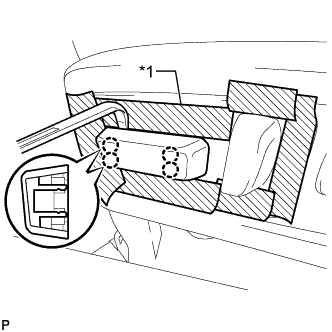
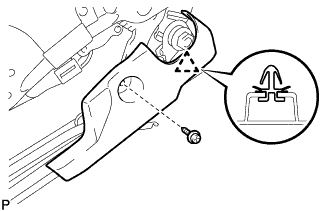
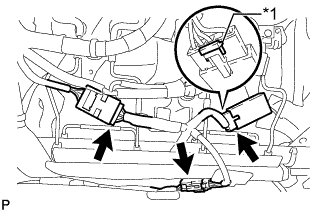
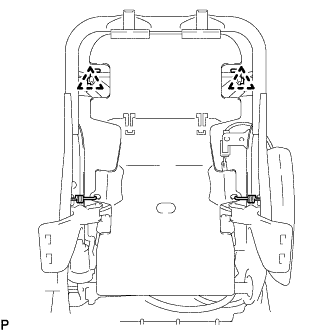
REMOVE FRONT SEAT AIRBAG ASSEMBLY LH
-
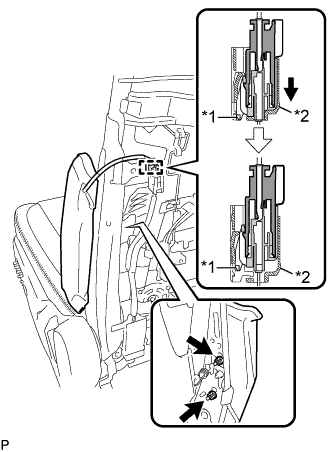
Text in Illustration *1 Housing Lock *2 Outer Housing Disconnect the airbag connector.
Note
When disconnecting any airbag connector, take care not to damage the airbag wire harness.
-
Push the housing lock and slide the outer housing. (At this time, the connector cannot be disconnected yet.)
-
Push the housing lock again and disconnect the connector.
-
-
Detach the connector clamp from the front seatback frame sub-assembly.
-
Remove the 2 nuts and the front seat airbag assembly.
CAUTION:
-
The nuts must not be reused.
-
Make sure that the front seatback frame sub-assembly is not deformed. If it is, replace it with a new one.
-
-
-
REMOVE INNER SEAT BRACKET ASSEMBLY LH (for Driver Side)
-
Remove the 2 nuts and inner seat bracket assembly LH.
-
-
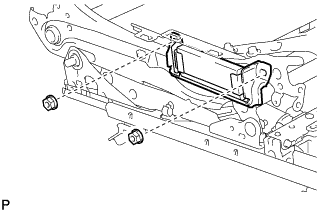
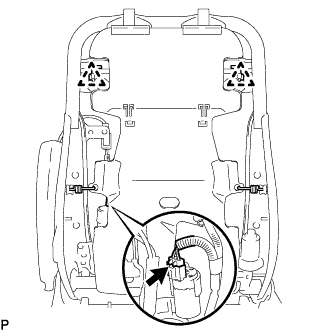
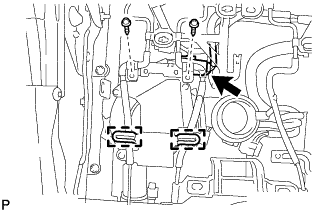
REMOVE POWER SEAT MOTOR ASSEMBLY
-
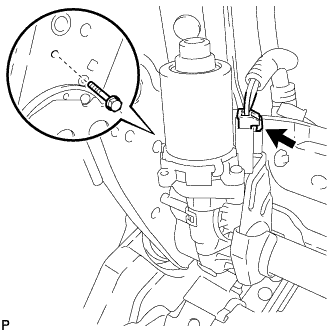
Disconnect the connector.
-
Detach the 5 claws and remove the push nut from the reclining connecting pipe.
-
Remove the reclining connecting pipe.
-
Remove the bolt and power seat motor assembly.
-
-
REMOVE RECLINING ADJUSTER INSIDE COVER
-
Remove the reclining adjuster inside cover.
-
-
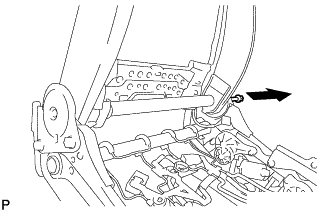
REMOVE FRONT NO. 1 SEATBACK WIRE SET BRACKET (for Front Passenger Side)
-
Remove the nut and front No. 1 seatback wire set bracket.
-
-
REMOVE FRONT NO. 2 SEATBACK WIRE SET BRACKET (for Front Passenger Side)
-
Remove the nut and front No. 2 seatback wire set bracket.
-
-
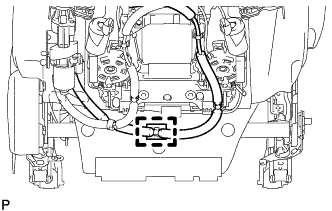
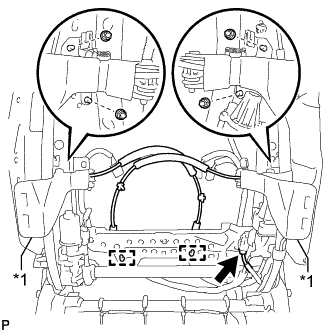
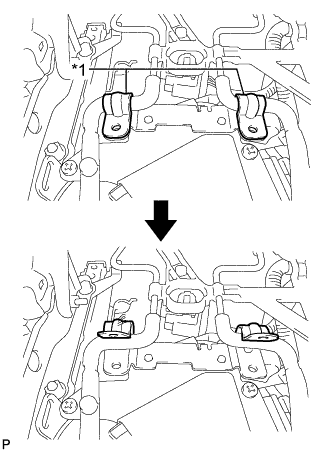
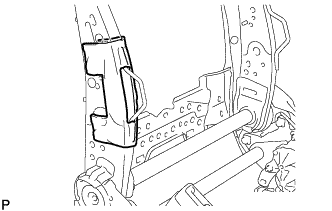
REMOVE POSITION CONTROL ECU ASSEMBLY (w/ Memory)
-
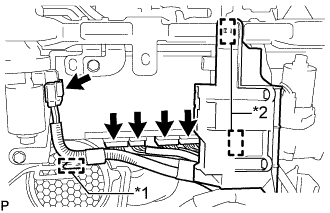
Text in Illustration *1 Wire Harness Clamp *2 Clamp Disconnect the connector and detach the wire harness clamp.
-
Detach the 2 clamps and move the front seat wire connector housing.
-
Disconnect the 4 connectors.
-
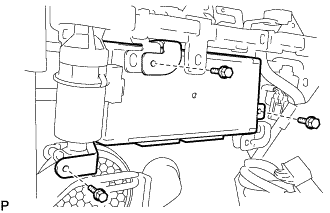
Remove the 3 bolts and position control ECU assembly.
-
-
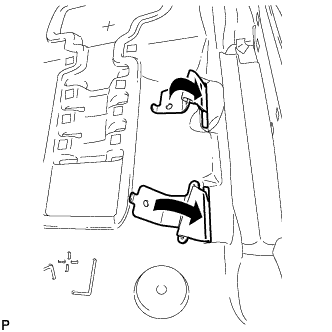
REMOVE RECLINING ADJUSTER INSIDE COVER LH
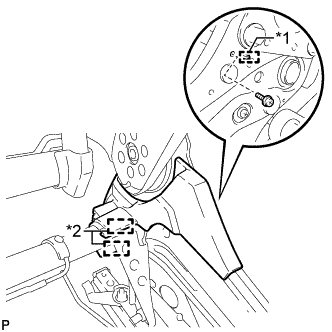
Text in Illustration *1 Guide *2 Hook
-
Remove the screw and detach the guide.
-
Detach the 2 hooks and remove the reclining adjuster inside cover LH.
-
-
REMOVE RECLINING ADJUSTER INSIDE COVER RH
Tech Tips
Use the same procedure described for the LH side.
-
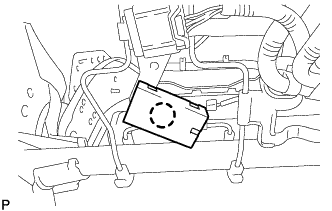
REMOVE SEAT HEATER CONTROL SUB-ASSEMBLY LH
-
Detach the claw and remove the seat heater control sub-assembly LH.
-
-
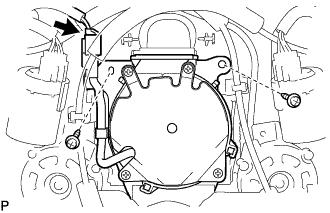
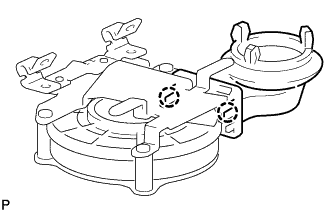
REMOVE SEAT CLIMATE CONTROL BLOWER LH
-
Disconnect the connector.
-
Remove the 2 screws.
-
Text in Illustration *1 Tab Open the 2 tabs as shown in the illustration.
-
Detach the 2 hooks and remove the seat climate control blower LH together with the seat cushion climate control duct LH from the separate type front seat cushion spring assembly.
-
-
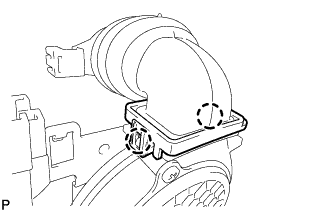
REMOVE SEAT CUSHION CLIMATE CONTROL DUCT LH
-
Detach the 2 claws and remove the seat cushion climate control duct LH from the seat climate control blower LH.
-
-
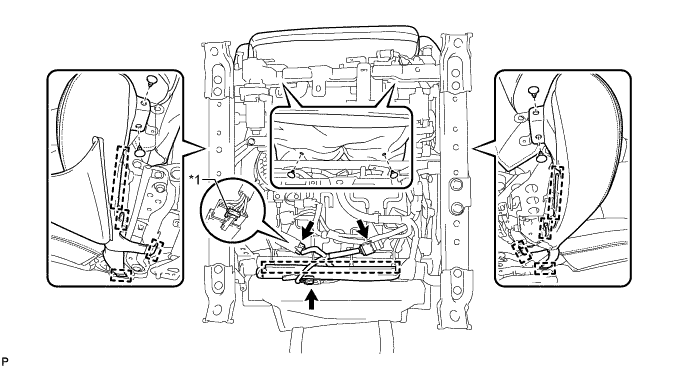
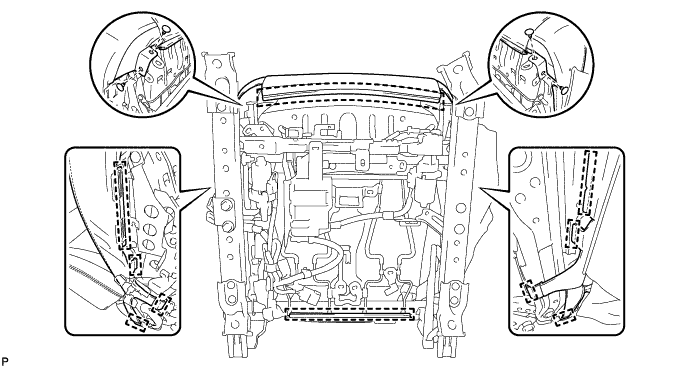
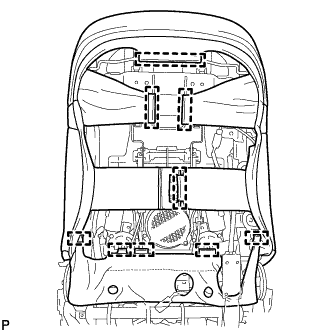
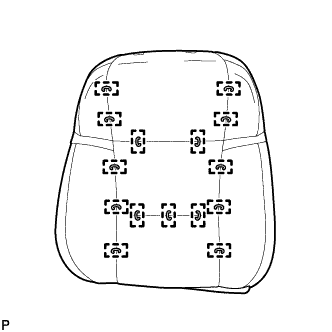
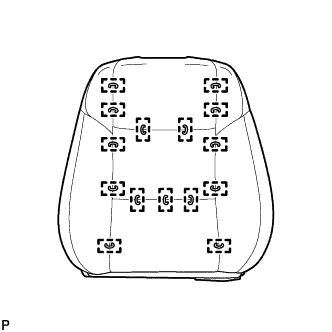
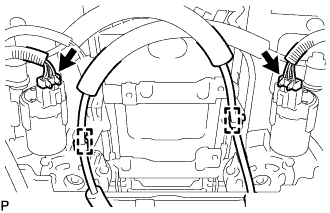
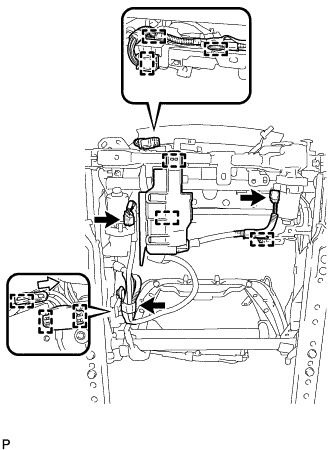
REMOVE SEPARATE TYPE FRONT SEAT CUSHION SPRING ASSEMBLY
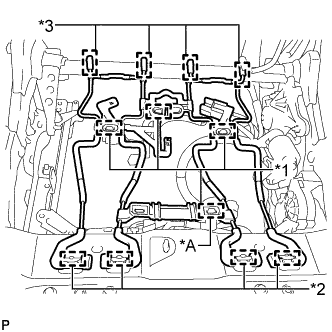
Text in Illustration *A for Driver Side *1 Wire Harness Clamp *2 Hook A *3 Hook B
-
for Driver Side:
Detach the 4 wire harness clamps.
-
for Front Passenger Side:
Detach the 3 wire harness clamps.
-
Detach the 4 hooks A.
-
Detach the 4 hooks B and remove the separate type front seat cushion spring assembly.
-
-
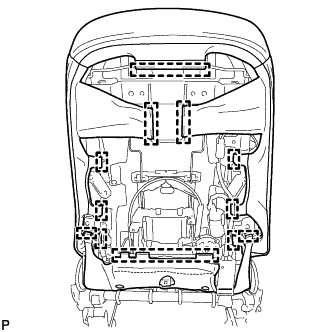
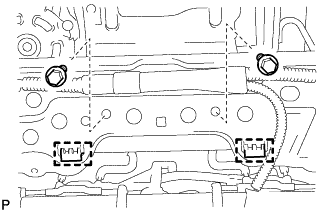
REMOVE FRONT SEAT WIRE (for Driver Side)
-
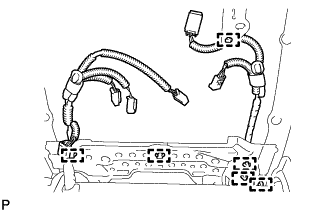
Detach the 6 wire harness clamps.
-
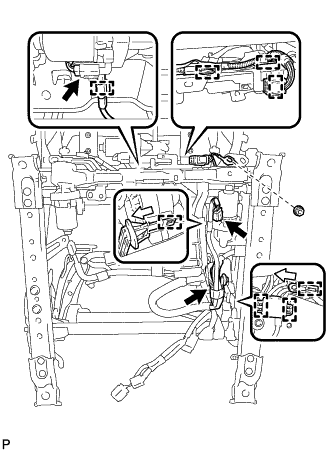
Disconnect the 3 connectors.
-
Remove the nut and disconnect the ground wire.
-
Detach the 8 wire harness clamps and remove the front seat wire.
-
-
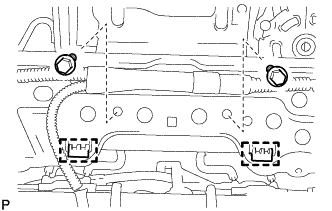
REMOVE FRONT SEAT WIRE (for Front Passenger Side)
-
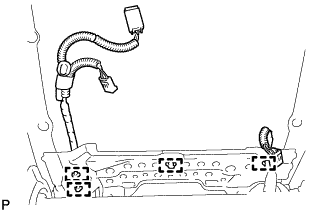
Detach the 4 wire harness clamps.
-
Disconnect the 3 connectors.
-
Detach the 9 wire harness clamps and remove the front seat wire.
-
-
REMOVE SEATBACK FELT (for Front Passenger Side)
Remove the seatback felt.
-
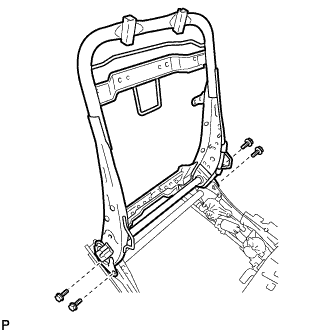
REMOVE FRONT SEATBACK FRAME SUB-ASSEMBLY LH
-
Remove the 4 bolts and front seatback frame sub-assembly LH from the front seat adjuster LH.
-