GENERATOR INSTALLATION

-
INSTALL GENERATOR ASSEMBLY
-
Install the 2 brackets with the 2 bolts.
- Torque:
- for bolt A
- 20 N*m { 204 kgf*cm, 15 ft.*lbf }
- for bolt B
- 10 N*m { 102 kgf*cm, 7 ft.*lbf }
Text in Illustration 
Bolt A 
Bolt B -
Install the generator with the 2 bolts.
- Torque:
- 43 N*m { 438 kgf*cm, 32 ft.*lbf }
-
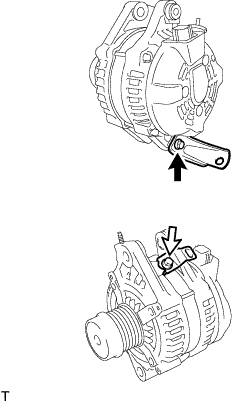
Install the bracket with the nut.
- Torque:
- 20 N*m { 204 kgf*cm, 15 ft.*lbf }
-
Connect the generator wire to terminal B with the nut.
- Torque:
- 9.8 N*m { 100 kgf*cm, 87 in.*lbf }
-
Install the terminal cap.
-
Attach the 2 clamps, and connect the generator connector to the generator.
-
Connect the connector to the cooling fan ECU.
-
-
CONNECT WIRE HARNESS
-
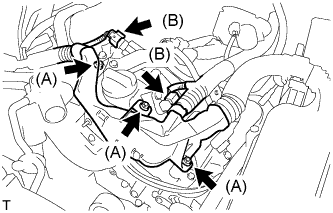
Connect the wire harness with the 3 nuts (A).
- Torque:
- 10 N*m { 102 kgf*cm, 7 ft.*lbf }
-
Connect the 2 connectors (B).
-
-
INSTALL NO. 2 IDLER PULLEY SUB-ASSEMBLY
-
Install the pulley and cover plate with the bolt.
- Torque:
- 43 N*m { 438 kgf*cm, 32 ft.*lbf }
-
-
INSTALL NO. 2 ENGINE COVER
-
Install the No. 2 engine cover with the 3 clips.
-
Connect the clamp.
-
-
INSTALL FAN AND GENERATOR V BELT
-
INSTALL ENGINE UNDER COVER
-
for 2WD:
-
Install the engine under cover with the 13 screws and 3 clips.
-
-
for AWD:
-
Install the engine under cover with the 10 screws and 3 clips.
-
-
-
CONNECT CABLE TO NEGATIVE BATTERY TERMINAL
Note
When disconnecting the cable, some systems need to be initialized after the cable is reconnected Click here.