FRONT BRAKE (for 17 inch Front Disc Brake) INSTALLATION

Tech Tips
-
Use the same procedure for the RH and LH sides.
-
The procedure listed below is for the LH side.
-
INSTALL FRONT DISC
Note
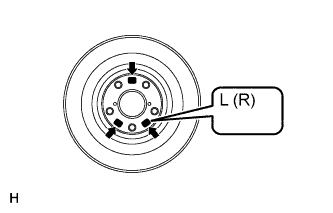
The front disc has an identification mark. Check the identification mark when installing the disc.
-
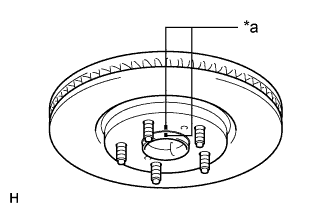
Text in Illustration *a Matchmark Align the matchmarks and install the front disc.
Tech Tips
When replacing the front disc with a new one, select the installation position where the front disc has the smallest runout.
-
-
INSTALL DISC BRAKE CYLINDER ASSEMBLY LH
-
Install the disc brake cylinder assembly with the 2 bolts.
- Torque:
- 135 N*m { 1377 kgf*cm, 100 ft.*lbf }
-
-
CONNECT FRONT BRAKE FLEXIBLE HOSE
-
Connect the front brake flexible hose with the new union bolt and a new gasket.
- Torque:
- 39 N*m { 400 kgf*cm, 29 ft.*lbf }
Note
Insert the flexible hose lock securely in the lock hole in the disc brake cylinder assembly.
-
-
INSTALL FRONT DISC BRAKE PAD KIT
-
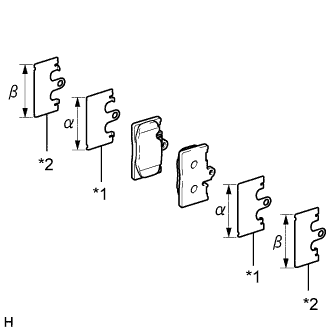
Text in Illustration *1 No. 1 Anti-squeal Shim *2 No. 2 Anti-squeal Shim Install the No. 1 anti-squeal shim and No. 2 anti-squeal shim to each front disc brake pad.
Note
-
Make sure that the No. 1 anti-squeal shim and No. 2 anti-squeal shim are installed in the correct position.
-
As shown in the illustration, the No. 1 anti-squeal shim and No. 2 anti-squeal shim can be identified by length, with β being longer than α.
-
-
Install the 2 front disc brake pads to the disc brake cylinder assembly.
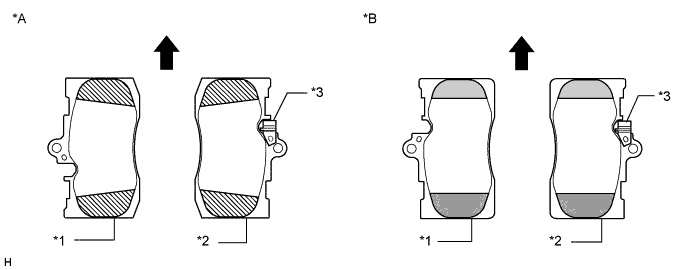
Text in Illustration *A for Type A *B for Type B *1 Outer Pad *2 Inner Pad *3 Pad Wear Indicator - - 
Direction of Disc Rotation for Forward Movement 
Chamfered Edge (Large) 
Chamfered Edge (Small) 
Chamfered Edge (Same Size) Note
-
for Type A: The upper and lower edges of the brake pads are the equally chamfered.
-
for Type B: The upper and lower edges of the brake pads are chamfered differently. Install each brake pad to the correct side and in the correct position as shown in the illustration.
-
The front disc brake pad with the pad wear indicator is positioned on the inside of the vehicle.
-
Install the disc brake pads in the correct directions.
-
There should be no oil or grease on the friction surfaces of the front disc brake pads and front disc.
-
-
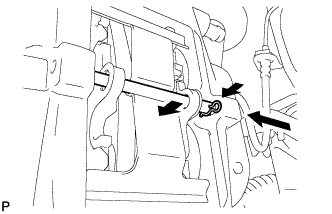
Install the hole pin while pushing on the front disc brake anti-rattle spring.
-
Install the pin hold clip.
-
-
BLEED BRAKE LINE
-
Remove the brake master cylinder reservoir filler cap assembly.
-
Add brake fluid until the fluid level is between the MIN and MAX lines of the reservoir.
Brake fluid SAE J1703 or FMVSS No. 116 DOT 3 -
Loosen the bleeder plug of the front disc brake cylinder RH.
-
Repeatedly depress the brake pedal and bleed the air from the bleeder plug of the front disc brake cylinder RH.
Note
Add fluid as necessary so that the fluid in the reservoir does not decrease below the MIN level.
-
After air is completely bled out, tighten the bleeder plug while depressing the brake pedal.
- Torque:
- 11 N*m { 110 kgf*cm, 8 ft.*lbf }
-
Bleed the air from the bleeder plug of the front disc brake cylinder LH using the same procedure as for the RH side.
-
Loosen the bleeder plug of the rear disc brake cylinder RH.
-
Repeatedly depress the brake pedal and bleed the air from the bleeder plug of the rear disc brake cylinder RH.
Note
Add fluid as necessary so that the fluid in the reservoir does not decrease below the MIN level.
-
After air is completely bled out, tighten the bleeder plug while depressing the brake pedal.
- Torque:
- 8.3 N*m { 85 kgf*cm, 73 in.*lbf }
-
Bleed the air from the bleeder plug of the rear disc brake cylinder LH using the same procedure as for the RH side.
-
Check for brake fluid leaks.
-
Check the brake fluid level in the reservoir Click here.
-
-
INSTALL FRONT WHEEL
- Torque:
- 103 N*m { 1050 kgf*cm, 76 ft.*lbf }