FRONT CONSOLE BOX REASSEMBLY

Tech Tips
-
Use the same procedure for RHD and LHD vehicles.
-
The procedure listed below is for LHD vehicles.
-
INSTALL COMBINATION SWITCH ASSEMBLY
-
Attach the claw and install the combination switch assembly to the upper console panel.
-
Install the 3 screws.
-
Attach the wire harness and connector.
-
-
INSTALL SHIFTING HOLE COVER SUB-ASSEMBLY
-
Attach the 4 claws to install the shifting hole cover sub-assembly.
-
Install the 4 screws.
-
-
INSTALL SHIFTING HOLE FRAME SUB-ASSEMBLY
-
Attach the 5 claws to install the shifting hole frame sub-assembly.
-
Install the 2 screws.
-
-
INSTALL REMOTE TOUCH ASSEMBLY
-
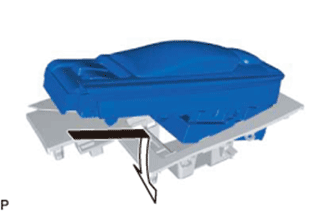
Move the remote touch assembly in the direction of the arrow in the illustration and set it on the upper console panel.
-
Attach the 9 claws to install the remote touch assembly.
-
-
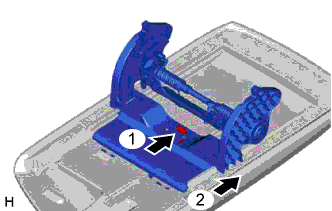
INSTALL CONSOLE COMPARTMENT DOOR HINGE SUB-ASSEMBLY
-
Push the part indicated by arrow 1, and then slide the console compartment door hinge sub-assembly in the direction of arrow 2 to install it.
-
-
INSTALL CONSOLE COMPARTMENT DOOR LOCK SUB-ASSEMBLY
-
Install the console compartment door lock sub-assembly with the 3 screws.
-
-
INSTALL REAR CONSOLE ARMREST ASSEMBLY
-
Install the rear console armrest assembly with the 4 screws.
-
-
INSTALL LOWER CONSOLE COVER
-
Attach the 2 guides and 3 claws to install the lower console cover.
-
-
INSTALL NO. 5 CONSOLE BOX MOUNTING BRACKET
-
Attach the 2 claws to install the No. 5 console box mounting bracket.
-
-
INSTALL LOWER CONSOLE BOX POCKET
-
Attach the 8 claws to install the lower console box pocket.
-
-
INSTALL UPPER CONSOLE BOX SUB-ASSEMBLY
-
Install the upper console box sub-assembly.
-