FRONT SEAT OUTER BELT ASSEMBLY INSPECTION

-
INSPECT FRONT SEAT OUTER BELT ASSEMBLY
-
Check tension reducer operation.
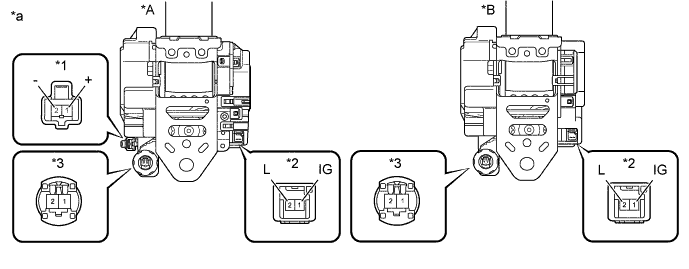
Text in Illustration *A w/ Pre-collision System *B w/o Pre-collision System *1 Pre-collision System Connector *2 Tension Reducer Connector *3 Pretensioner Connector - - *a Component without harness connected
(Front Seat Outer Belt Assembly)
- - Note
Do not apply battery voltage to the pretensioner connector.
-
Connect a positive (+) lead of the battery to terminal 1 (IG) of the tension reducer connector and a negative (-) lead to terminal 2 (L).
-
Check that an operating sound is heard when the magnetized solenoid is attracting the plunger.
-
Pull out the seat belt and allow it to retract. Listen to the operating sound.
-
Pull out the seat belt again, disconnect the negative (-) lead of the battery and allow the seat belt to retract. Listen to the operating sound again and check that the operating sound volume has increased.
-
If the result is not as specified, replace the front seat outer belt assembly.
-
-
-
Check the motor of pre-collision system.
-
Measure the resistance according to the value(s) in the table below.
Standard Resistance Tester Connection Condition Specified Condition 1 (+) - 2 (-) Always Below 20 Ω If the result is not as specified, replace the front seat outer belt assembly.
-
-

Text in Illustration *a 45° Check the degree of tilt when the ELR begins to lock.
-
Check that the belt does not lock at less than 15 degrees of tilt in any direction but locks at over 45 degrees of tilt while gently pulling the belt.
Note
Do not disassemble the retractor.
-
-