LANE RECOGNITION CAMERA SENSOR REMOVAL

-
REMOVE FRONT ROOF TOP GARNISH
-
Using a moulding remover, detach the 2 claws A.
-
Using a moulding remover, detach the 2 clips A.
Tech Tips
When the 2 clips A are detached, claw B and guide B may also become detached.
-
Detach the 2 clips B.
-
Move the hooks of the 2 guides A forward, disconnect the connector, and remove the front roof garnish together with the map light assembly.
Note
w/ Lane Keeping Assist System:
When removing and installing the front roof top garnish, do not apply force to the camera sensor located at (x).
Tech Tips
If the claw B and guide B do not become detached when the 2 clips labeled A are detached, detach claw B and guide B to remove the front roof top garnish together with the map light assembly.
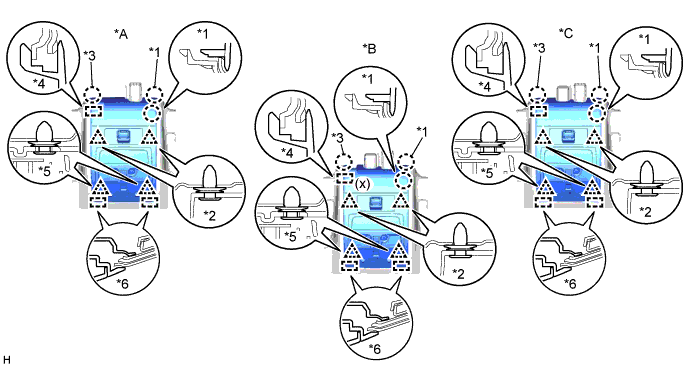
Text in Illustration *A for Standard *B w/ Lane Keeping Assist System *C w/ Rain Sensor - - *1 Claw A *2 Clip A *3 Claw B *4 Guide B *5 Clip B *6 Guide A -
Detach the 3 claws on the back of the front roof top garnish and map light assembly, and disconnect the front roof top garnish and map light assembly.
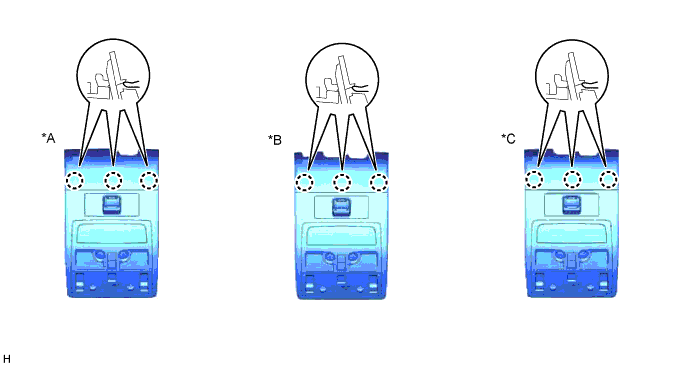
Text in Illustration *A for Standard *B w/ Lane Keeping Assist System *C w/ Rain Sensor - -
-
-
REMOVE MAP LIGHT ASSEMBLY
-
Using a moulding remover, detach the 2 claws A.
-
Using a moulding remover, detach the 2 clips A.
Tech Tips
When the 2 clips A are detached, claw B and guide B may also become detached.
-
Detach the 2 clips B.
-
Move the hooks of the 2 guides forward, disconnect the connector, and remove the map light assembly together with the front roof top garnish.
Note
w/ Lane Keeping Assist System:
When removing the map light assembly together with the front roof top garnish, make sure not to apply excessive pressure to the camera sensor (x).
Tech Tips
If claw B and guide B do not become detached when the 2 clips labeled A are detached, detach claw B and guide B to remove the map light assembly together with the front roof top garnish.
Text in Illustration *A for Standard *B w/ Lane Keeping Assist System *C w/ Rain Sensor - - *1 Claw A *2 Clip A *3 Claw B *4 Guide B *5 Clip B *6 Guide A -
Detach the 3 claws on the back of the map light assembly and front roof top garnish, and disconnect the map light assembly and front roof top garnish.
Text in Illustration *A for Standard *B w/ Lane Keeping Assist System *C w/ Rain Sensor - -
-
-
REMOVE LANE RECOGNITION CAMERA SENSOR ASSEMBLY
-
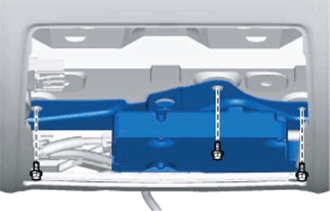
Remove the 3 bolts.
-
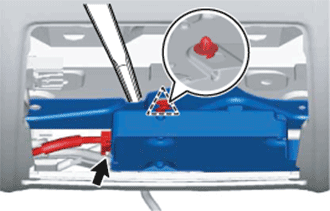
Using a moulding remover, detach the clip and remove the lane recognition camera sensor assembly.
Note
Do not touch the lens of the camera sensor during removal.
-
Disconnect the connector.
-