FRONT DIFFERENTIAL SIDE GEAR SHAFT OIL SEAL (for AWD) REPLACEMENT

-
PLACE FRONT WHEELS FACING STRAIGHT AHEAD
-
DRAIN DIFFERENTIAL OIL
-
Stop the vehicle on a level place.
-
for Front Differential:
-
Remove the engine under cover.
-
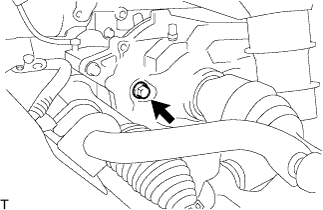
Remove the filler plug and gasket.
-
Remove the drain plug and gasket, and drain the oil.
-
Install a new gasket and the drain plug.
- Torque:
- 39 N*m { 400 kgf*cm, 29 ft.*lbf }
-
-
for Rear Differential:
-
Using a 10 mm hexagon wrench, remove the filler plug and gasket.
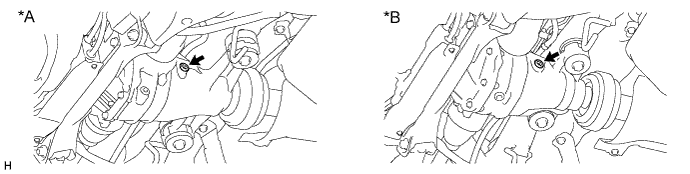
Text in Illustration *A for 2GR-FSE *B for 4GR-FSE -
Using a 10 mm hexagon wrench, remove the drain plug and gasket, and drain the oil.
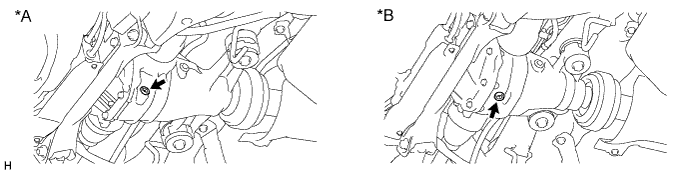
Text in Illustration *A for 2GR-FSE *B for 4GR-FSE -
Install a new gasket and the drain plug.
- Torque:
- 49 N*m { 500 kgf*cm, 36 ft.*lbf }
-
-
-
REMOVE ENGINE ASSEMBLY
-
REMOVE FRONT DIFFERENTIAL CARRIER ASSEMBLY
-
Support the front differential carrier assembly with a jack.
Note
Do not drop the front differential carrier assembly.
-
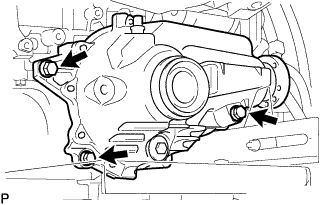
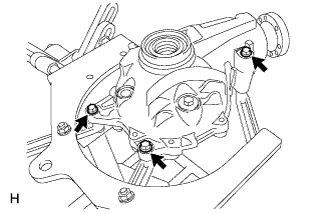
Remove the 3 bolts and front differential carrier assembly.
Note
-
Do not damage the installation surface when removing the front differential carrier assembly.
-
The remaining oil may leak out when removing the front differential carrier assembly.
-
Securely support the differential carrier while performing this step to avoid excessively tilting or dropping the differential carrier.
-
-
-
SECURE FRONT DIFFERENTIAL CARRIER ASSEMBLY
-
Set the front differential carrier assembly to an overhaul stand, etc. as shown in the illustration.
-
-
REMOVE FRONT DIFFERENTIAL CASE OIL SEAL RH
-
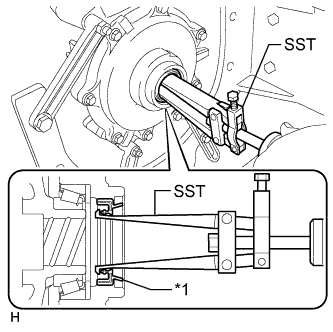
Text in Illustration *1 Front Differential Case Oil Seal Using SST, remove the front differential case oil seal RH.
- SST
- 09308-00010
-
-
REMOVE FRONT DIFFERENTIAL CASE OIL SEAL LH
Tech Tips
Use the same procedure described for the RH side.
-
INSTALL FRONT DIFFERENTIAL CASE OIL SEAL RH
-
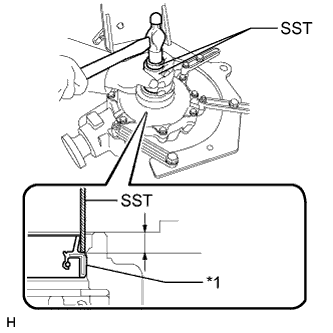
Text in Illustration *1 Front Differential Case Oil Seal Using SST and a hammer, tap in a new front differential case oil seal RH to the differential carrier assembly.
- SST
- 09612-10093 ( 09613-22011 )
- 09950-60010 ( 09951-00390 )
Standard depth 7.5 to 8.5 mm (0.296 to 0.334 in.) Note
-
Tap the front differential case oil seal uniformly so that the oil seal is straight.
-
Do not excessively tap the front differential case oil seal.
-
Make sure the difference between the maximum and minimum measured values is less than 0.45 mm (0.0177 in.), as a greater difference may lead to oil leaks.
-
-
INSTALL FRONT DIFFERENTIAL CASE OIL SEAL LH
-
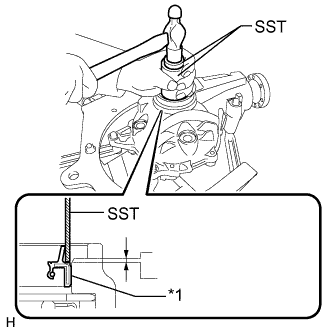
Text in Illustration *1 Front Differential Case Oil Seal Using SST and a hammer, tap in a new front differential case oil seal LH to the differential carrier assembly.
- SST
- 09612-10093 ( 09613-22011 )
- 09950-60010 ( 09951-00390 )
Standard depth 1.0 to 2.0 mm (0.0394 to 0.0787 in.) Note
-
Tap the front differential case oil seal uniformly so that the front differential case oil seal is straight.
-
Do not excessively tap the front differential case oil seal.
-
Make sure the difference between the maximum and minimum measured values is less than 0.47 mm (0.0185 in.), as a greater difference may lead to oil leaks.
-
-
REMOVE FRONT DIFFERENTIAL CARRIER ASSEMBLY
-
Remove the differential carrier from the overhaul stand, etc.
-
-
INSTALL FRONT DIFFERENTIAL CARRIER ASSEMBLY
-
Support the differential carrier assembly with a jack. Temporarily install the differential carrier assembly to the engine assembly with the 3 bolts.
-
Tighten the 3 bolts to install the differential carrier assembly.
- Torque:
- 87 N*m { 890 kgf*cm, 64 ft.*lbf }
-
-
INSTALL ENGINE TO VEHICLE
-
ADD DIFFERENTIAL OIL
-
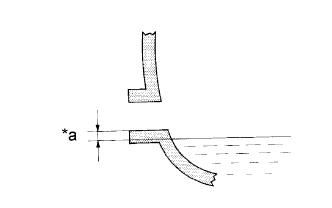
Text in Illustration *a 0 to 5 mm (0 to 0.196 in.) Add differential oil so that the oil level is within 5 mm (0 to 0.196 in.) of the bottom lip of the differential filler plug hole.
Note
-
Too much or too little oil will lead to differential problems.
-
After changing the oil, drive the vehicle and then check the oil level again.
-
-
for Front Differential:
Oil type Hypoid gear oil API GL-5 or equivalent Recommended Viscosity Temperature Viscosity Above -18°C (0°F) SAE 90 Below -18°C (0°F) SAE 80W or 80W-90 Standard Differential Oil Capacity 0.65 to 0.75 liters (0.69 to 0.79 US qts, 0.58 to 0.66 Imp. qts)
-
Using a 10 mm hexagon wrench, install a new gasket and the filler plug.
- Torque:
- 39 N*m { 400 kgf*cm, 29 ft.*lbf }
-
Install the engine under cover.
-
-
for Rear Differential:
Oil type and viscosity Toyota genuine differential gear oil LT 75W-85 GL-5 or equivalent Standard Differential Oil Capacity Engine Specified Condition 2GR-FSE 1.30 to 1.40 liters (1.38 to 1.47 US qts, 1.15 to 1.23 Imp. qts) 4GR-FSE 1.10 to 1.20 liters (1.17 to 1.26 US qts, 0.97 to 1.05 Imp. qts)
-
Install a new gasket and the filler plug.
- Torque:
- 49 N*m { 500 kgf*cm, 36 ft.*lbf }
-
-