FRONT DIFFERENTIAL CARRIER OIL SEAL (for AWD) REPLACEMENT

-
DRAIN DIFFERENTIAL OIL
-
Stop the vehicle on a level place.
-
for Front Differential:
-
Remove the engine under cover.
-
Remove the filler plug and gasket.
-
Remove the drain plug and gasket, and drain the oil.
-
Install a new gasket and the drain plug.
- Torque:
- 39 N*m { 400 kgf*cm, 29 ft.*lbf }
-
-
for Rear Differential:
-
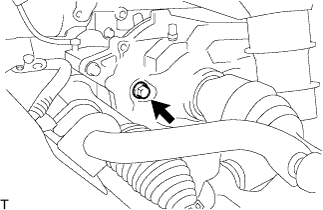
Using a 10 mm hexagon wrench, remove the filler plug and gasket.
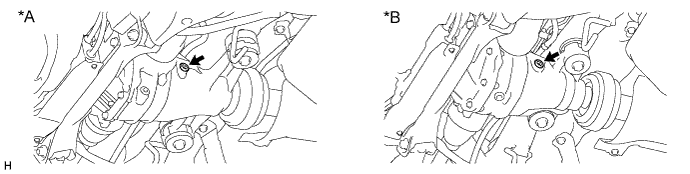
Text in Illustration *A for 2GR-FSE *B for 4GR-FSE -
Using a 10 mm hexagon wrench, remove the drain plug and gasket, and drain the oil.
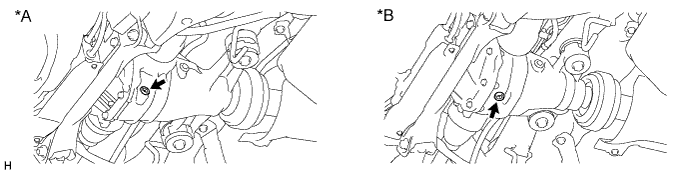
Text in Illustration *A for 2GR-FSE *B for 4GR-FSE -
Install a new gasket and the drain plug.
- Torque:
- 49 N*m { 500 kgf*cm, 36 ft.*lbf }
-
-
-
REMOVE ENGINE ASSEMBLY
-
REMOVE FRONT DIFFERENTIAL CARRIER ASSEMBLY
-
Support the front differential carrier assembly with a jack.
Note
Do not drop the front differential carrier assembly.
-
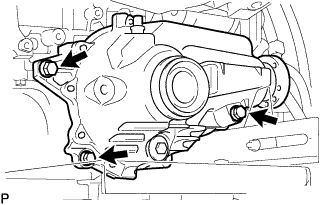
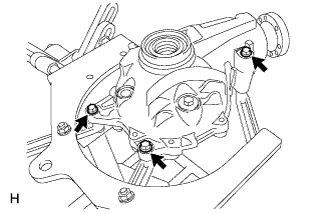
Remove the 3 bolts and front differential carrier assembly.
Note
-
Do not damage the installation surface when removing the front differential carrier assembly.
-
The remaining oil may leak out when removing the front differential carrier assembly.
-
Securely support the differential carrier while performing this step to avoid excessively tilting or dropping the differential carrier.
-
-
-
SECURE FRONT DIFFERENTIAL CARRIER ASSEMBLY
-
Set the front differential carrier assembly to an overhaul stand, etc. as shown in the illustration.
-
-
REMOVE FRONT DRIVE PINION COMPANION FLANGE FRONT NUT
-
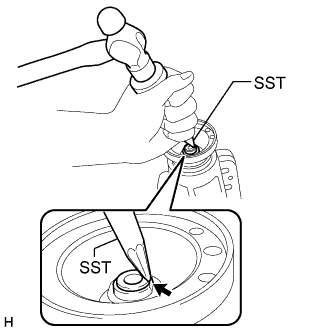
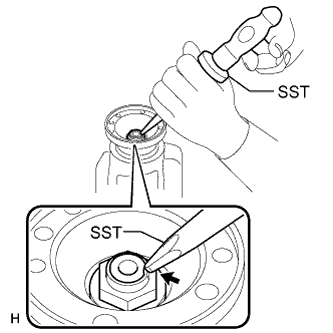
Using SST and a hammer, unstake the staked part of the front drive pinion companion flange front nut.
- SST
- 09930-00010
Note
-
Be sure to use SST with the tapered surface facing the shaft.
-
Do not grind the tip of SST with a grinder, etc.
-
Completely loosen the staked part of the nut when removing it.
-
Do not damage the threads of the drive pinion.
-
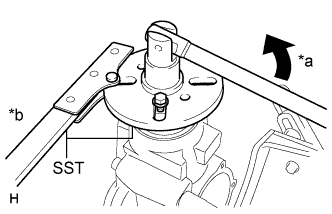
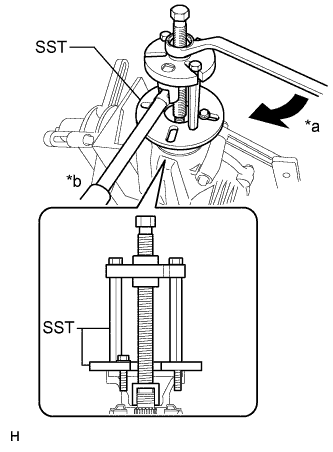
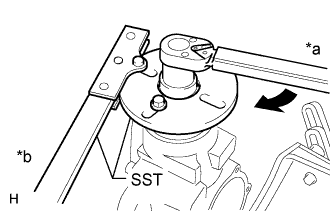
Text in Illustration *a Turn *b Hold Using SST to hold the flange, remove the front drive pinion companion flange front nut.
- SST
- 09330-00021
- 09950-30012 ( 09955-03030 )
Note
Apply grease to the threads and tip of SST center bolt before use.
-
-
REMOVE FRONT DRIVE PINION COMPANION FLANGE FRONT SUB-ASSEMBLY WITH DEFLECTOR
-
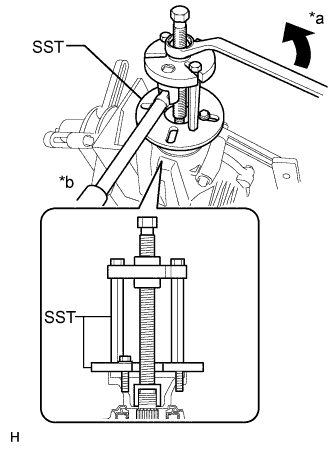
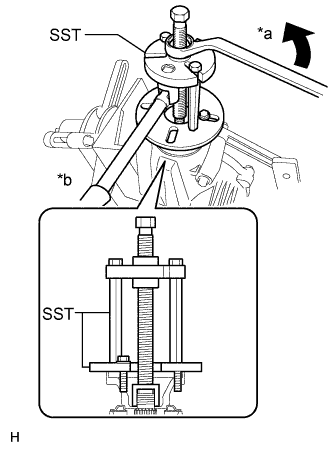
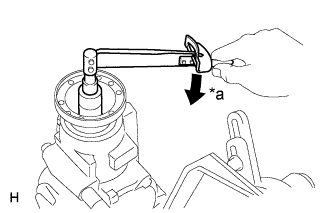
Text in Illustration *a Turn *b Hold Using SST, remove the front drive pinion companion flange sub-assembly front.
- SST
- 09950-30012 ( 09951-03010, 09953-03010, 09954-03010, 09955-03030, 09956-03020 )
Note
Apply grease to the threads and tip of SST center bolt before use.
-
-
REMOVE FRONT DIFFERENTIAL CARRIER OIL SEAL
-
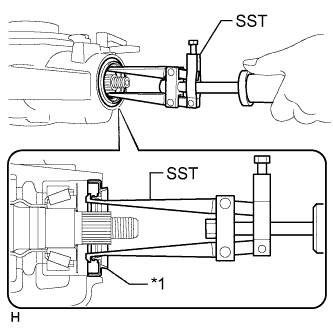
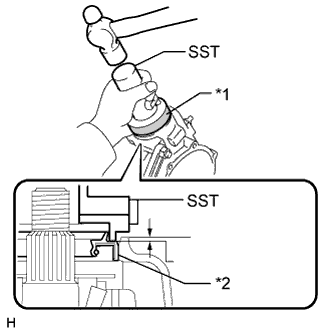
Text in Illustration *1 Front Differential Carrier Oil Seal Using SST, remove the front differential carrier oil seal from the front differential carrier assembly.
- SST
- 09308-00010
-
-
REMOVE FRONT DIFFERENTIAL DRIVE PINION OIL SLINGER
-
Remove the front differential drive pinion oil slinger.
-
-
REMOVE FRONT DRIVE PINION REAR TAPERED ROLLER BEARING
-
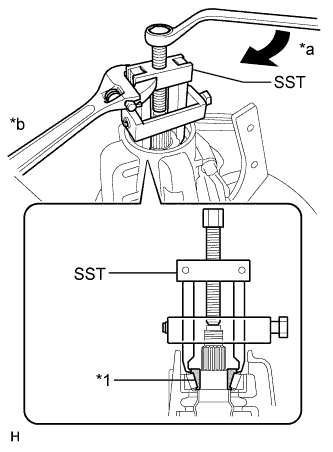
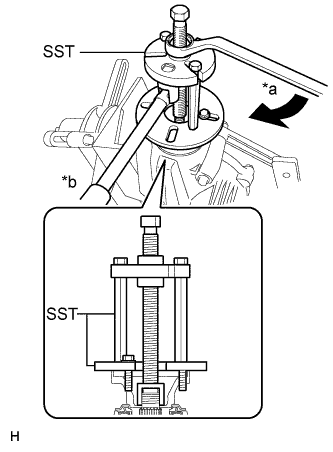
Text in Illustration *1 Inner Race *a Turn *b Hold Using SST, remove the inner race of the front drive pinion rear tapered roller bearing from the drive pinion.
- SST
- 09556-22010
Note
Apply grease to the threads and tip of SST center bolt before use.
-
-
REMOVE FRONT DIFFERENTIAL DRIVE PINION BEARING SPACER
-
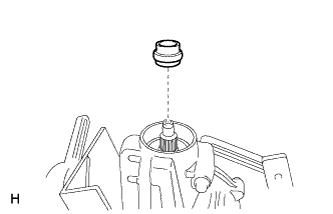
Remove the front differential drive pinion bearing spacer.
-
-
INSTALL FRONT DIFFERENTIAL DRIVE PINION BEARING SPACER
-
Install a new drive pinion bearing spacer to the drive pinion.
Note
Be sure to face the larger inner diameter side rearward as shown in the illustration.
-
-
INSTALL FRONT DRIVE PINION REAR TAPERED ROLLER BEARING
-
Text in Illustration *a Turn *b Hold Using the companion flange, install the inner race of the front drive pinion rear tapered roller bearing to the drive pinion.
- SST
- 09950-30012 ( 09951-03010, 09953-03010, 09954-03010, 09955-03030, 09956-03020 )
Note
Apply grease to the threads and tip of SST center bolt before use.
-
Text in Illustration *a Turn *b Hold Using SST, remove the companion flange.
- SST
- 09950-30012 ( 09951-03010, 09953-03010, 09954-03010, 09955-03030, 09956-03020 )
Note
Apply grease to the threads and tip of SST center bolt before use.
-
-
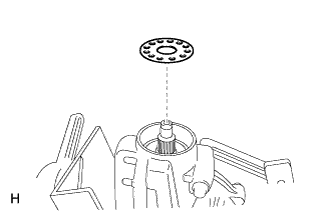
INSTALL FRONT DIFFERENTIAL DRIVE PINION OIL SLINGER
-
Install the front differential drive pinion oil slinger.
-
-
INSTALL FRONT DIFFERENTIAL CARRIER OIL SEAL
-
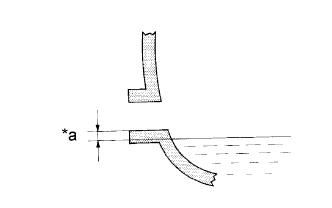
Text in Illustration *1 Protective Tape *2 Front Differential Carrier Oil Seal Using SST and a hammer, tap in a new front differential carrier oil seal.
- SST
- 09309-36010
- 09502-12010
Standard depth 0.5 to 1.5 mm (0.0197 to 0.0590 in.) Note
-
Using a vernier caliper, measure the depth of the oil seal.
-
Measure at 3 or more areas around the circumference of the oil seal.
-
Make sure the difference between the maximum and minimum measured values is less than 0.6 mm (0.0236 in.), as a greater difference may lead to oil leaks.
-
Tap the oil seal uniformly so that the oil seal is straight.
-
Do not excessively tap the oil seal.
Tech Tips
First, uniformly tap in the oil seal until it is flush with the edge of the carrier, and tap it little by little until the depth is within the standard range.
-
-
INSTALL FRONT DRIVE PINION COMPANION FLANGE FRONT SUB-ASSEMBLY WITH DEFLECTOR
-
Text in Illustration *a Turn *b Hold Using SST, install the companion flange to the drive pinion.
- SST
- 09950-30012 ( 09951-03010, 09953-03010, 09954-03010, 09955-03030, 09956-03020 )
Note
Apply grease to the threads and tip of SST center bolt before use.
-
Coat the threads of a new drive pinion nut with hypoid gear oil LSD.
-
Text in Illustration *a Turn *b Hold Using SST to hold the flange, tighten the drive pinion nut.
- SST
- 09330-00021 ( 09955-03030 )
- Torque:
- 108 to 235 N*m { 1100 to 2400 kgf*cm, 80 to 173 ft.*lbf }
-
-
INSPECT DRIVE PINION PRELOAD
-
Text in Illustration *a Turn Using a torque wrench, measure the total preload.
Total preload (at starting) Item Specified Condition New bearing 1.27 to 2.06 N*m (13.0 to 21.0 kgf*cm, 11.2 to 18.2 in.*lbf) Reused bearing 0.78 to 1.27 N*m (8.0 to 12.9 kgf*cm, 6.9 to 11.2 in.*lbf) If the total preload is not within the specified range, adjust the total preload or repair as necessary.
-
-
STAKE FRONT DRIVE PINION COMPANION FLANGE FRONT NUT
-
Using SST and a hammer, stake the drive pinion nut.
- SST
- 09930-00010
-
-
REMOVE FRONT DIFFERENTIAL CARRIER ASSEMBLY FROM OVERHAUL STAND
-
Remove the differential carrier from the overhaul stand, etc.
-
-
INSTALL FRONT DIFFERENTIAL CARRIER ASSEMBLY
-
Support the differential carrier assembly with a jack. Temporarily install the differential carrier assembly to the engine assembly with the 3 bolts.
-
Tighten the 3 bolts to install the differential carrier assembly.
- Torque:
- 87 N*m { 890 kgf*cm, 64 ft.*lbf }
-
-
INSTALL ENGINE TO VEHICLE
-
ADD DIFFERENTIAL OIL
-
Text in Illustration *a 0 to 5 mm (0 to 0.196 in.) Add differential oil so that the oil level is within 5 mm (0 to 0.196 in.) of the bottom lip of the differential filler plug hole.
Note
-
Too much or too little oil will lead to differential problems.
-
After changing the oil, drive the vehicle and then check the oil level again.
-
-
for Front Differential:
Oil type Hypoid gear oil API GL-5 or equivalent Recommended Viscosity Temperature Viscosity Above -18°C (0°F) SAE 90 Below -18°C (0°F) SAE 80W or 80W-90 Standard Differential Oil Capacity 0.65 to 0.75 liters (0.69 to 0.79 US qts, 0.58 to 0.66 Imp. qts)
-
Using a 10 mm hexagon wrench, install a new gasket and the filler plug.
- Torque:
- 39 N*m { 400 kgf*cm, 29 ft.*lbf }
-
Install the engine under cover.
-
-
for Rear Differential:
Oil type and viscosity Toyota genuine differential gear oil LT 75W-85 GL-5 or equivalent Standard Differential Oil Capacity Engine Specified Condition 2GR-FSE 1.30 to 1.40 liters (1.38 to 1.47 US qts, 1.15 to 1.23 Imp. qts) 4GR-FSE 1.10 to 1.20 liters (1.17 to 1.26 US qts, 0.97 to 1.05 Imp. qts)
-
Install a new gasket and the filler plug.
- Torque:
- 49 N*m { 500 kgf*cm, 36 ft.*lbf }
-
-