TRANSFER VALVE BODY ASSEMBLY INSTALLATION

-
INSTALL TRANSFER CONTROL SOLENOID ASSEMBLY
-
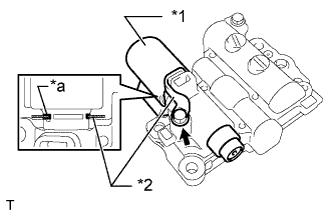
Text in Illustration *1 Transfer Control Solenoid Assembly *2 Solenoid Lock Plate *a Cutout Install the transfer control solenoid assembly and solenoid lock plate to the transfer control valve body assembly with the bolt.
- Torque:
- 6.4 N*m { 65 kgf*cm, 57 in.*lbf }
Tech Tips
Install the solenoid lock plate into the cutout on the transfer control solenoid assembly.
-
-
INSTALL TRANSFER CONTROL VALVE BODY ASSEMBLY
-
Connect the connector to the transfer control solenoid assembly.
-
Install the transfer control valve body assembly with the 4 bolts.
- Torque:
- 9.8 N*m { 100 kgf*cm, 87 in.*lbf }
-
-
INSTALL TRANSFER OIL PAN SUB-ASSEMBLY
-
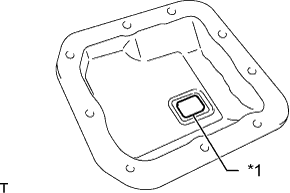
Text in Illustration *1 Transfer Oil Cleaner Magnet Install the transfer oil cleaner magnet to the transfer oil pan sub-assembly.
-
Clean the threads of the bolts and the transfer oil pan sub-assembly with non-residue solvent.
-
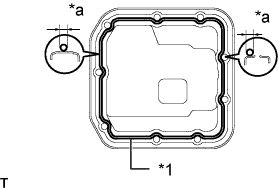
Text in Illustration *1 Seal Packing *a Seal Width 3.0 to 3.5 mm (0.12 to 0.14 in.) Apply seal packing to the transfer oil pan sub-assembly as shown in the illustration.
Seal packing Toyota Genuine Seal Packing 1281, Three Bond 1281 or equivalent Note
Reassemble the parts within 5 minutes of applying fresh FIPG material. Otherwise, the packing (FIPG) material must be removed and reapplied.
-
Temporarily install the 9 bolts in several steps, and then tighten them to the specified torque.
- Torque:
- 7.4 N*m { 75 kgf*cm, 65 in.*lbf }
-
-
INSTALL TRANSFER DYNAMIC DAMPER
-
Install the transfer dynamic damper with the 2 bolts.
- Torque:
- 52 N*m { 530 kgf*cm, 38 ft.*lbf }
-
-
INSTALL REAR ENGINE MOUNTING MEMBER
-
Install the rear engine mounting member with the 4 bolts and 3 nuts.
- Torque:
- Bolt
- 26 N*m { 260 kgf*cm, 19 ft.*lbf }
- Nut
- 38 N*m { 387 kgf*cm, 28 ft.*lbf }
-
-
INSTALL FRONT NO. 1 FLOOR HEAT INSULATOR
-
Install the front No. 1 floor heat insulator with the 4 nuts.
- Torque:
- 5.4 N*m { 55 kgf*cm, 48 in.*lbf }
-
-
INSTALL FRONT EXHAUST PIPE ASSEMBLY
-
ADD AUTOMATIC TRANSMISSION FLUID
-
INSPECT FOR EXHAUST GAS LEAK