MULTIPLEX TILT AND TELESCOPIC ECU INSTALLATION

-
INSTALL MULTIPLEX TILT AND TELESCOPIC ECU
-
Engage the claw to install the multiplex tilt and telescopic ECU to the steering column assembly.
-
Engage the wire harness clamp.
-
Connect the connector to the multiplex tilt and telescopic ECU.
-
-
INSTALL INSTRUMENT PANEL SUB-ASSEMBLY (w/o Driver Side Knee Airbag)
-
w/o Driver Side Knee Airbag:
-
Engage the 5 clips and 3 guides.
-
-
w/ Driver Side Knee Airbag:
-
Engage the 4 claws, 7 clips and 3 guides.
-
-
Install the instrument panel sub-assembly with the 2 bolts <B>.
-
-
CONNECT HOOD LOCK CONTROL LEVER SUB-ASSEMBLY (w/o Driver Side Knee Airbag)
-
Engage the claw and 2 guides to connect the hood lock control lever sub-assembly.
-
-
INSTALL INSTRUMENT SIDE PANEL LH (w/o Driver Side Knee Airbag)
-
Engage the 3 guides.
-
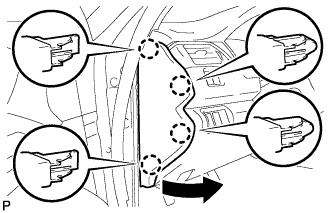
Engage the 4 claws to install the instrument side panel LH as shown in the illustration.
-
-
INSTALL FRONT DOOR OPENING TRIM WEATHERSTRIP LH (w/o Driver Side Knee Airbag)
-
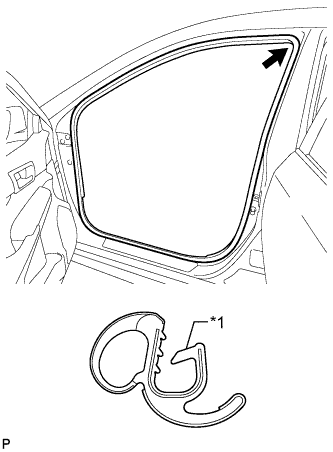
Text in Illustration *1 Alignment Mark (Yellow) Align the alignment mark (Yellow) on the weatherstrip with the protruding portion on the body indicated by the arrow in the illustration, and install the front door opening trim weatherstrip LH.
Note
After installation, check that the corners fit correctly.
-
-
INSTALL COWL SIDE TRIM SUB-ASSEMBLY LH (w/o Driver Side Knee Airbag)
-
Engage the 2 clips.
-
Install the cowl side trim sub-assembly LH with the clip.
-
-
INSTALL FRONT DOOR SCUFF PLATE LH (w/o Driver Side Knee Airbag)
-
Engage the 10 claws to install the front door scuff plate LH.
-
-
INSTALL LOWER NO. 1 INSTRUMENT PANEL AIRBAG ASSEMBLY (w/ Driver Side Knee Airbag)