CANISTER ON-VEHICLE INSPECTION

-
INSPECT CHARCOAL CANISTER ASSEMBLY
-
Visually check the charcoal canister.
-
Visually check the charcoal canister for cracks or damage.
Tech Tips
If cracks or damage are found, replace the charcoal canister assembly.
-
-
Check charcoal canister operation under positive pressure.
-
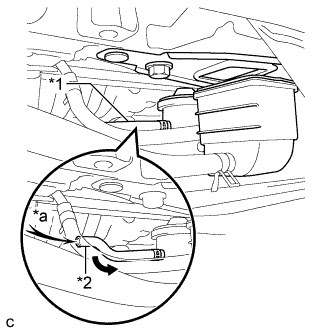
Text in Illustration *1 Vent Line Hose *2 Test Hose *a Air Disconnect the vent line hose from the charcoal canister assembly. Close the vent line hose using a hose plug or a similar part.
-
Connect a test hose to the charcoal canister assembly.
-
Blow 5 kPa (0.1 kgf/cm2, 0.7 psi) of air into the hose.
Standard Air can be blown through the canister. Tech Tips
If the standard is not as specified, replace the charcoal canister assembly.
-
-
Check charcoal canister operation under vacuum.
-
Disconnect the vent line hose from the charcoal canister assembly. Close the vent line hose using a hose plug or a similar part.
-
Connect a test hose to the charcoal canister assembly.
-
Connect a vacuum pump to the test hose.
-
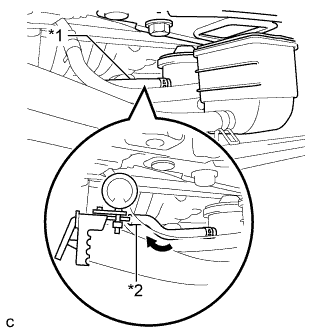
Text in Illustration *1 Vent Line Hose *2 Test Hose Using the vacuum pump, apply vacuum and check the indicator.
Standard The vacuum pump indicator does not move from its initial position. Tech Tips
-
The indicator may move when applying vacuum. If the indicator quickly returns to its initial position, the charcoal canister is operating normally.
-
If the standard is not as specified, replace the charcoal canister assembly.
-
-
-
Check for clogs in the air filter (when not using the intelligent tester).
-
Disconnect the vent line hose from the charcoal canister assembly. Close the vent line hose using a hose plug or a similar part.
-
Connect a test hose to the charcoal canister assembly.
-
Connect a vacuum pump to the test hose.
-
Start the engine.
-
Warm up the engine.
-
After warm-up, idle the engine for 15 minutes and check the vacuum pump indicator.
Standard The vacuum pump indicator does not move from its initial position. Tech Tips
The indicator may move when the purge VSV opens to vacuum. If the indicator quickly returns to its initial position, the charcoal canister is operating normally.
-
-
Check for clogs in the air filter (when using the intelligent tester).
Tech Tips
When performing an Active Test of the purge VSV using the intelligent tester, it is not necessary to warm-up and idle the engine for 15 minutes.
-
Disconnect the vent line hose from the charcoal canister assembly. Close the vent line hose using a hose plug or a similar part.
-
Connect a test hose to the charcoal canister assembly.
-
Connect a vacuum pump to the test hose.
-
Connect the intelligent tester to the DLC3.
-
Start the engine.
-
Enter the following menus: Powertrain / Engine / Active Test / Activate the VSV for Evap Control.
-
Perform the Active Test with the engine idling.
Standard The vacuum pump indicator does not move from its initial position. Tech Tips
The indicator may move when the purge VSV opens to vacuum. If the indicator quickly returns to its initial position, the charcoal canister is operating normally.
-
-