ROOF HEADLINING INSTALLATION
PROCEDURE
-
INSTALL ROOF SIDE RAIL BRACKET LH (w/ Curtain Shield Airbag)
-
Install the roof side rail bracket LH with 2 bolts.
- Torque:
- 13 N*m { 133 kgf*cm, 10 ft.*lbf }
-
-
INSTALL ROOF SIDE RAIL BRACKET RH (w/ Curtain Shield Airbag)
Tech Tips
Use the same procedure for the LH side and RH side.
-
INSTALL REAR NO. 2 SIDE RAIL SPACER LH (w/ Curtain Shield Airbag)
-
Engage the 2 claws to install the rear No. 2 side rail spacer LH.
-
-
INSTALL REAR NO. 2 SIDE RAIL SPACER RH (w/ Curtain Shield Airbag)
Tech Tips
Use the same procedure for the LH side and RH side.
-
INSTALL REAR SIDE RAIL SPACER LH (w/o Curtain Shield Airbag)
-
Engage the 5 claws to install the rear side rail spacer LH.
-
-
INSTALL REAR SIDE RAIL SPACER RH (w/o Curtain Shield Airbag)
Tech Tips
Use the same procedure for the LH side and RH side.
-
INSTALL FRONT SIDE RAIL SPACER LH (w/o Curtain Shield Airbag)
-
Engage the 5 claws to install the front side rail spacer LH.
-
-
INSTALL FRONT SIDE RAIL SPACER RH (w/o Curtain Shield Airbag)
Tech Tips
Use the same procedure for the RH side and LH side.
-
INSTALL CURTAIN SHIELD AIR BAG ASSEMBLY LH (w/ Curtain Shield Airbag)
-
INSTALL CURTAIN SHIELD AIR BAG ASSEMBLY RH (w/ Curtain Shield Airbag)
Tech Tips
Use the same procedure for the RH side and LH side.
-
INSTALL ROOF HEADLINING ASSEMBLY
-
Pull the roof headlining into the vehicle through the back door.
Note
Do not damage the roof headlining assembly or body interior.
-
Engage the clamp. (for grass roof)
-
Connect the connector. (for grass roof)
-
Engage the 2 clips.
-
Engage the 7 clamps.
-
Connect the 3 connectors.
-
-
INSTALL VISOR HOLDER
-
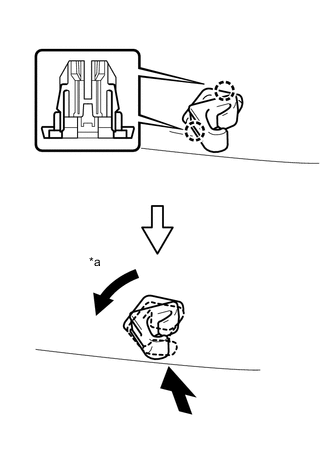
Text in illustration *a 45 degrees Engage the 2 claws and turn the visor holder counterclockwise 45 degrees to install it.
Tech Tips
Use the same procedure for the RH side and LH side.
-
-
INSTALL VISOR ASSEMBLY LH
-
Engage the 2 clips to install the visor assembly LH.
-
Install the visor assembly LH to the visor holder.
-
-
INSTALL VISOR ASSEMBLY RH
Tech Tips
Use the same procedure for the RH side and LH side.
-
INSTALL VISOR BRACKET COVER LH
-
Engage the 4 claws to install the visor bracket cover LH.
-
-
INSTALL VISOR BRACKET COVER RH
Tech Tips
Use the same procedure for the RH side and LH side.
-
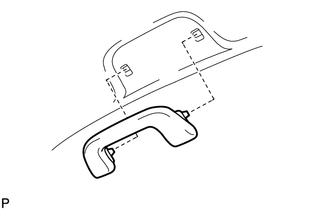
INSTALL INNER REAR VIEW MIRROR ASSEMBLY (w/ EC Mirror)
-
INSTALL INNER REAR VIEW MIRROR STAY HOLDER COVER
-
INSTALL INNER REAR VIEW MIRROR ASSEMBLY (w/o EC Mirror)
-
INSTALL RAIN SENSOR
-
INSTALL NO. 1 ROOM LIGHT ASSEMBLY
-
REMOVE MAP LIGHT ASSEMBLY (except Glass Roof)
-
INSTALL MAP LIGHT ASSEMBLY (for Glass Roof)
-
INSTALL ASSIST GRIP COVER
-

Install the 2 springs and the 2 assist grip covers to the assist grip assembly.
Tech Tips
Use the same procedure for all the assist grip covers.
-
-
INSTALL ASSIST GRIP ASSEMBLY
-
Install the assist grip assembly.
-
Use the same procedures for all the assist grip assembly.
-
-
INSTALL CENTER PILLAR UPPER GARNISH LH
-
Pass the front seat belt through the center upper pillar garnish LH.
-
Engage the clip and the guide, install the center pillar upper garnish LH.
-
Install the bolt.
-
-
INSTALL CENTER PILLAR UPPER GARNISH RH
Tech Tips
Use the same procedure for the RH side and LH side.
-
INSTALL CENTER PILLAR LOWER GARNISH LH
-
Engage the 2 guides to install the center pillar lower garnish LH.
-
Engage the 2 clips and 2 claws.
-
-
INSTALL CENTER PILLAR LOWER GARNISH LH
Tech Tips
Use the same procedure for the RH side and LH side.
-
CONNECT FRONT SEAT OUTER BELT ASSEMBLY LH
-
CONNECT FRONT SEAT OUTER BELT ASSEMBLY RH
Tech Tips
Use the same procedure for the RH side and LH side.
-
INSTALL LAP BELT OUTER ANCHOR COVER
-
INSTALL ROOF SIDE INNER GARNISH LH
-
Pass the rear seat belt through the roof side inner garnish LH.
-
Engage the 8 clips and install the roof side inner garnish LH.
-
-
INSTALL ROOF SIDE INNER GARNISH RH
Tech Tips
Use the same procedure for the RH side and LH side.
-
CONNECT REAR NO. 1 SEAT OUTER BELT ASSEMBLY LH
-
CONNECT REAR NO. 1 SEAT OUTER BELT ASSEMBLY RH
Tech Tips
Use the same procedure for the RH side and LH side.
-
INSTALL REAR SEAT ASSEMBLY
-
INSTALL REAR SEAT SHOULDER BELT HANGER
-
Engage the claw and guide, install the rear seat shoulder belt hanger.
Tech Tips
Use the same procedure for the RH side and LH side.
-
-
INSTALL REAR ABSORBER CAP
-
Engage the 2 guides and 2 claws, install the rear absorber cap.
Tech Tips
Use the same procedure for the RH side and LH side.
-
-
INSTALL REAR POWER OUTLET SOCKET COVER (w/ Power Outlet Socket)
-
INSTALL REAR POWER OUTLET SOCKET ASSEMBLY (w/ Power Outlet Socket)
-
INSTALL DECK TRIM SIDE SERVICE HOLE COVER (w/o Power Outlet Socket)
-
Engage the 2 claws and install the deck trim side service hole cover.
-
-
INSTALL NO. 2 ROOM LIGHT ASSEMBLY
-
INSTALL DECK TRIM SIDE PANEL ASSEMBLY LH
-
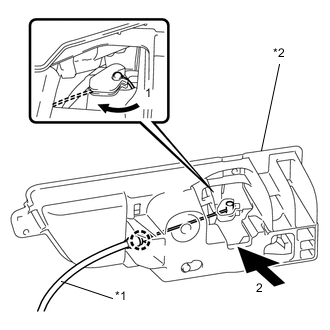
Text in illustration *1 Rear Seat Reclining Control Cable *2 Rear Seat Lock Control Lever Sub-assembly Connect the rear seat reclining control cable to the rear seat lock control lever sub-assembly in the order shown in the illustration.
-
Engage the claw.
-
Install the rear seat reclining control cable clamp.
-
Connect each connector. (for LH Side)
-
Engage the 4 claws and guide to install the deck trim side panel assembly LH.
-
Engage the 4 clips.
-
Install the 3 screws.
-
Engage the cable cap.
-
Install the clip.
-
Install the bolt.
-
-
INSTALL DECK TRIM SIDE PANEL ASSEMBLY RH
Tech Tips
Use the same procedure for the RH side and LH side.
-
INSTALL RECLINING REMOTE CONTROL BEZEL LH
-
Engage the 2 craws and the guide, and install the reclining remote control bezel LH.
-
-
INSTALL RECLINING REMOTE CONTROL BEZEL RH
Tech Tips
Use the same procedure for the RH side and LH side.
-
INSTALL LUGGAGE HOLD BELT STRIKER ASSEMBLY
-
Install the luggage hold belt striker assembly with the bolt.
Tech Tips
Use the same procedure for the RH side and LH side.
-
-
INSTALL DECK SIDE TRIM BOX LH
-
Engage the 2 claws and install the deck side trim box LH.
-
Install the 2 bolts.
-
-
INSTALL DECK SIDE TRIM BOX RH
Tech Tips
Use the same procedure for the RH side and LH side.
-
INSTALL LUGGAGE ROOM BOX SEPARATOR
-
Engage the 2 guides.
-
Install the luggage room box separator with 2 bolts.
-
Engage the 7 clips.
-
-
INSTALL REAR FLOOR REAR MAT
-
Engage the 5 clips and install the rear floor rear mat.
-
-
INSTALL REAR DECK TRIM COVER
-
Engage the 2 guides and install the rear deck trim cover.
-
Engage the 4 clips and 4 claws.
-
-
INSTALL REAR DECK FLOOR BOX (w/ Rear Deck Floor Box)
-
Install the rear deck floor box.
-
-
INSTALL DECK BOARD ASSEMBLY
-
Install the deck board assembly.
-
-
INSTALL BACK DOOR WEATHERSTRIP
-
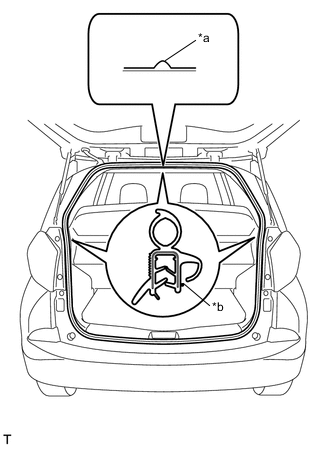
Text in illustration *a Flange Position *b Paint Mark Align the paint mark on the back door weatherstrip with the flange position on the vehicle body and install the weatherstrip.
Paint Mark Part Color Center light blue Side Yellow Note
After installation, check that the corners fit correctly.
-
-
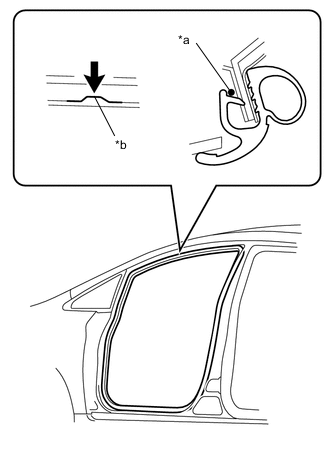
INSTALL REAR DOOR OPENING TRIM WEATHERSTRIP LH
-
Text in illustration *a Paint Mark *b Flange Position Align the paint mark on the rear door opening trim weatherstrip LH with the flange position on the vehicle body and install the weatherstrip.
Paint Mark Part Color LH side light blue RH side Yellow Note
After installation, check that the corners fit correctly.
-
-
INSTALL REAR DOOR OPENING TRIM WEATHERSTRIP RH
Tech Tips
Use the same procedure for the LH side and RH side.
-
INSTALL REAR DOOR SCUFF PLATE LH
-
Engage the guide and 6 claws, and install the rear door scuff plate LH.
-
-
INSTALL REAR DOOR SCUFF PLATE RH
Tech Tips
Use the same procedure for the LH side and RH side.
-
INSTALL FRONT PILLAR GARNISH LH (w/ Curtain Shield Airbag)
-
Remove the adhesive tape and a cloth or nylon sheet.
-
Make sure that the front pillar garnish clip is not damaged.
Note
-
If the front pillar garnish is damaged, replace it with a new one.
-
When using a new clip, attach it to the pillar as shown in the illustration.
-
-
Text in Illustration *1 Protective Tape *a 90 Degrees Engage the guide.
-
Using needle nose pliers, turn the front pillar garnish clip 90 degrees to attach it to the front pillar garnish.
-
Engage the clip and the front pillar garnish clip RH to install the front pillar garnish.
-
-
INSTALL FRONT PILLAR GARNISH RH (w/ Curtain Shield Airbag)
Tech Tips
Use the same procedure for the LH side and RH side.
-
INSTALL FRONT PILLAR GARNISH LH (w/o Curtain Shield Airbag)
-
Engage the guide and 2 clips, and install the front pillar garnish RH.
-
-
INSTALL FRONT PILLAR GARNISH RH (w/o Curtain Shield Airbag)
Tech Tips
Use the same procedures for the LH and RH side.
-
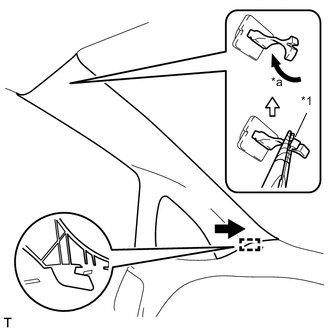
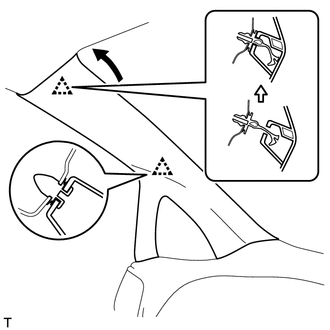
INSTALL FRONT PILLAR GARNISH CORNER PIECE LH
-
Engage the 5 claws and 2 guides, and install the front pillar garnish corner piece LH.
-
-
INSTALL FRONT PILLAR GARNISH CORNER PIECE RH
Tech Tips
Use the same procedures for the LH and RH side.
-
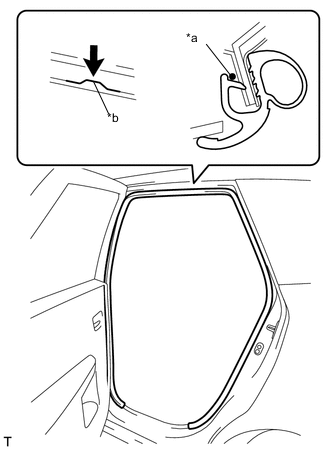
INSTALL FRONT DOOR OPENING TRIM WEATHERSTRIP LH
-
Text in Illustration *a Paint Mark *b Flange Position Align the paint mark on the front door opening trim weatherstrip with the flange position on the vehicle body and install the weatherstrip.
Paint Mark Part Color LH side Orange Yellow RH side White CAUTION:
After installation, check that the corners fit correctly.
-
-
INSTALL FRONT DOOR OPENING TRIM WEATHERSTRIP RH
Tech Tips
Use the same procedures for the LH and RH side.
-
INSTALL COWL SIDE TRIM BOARD LH
-
Engage the claw and install the cowl side trim board LH.
-
Install the clip.
-
-
INSTALL COWL SIDE TRIM BOARD RH
Tech Tips
Use the same procedures for the LH and RH side.
-
INSTALL FRONT DOOR SCUFF PLATE LH
-
Engage the 9 claws and install the front door scuff plate LH.
-
-
INSTALL FRONT DOOR SCUFF PLATE RH
Tech Tips
Use the same procedure for the LH side and RH side.
-
CONNECT CABLE TO NEGATIVE BATTERY TERMINAL
- Torque:
- 5.5 N*m { 56 kgf*cm, 49 in.*lbf }
Note
When disconnecting the cable, some systems need to be initialized after the cable is reconnected Click here.
-
INSPECT SRS WARNING LIGHT