ROOF WINDOW FIX GLASS INSTALLATION
PROCEDURE
-
CLEAN ROOF WINDOW GLASS SUB-ASSEMBLY
-
Using a scraper, remove the adhesive sticking to the roof window glass.
Note
Be careful not to damage the roof window glass.
-
Clean the outer circumference of the roof window glass with a non-residue solvent.
Note
Do not touch the roof window glass surface after cleaning it.
-
-
INSTALL NO. 1 ROOF WINDOW GLASS SUB-ASSEMBLY
-
Clean and shape the contact surfaces of the vehicle body.
-
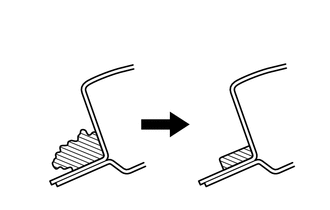
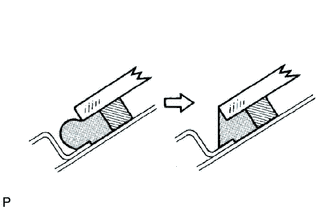
Using a knife, cut away excess adhesive on the contact surfaces of the vehicle body, as shown in the illustration.
Text in illustration 
Adhesive Note
Leave as much adhesive on the vehicle body as possible.
-
Clean the contact surfaces of the vehicle body with a piece of cloth saturated with cleaner.
-
-
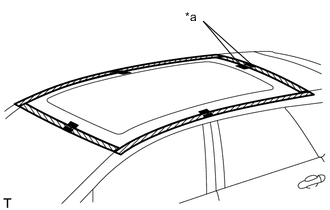
Text in illustration *a Matchmark Position the roof window glass.
-
Using suction cups, place the roof window glass in the correct position.
-
Check that the whole contact surface of the roof window glass rim is perfectly even.
-
Align the matchmarks on the roof window glass and vehicle body.
Note
Check that the roof window glass stoppers are attached to the vehicle body correctly.
-
Remove the windshield glass.
-
Using a brush, coat the installation surface on the vehicle body with primer.
Note
-
Do not coat the adhesive with primer.
-
Do not apply too much primer.
-
Allow the primer to dry for 3 minutes or more.
-
Throw away any leftover primer.
-
-
Using a brush, coat the application area of adhesive with primer.
Note
Do not apply too much primer.
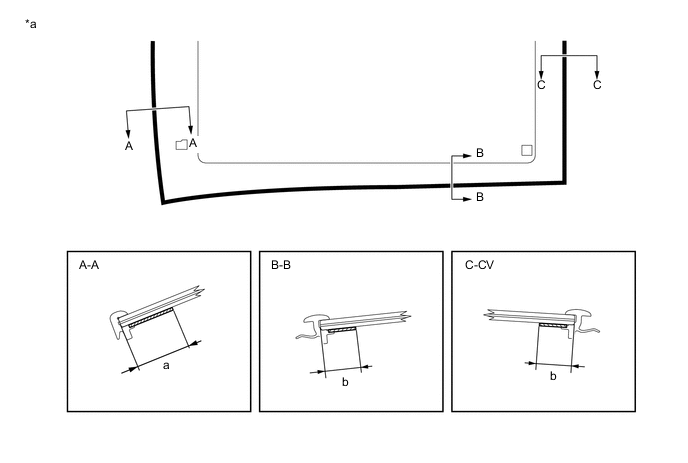
Text in illustration *a Back Side - - Primer - - Standard Dimension: Area Dimension a 23.7 mm (0.933 in.) b 15.5 mm (0.610 in.) -
Cut off the tip of the cartridge nozzle as shown in the illustration.
-
Load the sealant gun with cartridge.
-
Apply adhesive to the windshield glass, as shown in the illustration.
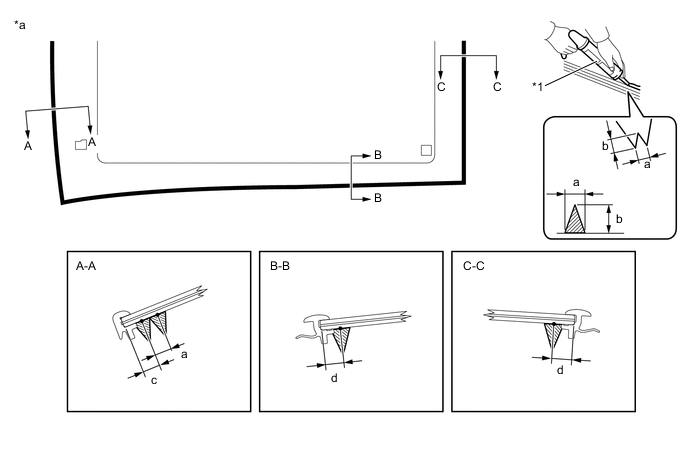
Text in illustration *1 Sealant Gun - - *a Back Side - - Adhesive - - Standard Dimension: Area Dimension a 8.0mm (0.315 in.) b 12.0mm (0.472 in.) c 8.7mm (0.342 in.) d 8.5mm (0.334 in.)
-
-
Install the roof window glass sub-assembly.
-
Using suction cups, position the roof window glass sub-assembly so that the matchmarks are aligned, and install it.
Text in illustration *a Matchmark Note
-
Check that the roof window glass sub-assembly stoppers are attached to the vehicle body correctly.
-
Check the clearance between the vehicle body and roof window glass sub-assembly.
-
-
Lightly press the front surface of the roof window glass sub-assembly to ensure that the roof window glass is securely fit to the vehicle body.
Tech Tips
Press the glass with a force of 98 N (10 kgf, 22 lbf) or more.
-
Using a scraper, remove any excess or protruding adhesive.
Text in illustration 
Adhesive Note
Apply adhesive onto the roof window glass rim.
-
Using a scraper, remove any excess or protruding adhesive.
-
Hold the roof window glass using protective tape until applied adhesive becomes hard.
-
-
-
INSPECT FOR LEAK AND REPAIR
-
After the adhesive has hardened, apply water from the outside of the vehicle. Check that no water leaks into the cabin.
-
If water leaks into the cabin, allow the water to dry and add adhesive.
-
Remove the protective tape.
-
-
INSTALL ROOF DRIP SIDE FINISH MOULDING
-
INSTALL SLIDING ROOF HOUSING SUB-ASSEMBLY
-
CONNECT CABLE TO NEGATIVE BATTERY TERMINAL
- Torque:
- 5.4 N*m { 55 kgf*cm, 48 in.*lbf }
Note
When disconnecting the cable, some systems need to be initialized after the cable is reconnected Click here.
-
INSPECT SRS WARNING LIGHT