HEATER ASSEMBLY INSTALLATION
PROCEDURE
-
INSTALL HEATER AND ACCESSORY ASSEMBLY
-
Set the heater and accessory assembly into the vehicle.
-
Install the heater and accessory assembly with the 4 nuts.
- Torque:
- 9.8 N*m { 100 kgf*cm, 87 in.*lbf }
-
-
CONNECT ENGINE ROOM MAIN WIRE
-
Engage the 2 clamps and connect the engine room main wire.
-
-
INSTALL ECM
-
INSTALL BOOSTER VACUUM TUBE
-
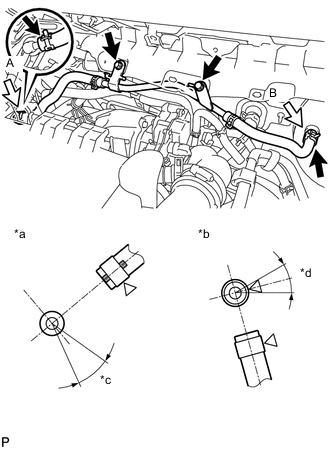
Text in Illustration *a View A *b View B *c 30° *d 30° Install the booster vacuum tube with the 2 bolts.
- Torque:
- 8.3 N*m { 85 kgf*cm, 73 in.*lbf }
-
Connect the 2 hoses onto the vacuum pump and brake booster.
Tech Tips
Perform the installation with the hose clip and mark at the correct angle.
-
-
INSTALL HEATER WATER INLET HOSE B
-
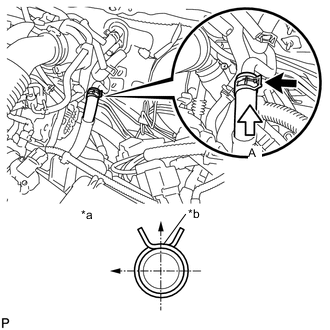
Text in Illustration *a View A *b White Painted Mark Install the heater water inlet hose B onto the water pipe.
Tech Tips
Perform the installation with the hose clip and mark at the correct angle.
-
-
INSTALL HEATER WATER INLET HOSE
-
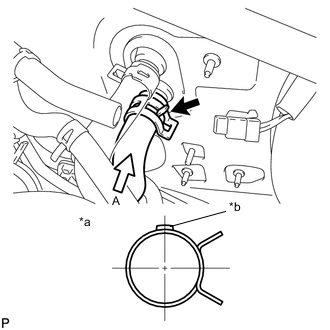
Text in Illustration *a View A *b White Painted Mark Install the heater water inlet hose onto the air conditioning unit.
Tech Tips
Perform the installation with the hose clip and mark at the correct angle.
-
-
CONNECT LIQUID TUBE SUB-ASSEMBLY
-
CONNECT SUCTION TUBE SUB-ASSEMBLY B
-
INSTALL TURBOCHARGER SUB-ASSEMBLY
-
INSTALL EXHAUST PIPE SUB-ASSEMBLY
-
ADD ENGINE COOLANT
-
CHARGE REFRIGERANT
-
INSPECT FOR COOLANT LEAK
-
INSPECT FOR FUEL LEAK
-
BLEED AIR FROM FUEL SYSTEM
-
WARM UP ENGINE
-
INSPECT FOR REFRIGERANT LEAK