REAR CENTER SEAT OUTER BELT ASSEMBLY(for 3 Point Type Rear Center Seat Belt) INSTALLATION
PROCEDURE
-
INSTALL REAR SEAT 3 POINT TYPE BELT ASSEMBLY RH
-
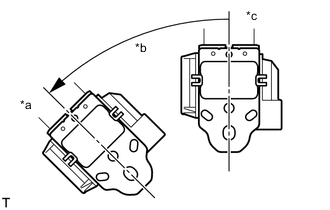
Text in Illustration *a Unlock *b 45° *c Lock Check the angle of inclination required to lock the retractor.
-
Gently incline the retractor from its initial position. Check that the belt does not lock when the retractor is inclined 15° or less in any direction. Also, check that the belt locks when the inclination of the retractor is 45° or more.
Note
Do not disassemble the retractor.
If the operation is not as specified, replace the rear No. 1 outer seat belt.
-
-
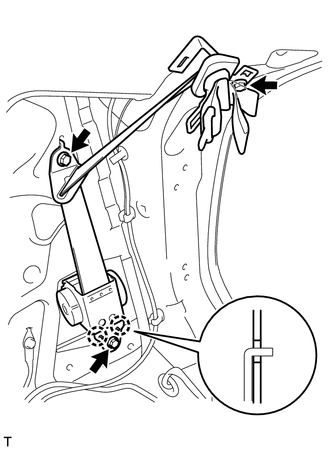
Hook the lower stay of the retractor onto the 2 body hooks and install the retractor with the bolt.
- Torque:
- 42 N*m { 428 kgf*cm, 31 ft.*lbf }
-
Install the 2 through anchor with the 2 bolt.
- Torque:
- 42 N*m { 428 kgf*cm, 31 ft.*lbf }
-
-
INSTALL ROOF SIDE INNER GARNISH RH
Tech Tips
Use the same procedure for the roof side inner garnish LH Click here.
-
INSTALL SHOULDER BELT ANCHOR COVER RH
-
Engage the 3 clips and 2 claws, install the shoulder belt anchor cover RH.
-
-
CONNECT REAR NO. 1 SEAT OUTER BELT ASSEMBLY RH
Tech Tips
Use the same procedure for the rear No. 1 seat outer belt assembly LH Click here.
-
INSTALL REAR SEAT ASSEMBLY RH
-
INSTALL NO. 2 SEAT LEG COVER
Tech Tips
Use the same procedure for the No. 2 seat leg cover (for LH Side) Click here.
-
INSTALL DECK TRIM SIDE PANEL ASSEMBLY RH
Tech Tips
Use the same procedure for the deck trim side panel assembly LH Click here.
-
INSTALL LUGGAGE HOLD BELT STRIKER ASSEMBLY
-
INSTALL RECLINING REMOTE CONTROL BEZEL RH
Tech Tips
Use the same procedure for the reclining remote control bezel LH Click here.
-
INSTALL DECK SIDE TRIM BOX RH (w/o Rear Deck Floor Box)
Tech Tips
Use the same procedure for the deck side trim box LH Click here.
-
INSTALL LUGGAGE ROOM BOX SEPARATOR
-
INSTALL REAR FLOOR REAR MAT (w/o Rear Deck Floor Box)
-
INSTALL REAR DECK TRIM COVER
-
INSTALL BACK DOOR WEATHERSTRIP
-
INSTALL DECK BOARD ASSEMBLY
-
INSTALL REAR DOOR OPENING TRIM WEATHERSTRIP RH
Tech Tips
Use the same procedure for the rear door opening trim weatherstrip LH Click here.
-
INSTALL REAR DOOR SCUFF PLATE RH
Tech Tips
Use the same procedure for the rear door scuff plate LH Click here.