FRONT DOOR LOCK INSTALLATION
CAUTION / NOTICE / HINT
Tech Tips
-
Use the same procedure for RHD and LHD vehicles.
-
The procedure listed below is for LHD vehicles.
PROCEDURE
-
INSTALL FRONT DOOR INSIDE LOCKING CABLE ASSEMBLY
-
Install the front door inside locking cable assembly to the front door lock assembly.
-
-
INSTALL FRONT DOOR LOCK REMOTE CONTROL CABLE ASSEMBLY
-
Install the front door lock remote control cable assembly to the front door lock assembly.
-
Engage the 7 claws.
-
-
INSTALL FRONT DOOR LOCK ASSEMBLY
Note
-
If reusing the front door lock assembly that has been removed, replace the door lock wire harness seal with a new seal.
-
Make sure that no grease or dirt adheres to the door lock wire harness seal surface.
-
Reusing the door lock wire harness seal or using a damaged door lock wire harness seal may cause water intrusion to the connection. This may result in a malfunction of the front door lock assembly.
-
Apply MP grease to the sliding parts of the front door lock assembly.
-
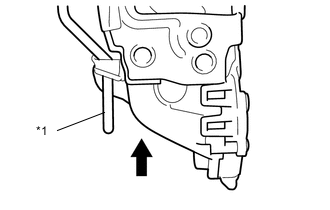
Text in Illustration *1 Front Door Lock Open Rod 
Slide Direction Insert the front door lock open rod to the front door lock assembly.
-
Make sure that the front door lock open rod is securely connected to the front door lock assembly.
-
Apply adhesive to the threads of the screws.
Adhesive Toyota Genuine Adhesive 1324, Three Bond 1324 or the equivalent. -
Using a "TORX" socket wrench T30, install the front door lock assembly with the 3 screws.
- Torque:
- 5.0 N*m { 51 kgf*cm, 44 in.*lbf }
-
-
INSTALL FRONT DOOR LOCK CYLINDER ASSEMBLY (for Driver Side)
-
Temporarily install the front door lock cylinder assembly.
Note
Check the engaging the front door lock cylinder assembly to the front door lock assembly.
-
Using a "TORX" socket wrench T30, install the front door lock cylinder assembly with the screw.
-
-
INSTALL HOLE PLUG
-
INSTALL FRONT DOOR REAR LOWER FRAME SUB-ASSEMBLY
-
INSTALL FRONT DOOR GLASS RUN
-
INSTALL FRONT DOOR GLASS SUB-ASSEMBLY
-
INSTALL FRONT DOOR SERVICE HOLE COVER
-
INSTALL FRONT DOOR TRIM BOARD SUB-ASSEMBLY
-
INSTALL FRONT UPPER ARMREST BASE PANEL LH (for Driver Side)
-
INSTALL FRONT UPPER ARMREST BASE PANEL RH (for Front Passenger Side)
Tech Tips
Use the same procedure described for the LH side Click here.