REAR AXLE BEAM INSTALLATION
PROCEDURE
-
TEMPORARILY TIGHTEN REAR AXLE BEAM ASSEMBLY
-
Support the rear axle beam with an engine lift.
-
Install the rear axle beam onto the vehicle and provisionally tighten the 2 bolts.
-
-
INSTALL REAR COIL SPRING LH
-
INSTALL REAR COIL SPRING RH
Tech Tips
Use the same procedure for the RH side as for the LH side.
-
TEMPORARILY TIGHTEN REAR SHOCK ABSORBER ASSEMBLY LH
-
TEMPORARILY TIGHTEN REAR SHOCK ABSORBER ASSEMBLY RH
Tech Tips
Use the same procedure for the RH side as for the LH side.
-
INSTALL REAR AXLE HUB AND BEARING ASSEMBLY (for Rear Drum Brake)
-
INSTALL REAR AXLE HUB AND BEARING ASSEMBLY (for Rear Disc Brake)
-
INSPECT REAR AXLE HUB BEARING BACKLASH (for Rear Drum Brake)
-
INSPECT REAR AXLE HUB BEARING BACKLASH (for Rear Disc Brake)
-
INSPECT REAR AXLE HUB RUNOUT (for Rear Drum Brake)
-
INSPECT REAR AXLE HUB RUNOUT (for Rear Disc Brake)
-
INSTALL REAR BRAKE DRUM SUB-ASSEMBLY (for Rear Drum Brake)
-
INSTALL REAR DISC (for Rear Disc Brake)
-
INSTALL REAR DISC BRAKE CYLINDER MOUNTING LH (for Rear Disc Brake)
-
INSTALL REAR DISC BRAKE CYLINDER MOUNTING RH (for Rear Disc Brake)
Tech Tips
Use the same procedure for the RH side as for the LH side.
-
INSTALL REAR DISC BRAKE PAD KIT (for Rear Disc Brake)
-
INSTALL REAR DISC BRAKE CYLINDER ASSEMBLY LH (for Rear Disc Brake)
-
Install the rear disc brake cylinder assembly LH with the 2 bolts.
- Torque:
- 34 N*m { 350 kgf*cm, 25 ft.*lbf }
-
-
INSTALL REAR DISC BRAKE CYLINDER ASSEMBLY RH (for Rear Disc Brake)
Tech Tips
Use the same procedure for the RH side as for the LH side.
-
INSTALL NO. 3 PARKING BRAKE CABLE ASSEMBLY
-
Install the parking brake cable with the bolt and clamp.
- Torque:
- 6.0 N*m { 61 kgf*cm, 53 in.*lbf }
-
-
INSTALL NO. 2 PARKING BRAKE CABLE ASSEMBLY
Tech Tips
Use the same procedure for the RH side as for the LH side.
-
INSTALL NO. 4 REAR BRAKE TUBE (for Rear Drum Brake)
-
Install the brake tube onto the rear axle beam with the nut.
- Torque:
- 5.0 N*m { 51 kgf*cm, 48 in.*lbf }
-
Connect the flexible hose to the axle beam with a new clip.
-
Using a union nut wrench, install the brake tube onto the flexible hose.
- Torque:
- 15 N*m { 155 kgf*cm, 11 ft.*lbf }
Note
Use the formula to calculate special torque values for situations where a union nut wrench is combined with a torque wrench Click here.
-
-
INSTALL NO. 3 REAR BRAKE TUBE (for Rear Drum Brake)
Tech Tips
Use the same procedure for the RH side as for the LH side.
-
INSTALL NO. 4 REAR BRAKE TUBE (for Rear Disc Brake)
-
Install the brake tube onto the rear axle beam with the nut.
- Torque:
- 5.0 N*m { 51 kgf*cm, 48 in.*lbf }
-
Connect the 2 flexible hoses to the axle beam with a 2 new clips.
-
Using a union nut wrench, install the brake tube onto the flexible hose.
- Torque:
- 15 N*m { 155 kgf*cm, 11 ft.*lbf }
Note
Use the formula to calculate special torque values for situations where a union nut wrench is combined with a torque wrench Click here.
-
-
INSTALL NO. 3 REAR BRAKE TUBE (for Rear Disc Brake)
Tech Tips
Use the same procedure for the RH side as for the LH side.
-
INSTALL SKID CONTROL SENSOR WIRE
-
INSTALL REAR WHEEL
- Torque:
- 103 N*m { 1050 kgf*cm, 76 ft.*lbf }
-
STABILIZE SUSPENSION
-
FULLY TIGHTEN REAR AXLE BEAM ASSEMBLY
-
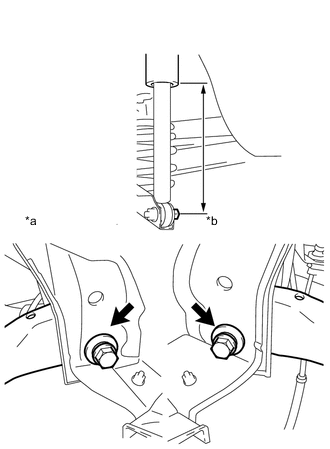
Text in Illustration *a RH Side *b LH Side Suspend the jack on the rear axle spring seat and adjust the length of the shock absorber to the reference value.
Length of shock absorber 220 mm (8.7 in.) -
Fully tighten the 2 bolts.
- Torque:
- 90 N*m { 918 kgf*cm, 66 ft.*lbf }
-
-
FULLY TIGHTEN REAR SHOCK ABSORBER ASSEMBLY
-
FILL RESERVOIR WITH BRAKE FLUID
-
BLEED CLUTCH LINE (for Manual Transmission)
-
for 1NR-FE Click here
-
for 1ND-TV Click here
-
-
BLEED CLUTCH LINE (for Multi-Mode Manual Transaxle)
(See page CLUTCH > CLUTCH SYSTEM (for EC65A) > BLEEDING > BLEED CLUTCH LINE)
-
BLEED BRAKE MASTER CYLINDER SUB-ASSEMBLY
-
BLEED BRAKE LINE
-
BLEED BRAKE ACTUATOR ASSEMBLY (w/ VSC)
-
INSPECT FOR BRAKE FLUID LEAK
-
INSPECT FLUID LEVEL
-
INSPECT REAR WHEEL ALIGNMENT
-
CHECK SPEED SENSOR SIGNAL
-
w/o VSC Click here
-
w/ VSC Click here
-