MULTI-MODE MANUAL TRANSAXLE SYSTEM INITIALIZATION
Note
When Learning of Multi-mode Manual Transaxle System is performed, the clutch disc assembly and clutch cover assembly have to be replaced as a set.
Tech Tips
-
The learning values and the DTC history of the multi-mode manual transaxle system are stored in the EEPROM in the TCM. The stored information is not cleared even when the negative terminal of the battery is disconnected. To clear all the stored information, initialize the TCM.
-
If initialization cannot be performed normally, there may be a malfunction in the shift lever position sensor, NE signals, or CAN communication.
-
If clutch fluid line parts are installed, bleed the air from the lines before performing initialization Click here.
-
When replacing the following parts, proceed with the operation in the order listed in the table below.
Part Installed Operation Order See Procedure
-
Transaxle assembly
-
Transaxle parts (inside gear box)
-
TCM
1. Initialization of Multi-Mode Manual Transaxle System
[Initialization of ECU]
See below 2. Learning of Multi-Mode Manual Transaxle System See below 3. Synchronization Position Calibration
-
Shift and select actuator
-
Shift stroke sensor
-
Select stroke sensor
1. Initialization of Multi-Mode Manual Transaxle System
[Initialization of transmission]
See below 2. Learning of Multi-Mode Manual Transaxle System See below 3. Synchronization Position Calibration
-
Clutch actuator
-
Clutch stroke sensor
-
Clutch disc and clutch cover
-
Clutch release with bearing cylinder assembly
-
Flywheel
-
Crankshaft
1. Initialization of Multi-Mode Manual Transaxle System
[Initialization of clutch]
See below 2. Learning of Multi-Mode Manual Transaxle System See below -
Note
Do not clear (initialize) parts other than those specified in the "Part Installed" column in the table above.
-
INITIALIZATION AND LEARNING (Using Intelligent Tester)
Tech Tips
-
By using the intelligent tester, initialization and learning of the multi-mode manual transaxle system can be performed sequentially. Under manual operation (not using intelligent tester), initialization and learning must be performed individually.
-
Perform the procedure below to ensure that the initialized TCM stores the adjusted clutch position (stopper position, clamp position, and standby position) or gear position (shift position and select position).
-
Prepare the vehicle [*1]:
-
Stop the vehicle
-
Move the shift lever to N.
-
Turn the ignition switch off.
-
-
Connect the intelligent tester to the DLC3.
-
Turn the ignition switch to ON.
-
Turn the tester on.
-
Enter the following menus: Powertrain / Multi-Mode M/T / Utility / Initialization.
-
Press the Next key.
-
Read the information.
-
After checking the vehicle condition, press the Next key.
-
Select the appropriate operation [*2].
Operation Removed or Replaced Parts condition Initialization of ECU: When removing and installing the transaxle assembly and TCM.
(This initializes learned values of both the clutch and transaxle.)
Initialization of transmission: When removing and installing parts related to the shift and select operation of the transaxle assembly. Initialization of clutch: When removing and installing the following parts related to the clutch system.
Clutch actuator, clutch stroke sensor, clutch disc and clutch cover, clutch release with bearing cylinder assembly, flywheel.
-
Press the Next key.
-
Read the information.
-
Press the Next key after turning the ignition switch off.
-
Wait 20 seconds.
Tech Tips
Count down the seconds from 20 to 0.
-
Read the information.
-
Press the Next key after turning the ignition switch to ON.
-
Wait 50 seconds [*3].
Tech Tips
Count down the seconds from 50 to 0.
-
Press the Exit key [*4].
-
Turn the intelligent tester off and turn the ignition switch off.
-
Wait at least 15 seconds.
-
Turn the ignition switch to ON.
-
Depress the brake pedal with the shift lever is in N.
-
Start the engine and wait at least 10 seconds.
Tech Tips
The shift N position indicator blinks when the engine starts.
-
Shift the gear from neutral to any other position.
-
This completes the Initialization and Learning process.
Tech Tips
-
When [Initialization of transmission] was selected at step [*2], add the following step between steps [*3] and [*4].
Additional step: [*4'] Wait at least 30 seconds.
-
If the Initialization and Learning operations fail, perform the operations again from step [*1] more than 15 seconds after turning the ignition switch off.
-
Perform Synchronization Position Calibration after performing Initialization of transmission or Initialization of ECU.
-
When the gear is shifted from neutral to any other position at the last step, the TCM learns the standby point. At this time, the value of Learn-Clutch Standby Point in the Data List changes from [Notexec] to [Exec].
-
-
-
INITIALIZATION (Without using Intelligent Tester)
Tech Tips
-
If the initialization of the multi-mode manual transaxle system fails, perform the operation again from step [*1'] 15 seconds or more after turning the ignition switch off.
-
Prepare the vehicle [*1']:
-
Stop the vehicle.
-
Move the shift lever to N.
-
Turn the ignition switch off.
-
-
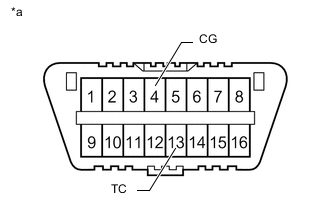
Text In Illustration *a Front view of DLC3 Using SST, connect terminals TC and CG of the DLC3.
- SST
- 09843-18040
-
Wait at least 10 seconds.
-
Turn the ignition switch to ON.
-

Depress the brake pedal at least 7 times within 3 seconds.
-
The buzzer sounds twice with an interval of 0.25 seconds.
-
-
Depress the brake pedal.
-
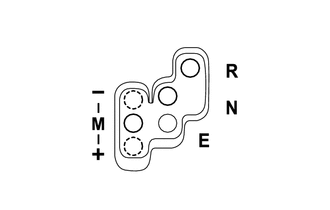
Move the shift lever the sequence shown in the table below.
Initializing Shift Sequence Operation Order Result Shift Sequence Initialization of the ECU N → E → M → - → M → - → M → - → M → - → M → E → N Initialization of the clutch N → E → M → + → M → - → M → + → M → - → M → E → N Initialization of the transmission N → E → M → - → M → - → M → + → M → + → M → E → N -
Release the brake pedal.
-
Depress the brake pedal once.
-
The buzzer sounds at intervals of 0.5 seconds as follows (there is an interval of 2.5 seconds between each cycle).
-
Twice when initializing the ECU (one cycle)
-
Three times when initializing the clutch (one cycle)
-
Four times when initializing the transmission (one cycle)
Tech Tips
-
If the buzzer does not sound as specified, wait at least 15 seconds after turning the ignition switch off. Then perform the procedure from step [*1'] again.
-
If the buzzer sounds at intervals of 1 second (not at intervals of 0.5 seconds), wait at least 15 seconds after turning the ignition switch off. Then perform the procedure from step [*1'] again.
-
-
-
Depress the brake pedal 3 times or more within 2 seconds.
-
The buzzer sounds twice with an interval of 0.25 seconds.
-
-
Turn the ignition switch off and wait at least 15 seconds.
-
The initialization is complete.
-
Disconnect the SST from terminals TC and CG of the DLC3.
-
-
LEARNING (Without using Intelligent Tester)
Tech Tips
-
Perform the procedure below to ensure that the initialized TCM stores the adjusted clutch position or gear position.
-
If the learning of the multi-mode manual transaxle system fails, perform the operation again from step [*1'] Initialization more than 15 seconds after turning the ignition switch off.
-
Prepare the vehicle:
-
Stop the vehicle.
-
Move the shift lever to N.
-
Turn the ignition switch off.
-
-
Turn the ignition switch to ON.
-
Wait at least 50 seconds.
-
Turn the ignition switch off.
-
Wait at least 15 seconds.
-
Turn the ignition switch to ON.
-
Start the engine under the following conditions:
-
Make sure that the shift lever is in N.
-
Brake pedal is depressed.
Tech Tips
The shift position N indicator blinks when the engine starts.
-
-
Wait at least 10 seconds.
-
Check that the shift position N indicator turns on continuously (stops blinking).
-
The learning is complete.
-