CLUTCH SYSTEM(for EC65A) BLEEDING

CAUTION / NOTICE / HINT
Note
Wash off clutch fluid immediately if it comes in contact with any painted surface.
Tech Tips
-
If any work is performed on the clutch system or if air in the clutch lines is suspected, bleed air from the clutch hydraulic system.
-
In case of clutch fluid replacement, make sure that the old fluid is replaced in the clutch line between the reservoir and the bleeder before bleeding.
PROCEDURE
-
REMOVE AIR CLEANER CAP SUB-ASSEMBLY
-
REMOVE AIR CLEANER FILTER ELEMENT SUB-ASSEMBLY
-
REMOVE AIR CLEANER CASE SUB-ASSEMBLY
-
FILL CLUTCH ACTUATOR RESERVOIR WITH BRAKE FLUID
-

Text in Illustration *a Full Level Add the brake fluid into the reservoir.
Fluid SAE J1704 or FMVSS No. 116 DOT4
-
-
BLEED CLUTCH LINE

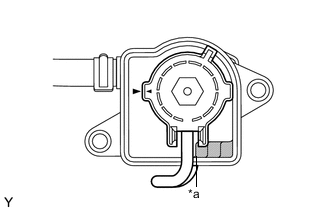
Text in Illustration *1 Release Cylinder Bleeder Plug Cap *2 Release Cylinder Bleeder Plug Tech Tips
In case of clutch fluid replacement, make sure that the old fluid is replaced in the clutch line between the reservoir and the bleeder before bleeding.
-
Remove the release cylinder bleeder plug cap.
-
Connect a vinyl tube to the release cylinder bleeder plug.
-
When using the intelligent tester:
-
Connect the intelligent tester to the DLC3.
-
Turn the ignition switch to ON.
-
Turn the tester ON
-
Enter the following menus: Help / Sub system/Utility / Air Bleeding.
-
According to the display on the tester, perform the Air Bleeding.
-
Enter the following menus: Powertrain / Multi-Mode M/T / Active Test / Target Clutch Control.
-
Repeatedly select clamp position and standby position 10 times to check for play in the clutch release with bearing cylinder assembly.
-
-
Tighten the release cylinder bleeder plug.
- Torque:
- 8.4 N*m { 86 kgf*cm, 74 in.*lbf }
-
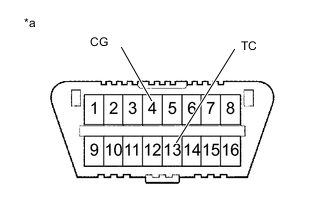
Text in Illustration *a Front View of DLC3 When not using the intelligent tester:
-
Using SST, connect terminals 13 (TC) and 4 (CG) of the DLC3.
- SST
- 09843-18040
-
Ignition switch ON.
-
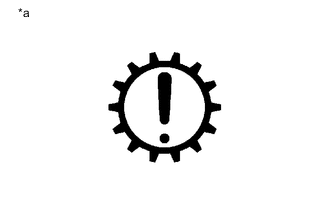
Text in Illustration *a Multi-mode Manual Transaxle Warning Light Multi-mode manual transaxle warning light is blinking.
-
Depress the brake pedal 7 times or more within 3 seconds.
-
Wait until the buzzer sounds twice.
-
Depress the brake pedal.
-
Move the shift lever to M while depressing the brake pedal.
-
Release the brake pedal.
-
Move the shift lever in the following order:
+, M, +, M, +, M, and -
-
Move the shift lever to N.
-
Depress the brake pedal.
-
Wait until the buzzer sounds 6 times (1 cycle).
-
Depress the brake pedal 3 times or more within 2 seconds.
-
Wait until the buzzer sounds twice.
-
Move the shift lever to - (*1).
-
Move the shift lever to M, and then wait for 10 seconds or more (*2).
Tech Tips
The wait time must be 10 seconds or more after the first shift, but can be as short as 0.5 seconds for subsequent shifts.
-
Move the shift lever to + (*3).
-
After moving the shift lever to M, and the wait for 10 seconds or more (*4).
-
Check that the brake fluid flows from the release cylinder bleeder plug. If brake fluid does not flow, repeat (*1), (*2), (*3), and (*4) as a set.
-
Temporarily tighten the release cylinder bleeder plug (*5).
-
Move the shift lever to - (*6)
-
Move the shift lever to M, and then wait for 0.5 seconds or more (*7).
-
Move the shift lever to + (*8).
-
Move the shift lever to M, and then wait for 0.5 seconds or more (*9).
-
Open the release cylinder bleeder plug (*10).
-
Repeat (*5), (*6), (*7), (*8), (*9), and (*10) as a set 15 times.
-
Check that the air bubbles do not come out of the release cylinder bleeder plug. If air bubbles do come out, repeat (*5), (*6), (*7), (*8), (*9), and (*10).
-
Tighten the release cylinder bleeder plug.
- Torque:
- 8.4 N*m { 86 kgf*cm, 74 in.*lbf }
-
Move the shift lever in the following order and repeat it 10 times.
-
Move the shift lever to -.
-
Move the shift lever to M, and then wait for 0.5 seconds or more.
-
Move the shift lever to N.
-
Ignition switch off.
-
Wait for 20 seconds or more.
Note
This wait time is critical for the multi-mode manual transaxle ECU to shut down.
-
Remove SST from the DLC3.
-
-
Install the release cylinder bleeder plug cap.
-
Check that all the air has been bled from the clutch line.
-
-
INSPECT BRAKE FLUID LEVEL IN RESERVOIR
-
Text in Illustration *a Full Level Check the fluid level and add fluid if necessary.
Fluid SAE J1704 or FMVSS No. 116 DOT4
-
-
INSTALL AIR CLEANER CASE SUB-ASSEMBLY
-
INSTALL AIR CLEANER FILTER ELEMENT SUB-ASSEMBLY
-
INSTALL AIR CLEANER CAP SUB-ASSEMBLY