OIL PUMP ASSEMBLY INSTALLATION
PROCEDURE
-
INSTALL CHECK VALVE
-
Apply Toyota Genuine CVT fluid TC to a new O-ring.
-
Install the O-ring to the check valve.
Note
Be careful not to damage or twist the O-ring.
-
Inspect check valve Click here.
-
Apply Toyota Genuine CVT fluid TC to the check valve.
-
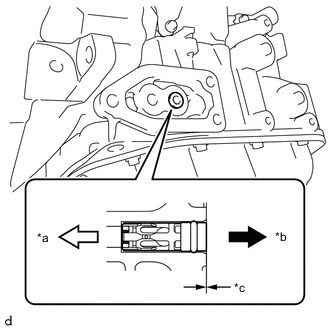
Text in Illustration *a Continuously Variable Transaxle Assembly Side *b Oil Pump with Motor Assembly Side *c 0 mm (0 in.) Install the check valve to the continuously variable transaxle assembly as shown in the illustration.
Note
Make sure that the check valve is installed in the correct direction.
-
-
INSTALL OIL PUMP WITH MOTOR ASSEMBLY
-
Clean and degrease the continuously variable transaxle assembly and oil pump with motor assembly.
Note
-
Do not allow CVT fluid to adhere to the contact surfaces of the continuously variable transaxle assembly and oil pump with motor assembly.
-
Do not allow foreign matter to enter the continuously variable transaxle assembly.
-
When wiping off the CVT fluid with a piece of cloth, make sure that there is no foreign matter adhering to the continuously variable transaxle assembly.
-
-
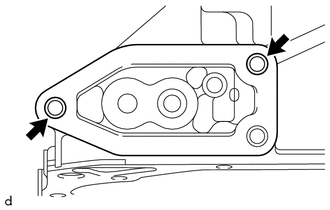
Install the 2 stud bolts to the continuously variable transaxle assembly as shown in the illustration.
Note
Make sure that there is no foreign matter adhering to the stud bolts.
Tech Tips
Part Name Part No. Stud bolt 92122-80825 This procedure is necessary to precisely position the oil pump with motor assembly.
-
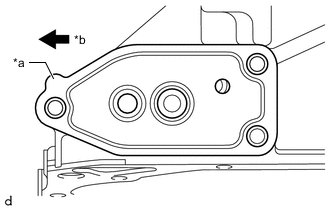
Text in Illustration *a Protrusion *b Right Side of the Vehicle Install a new gasket to the continuously variable transaxle assembly.
Note
-
Install the gasket so that the protrusion faces the right side of the vehicle.
-
Do not damage the gasket.
-
Make sure that there is no foreign matter and CVT fluid adhering to the gasket.
-
-
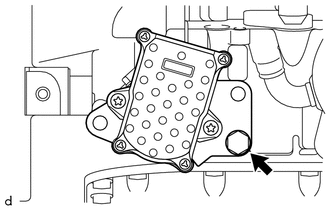
Install the oil pump with motor assembly to the continuously variable transaxle assembly with the bolt shown in the illustration.
- Torque:
- 21 N*m { 214 kgf*cm, 15 ft.*lbf }
Note
-
When reusing the bolts, Clean the threaded part.
-
Make sure that there is no foreign matter adhering to the bolts.
-
Do not use an impact wrench.
-
Avoid physical shock to the oil pump with motor assembly.
-
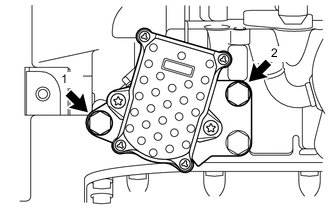
Remove the 2 stud bolts, and then install the 2 bolts in the order shown in the illustration.
- Torque:
- 21 N*m { 214 kgf*cm, 15 ft.*lbf }
-
Connect the connector.
-
-
ADD CONTINUOUSLY VARIABLE TRANSAXLE FLUID
-
BLEED OIL PUMP WITH MOTOR ASSEMBLY
-
INSPECT FLUID LEAK
-
INSTALL ENGINE UNDER COVER LH