SLIDING ROOF HOUSING INSTALLATION
-
INSTALL SLIDING ROOF HOUSING ASSEMBLY
-
Install the sliding roof housing sub-assembly with the 8 bolts and 8 nuts.
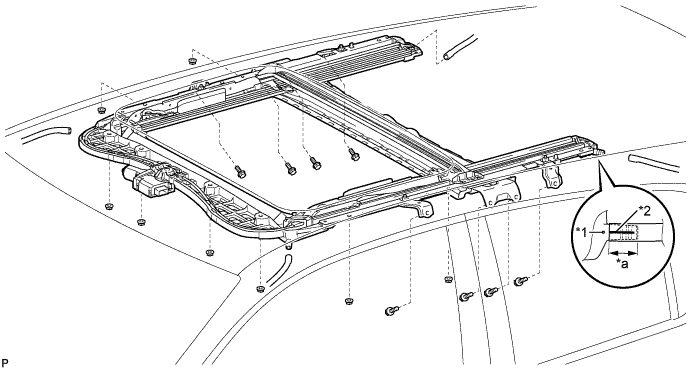
Text in Illustration *1 Mark *2 Marking *a Installation depth - - - Torque:
- Nut
- 5.5 N*m { 56 kgf*cm, 49 in.*lbf }
- Bolt
- 8.0 N*m { 82 kgf*cm, 71 in.*lbf }
-
Connect the 4 sliding roof drain hoses to the sliding roof housing sub-assembly.
Installation depth 20 mm (0.0394 in.) or more Note
-
Make sure to align the marking of the hoses with the mark of the sliding roof housing.
-
Be sure to install the drain hoses properly to prevent entry of water.
-
-
-
INSTALL REAR NO. 2 SIDE RAIL SPACER LH
-
Engage the 2 claws to install the rear No. 2 side rail spacer LH.
-
-
INSTALL REAR NO. 2 SIDE RAIL SPACER RH
Tech Tips
Use the same procedure as for the LH side.
-
INSTALL CURTAIN SHIELD AIRBAG ASSEMBLY LH
-
Check that the power switch is off.
-
Check that the cable is disconnected from the negative (-) auxiliary battery terminal.
CAUTION:
Wait at least 90 seconds after disconnecting the cable from the negative (-) auxiliary battery terminal to disable the SRS system.
-
Temporarily install the curtain shield airbag assembly with the 5 hooks.
Note
Do not twist the curtain shield airbag assembly when installing it.
-
Install 5 new bolts in the order shown in the illustration.
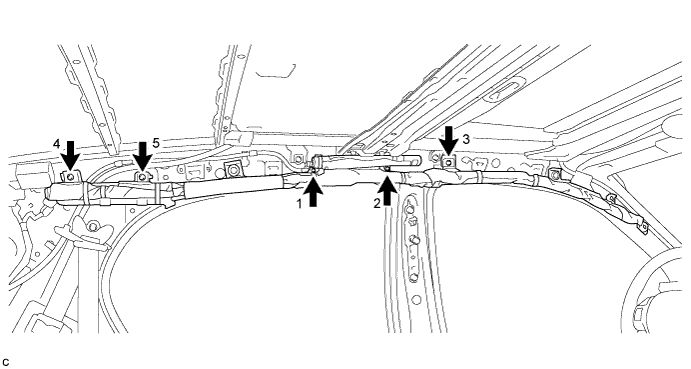
- Torque:
- 9.8 N*m { 100 kgf*cm, 87 in.*lbf }
-
Install the curtain shield airbag assembly to the body panel with 4 new clips and 4 new spacers in the order shown in the illustration
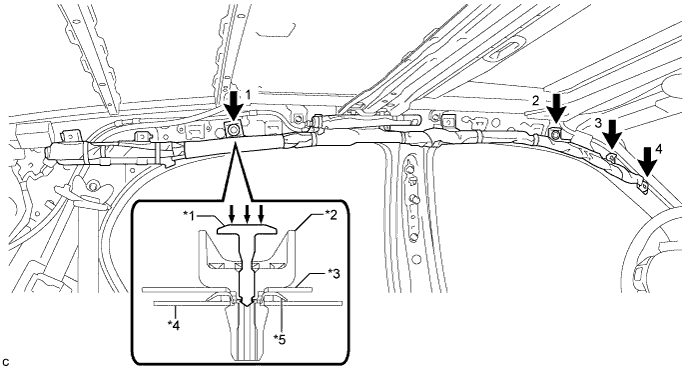
Text in Illustration *1 Pin *2 Clip *3 Airbag *4 Body *5 Spacer - - -
Install the 4 pins.
Note
Make sure that the pins of the clips are pushed in firmly.
-
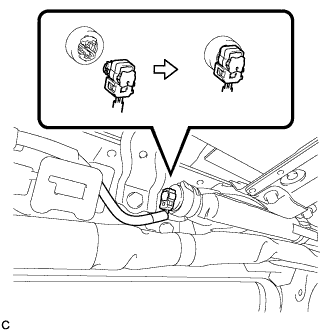
Connect the curtain shield airbag connector.
Note
When connecting any airbag connector, take care not to damage the airbag wire harness.
-
Push in the lock to install the airbag connector.
-
-
INSTALL CURTAIN SHIELD AIRBAG ASSEMBLY RH
Tech Tips
Use the same procedure as for the LH side.
-
INSTALL SLIDING ROOF WEATHERSTRIP
-
Install the sliding roof weatherstrip as follows:
-
Position the joint of the weatherstrip at the rear center.
-
Align the alignment mark (brown) on the weatherstrip with the alignment mark (green) at the corners of the sliding roof panel sub-assembly and install the weatherstrip.
-
Install the lip of the weatherstrip firmly.
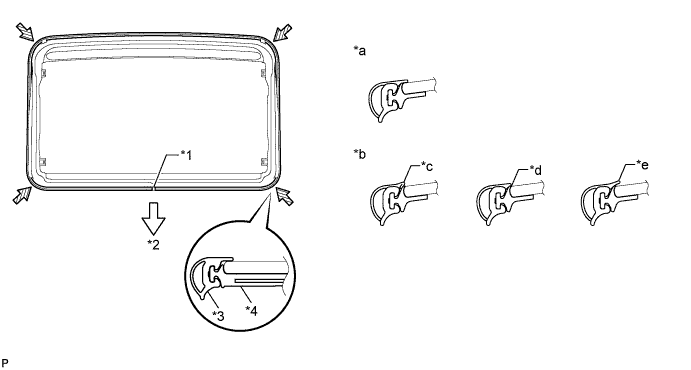
Text in Illustration *1 Joint *2 Rear *3 Alignment Mark (Brown) *4 Alignment Mark (Green) *a Normal *b Abnormal *c Pinched *d Exposed *e Gap (raised, wavy, etc.) - -
-
-
-
INSTALL SLIDING ROOF GLASS SUB-ASSEMBLY
-
Using a T25 "TORX" socket wrench, temporarily install the sliding roof glass sub-assembly with the 4 screws.
-
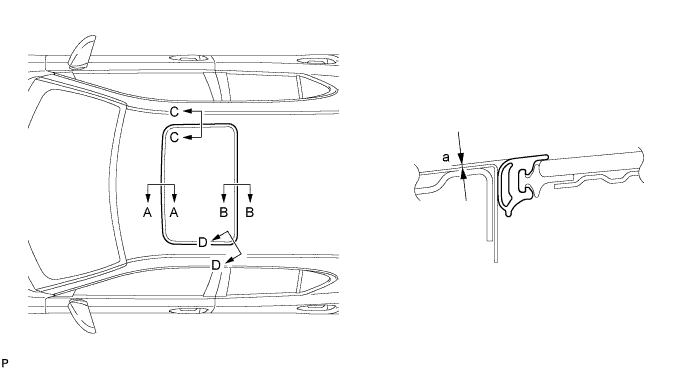
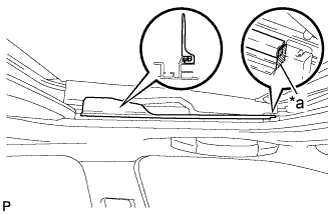
Perform a level check.
-
Check the difference in level for "a" between the roof panel and the upper surface of the weather strip when the sliding roof glass is fully closed.
Standard Area Measurement A - A 0 + 1.0 mm (0 + 0.0394 in.)
0 - 2.0 mm (0 - 0.0787 in.)
B - B 0 + 2.0 mm (0 + 0.0787 in.)
0 - 1.0 mm (0 - 0.0394 in.)
C - C 0 + 1.5 mm (0 + 0.0591 in.)
0 - 1.5 mm (0 - 0.0591 in.)
D - D 0 + 1.5 mm (0 + 0.0591 in.)
0 - 1.0 mm (0 - 0.0394 in.)
Tech Tips
"+" represents the condition that the glass is above the panel level. "-" represents the condition that the glass is below the panel level.
-
-
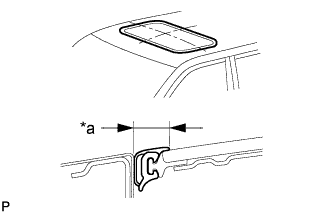
Text in Illustration *a Even Perform a gap check.
-
Check the gap between the roof panel and roof glass.
Note
The gap must be even all around.
-
-
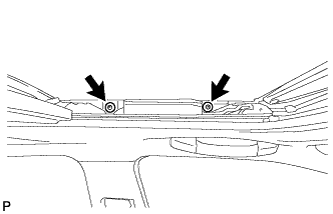
After adjusting the sliding roof glass, using a T25 "TORX" socket wrench, install the sliding roof glass sub-assembly with the 4 screws.
- Torque:
- 5.5 N*m { 56 kgf*cm, 49 in.*lbf }
-
-
CHECK FOR WATER LEAK
-
After adjusting the sliding roof glass sub-assembly, check for water leaks.
-
If there are any leaks, readjust the sliding roof glass sub-assembly.
-
-
INSTALL ROOF HEADLINING ASSEMBLY
-
INSTALL NO. 1 SLIDING ROOF SIDE GARNISH LH
-
Press the TILT UP switch to tilt the roof glass up until it is fully tilted upward.
-
Engage the 2 claws to install the No. 1 sliding roof side garnish LH.
-
-
INSTALL NO. 1 SLIDING ROOF SIDE GARNISH RH
Tech Tips
Use the same procedure as for the LH side.
-
INSTALL NO. 2 SLIDING ROOF SIDE GARNISH LH
-
Press the TILT UP switch to tilt the roof glass up until it is fully tilted upward.
-
Text in Illustration *a Shaded Portion Align the front end of the garnish with the shaded portion, and then install the No. 2 sliding roof side garnish LH.
-
-
INSTALL NO. 2 SLIDING ROOF SIDE GARNISH RH
Tech Tips
Use the same procedure as for the LH side.
-
RESET SLIDING ROOF DRIVE GEAR ASSEMBLY
-
CHECK SLIDING ROOF SYSTEM
-
INSPECT FOR WATER LEAK
-
Press the TILT UP switch to tilt the roof glass down until it is fully tilted upward.
-
After adjusting the sliding roof glass sub-assembly, inspect for water leaks.
-
If there are any leaks, readjust the sliding roof glass sub-assembly.
-