FRONT SEAT OUTER BELT ASSEMBLY INSPECTION
-
INSPECT FRONT SEAT OUTER BELT ASSEMBLY (w/ Pre-crash Safety System)
-
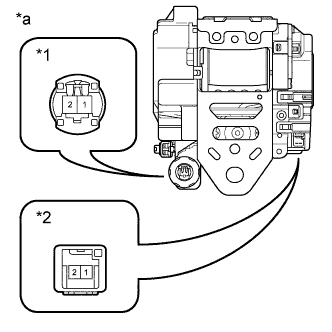
Text in Illustration *1 Pretensioner Connector *2 Seat Belt Tension Reducer Connector *a Component without harness connected
(Front Seat Outer Belt Assembly)
Check the seat belt tension reducer operation. (w/ Seat Belt Tension Reducer System)
Note
Do not apply auxiliary battery voltage to the pretensioner connector.
-
Connect a positive (+) lead of the auxiliary battery to terminal 1 of the seat belt tension reducer connector and a negative (-) lead to terminal 2.
-
Check that an operating sound is heard when the magnetized solenoid is attracting the plunger.
-
Pull out the seat belt and allow it to retract. Listen to the operating sound.
-
Pull out the seat belt again, disconnect the negative (-) lead of the auxiliary battery and allow the seat belt to retract. Listen to the operating sound again and check that the operating sound volume has increased.
-
If the result is not as specified, replace the front seat outer belt assembly.
-
-
-
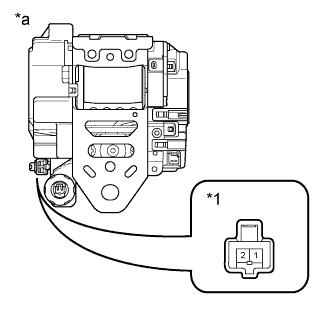
Text in Illustration *1 Pre-crash Seat Belt Connector *a Component without harness connected
(Front Seat Outer Belt Assembly)
Check the pre-crash seat belt operation.
-
Measure the resistance according to the value(s) in the table below.
Standard Resistance Tester Connection Condition Specified Condition 1 - 2 Always Below 1 MΩ
-
If the result is not as specified, replace the front seat outer belt assembly.
-
-
-
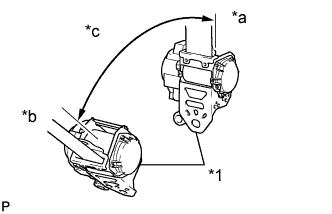
Text in Illustration *1 Retractor *a Unlocked *b Locked *c 45° Before installing the outer belt, check the ELR function.
Note
Do not disassemble the retractor.
-
When the inclination of the retractor is 15° or less, check that the belt can be pulled from the retractor. When the inclination of the retractor is over 45°, check that the belt locks.
If the result is not as specified, replace the outer belt assembly.
-
-
-
INSPECT FRONT SEAT OUTER BELT ASSEMBLY (w/o Pre-crash Safety System)
-
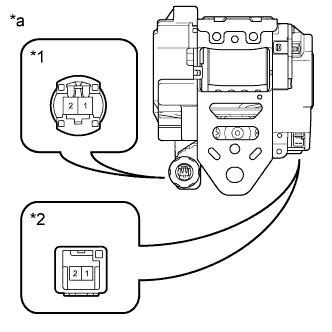
Text in Illustration *1 Pretensioner Connector *2 Seat Belt Tension Reducer Connector *a Component without harness connected
(Front Seat Outer Belt Assembly)
Check the seat belt tension reducer operation. (w/ Seat Belt Tension Reducer System)
Note
Do not apply auxiliary battery voltage to the pretensioner connector.
-
Connect a positive (+) lead of the auxiliary battery to terminal 1 of the seat belt tension reducer connector and a negative (-) lead to terminal 2.
-
Check that an operating sound is heard when the magnetized solenoid is attracting the plunger.
-
Pull out the seat belt and allow it to retract. Listen to the operating sound.
-
Pull out the seat belt again, disconnect the negative (-) lead of the auxiliary battery and allow the seat belt to retract. Listen to the operating sound again and check that the operating sound volume has increased.
-
If the result is not as specified, replace the front seat outer belt assembly.
-
-
-
Text in Illustration *1 Retractor *a Unlocked *b Locked *c 45° Before installing the outer belt, check the ELR function.
Note
Do not disassemble the retractor.
-
When the inclination of the retractor is 15° or less, check that the belt can be pulled from the retractor. When the inclination of the retractor is over 45°, check that the belt locks.
If the result is not as specified, replace the outer belt assembly.
-
-