YAW RATE AND ACCELERATION SENSOR INSTALLATION
-
INSTALL YAW RATE AND ACCELERATION SENSOR
-
Connect the yaw rate and acceleration sensor connector.
Note
Make sure that the yaw rate and acceleration sensor connector is connected securely.
-
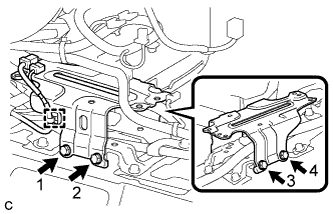
Install the yaw rate and acceleration sensor with the 2 bolts.
- Torque:
- 8.5 N*m { 87 kgf*cm, 75 in.*lbf }
Note
-
Do not damage the yaw rate and acceleration sensor.
-
Make sure that the yaw rate and acceleration sensor is installed securely.
-
Do not use dropped or damaged parts.
-
Keep the contact surfaces of the yaw rate and acceleration sensor and the body free of foreign matter.
-
Make sure that the sensor is facing the correct direction.
-
-
INSTALL NO. 5 DISC PLAYER BRACKET (w/ Navigation System for DVD)
-
Install the No. 5 disc player bracket with the 4 bolts.
Note
Tighten the 4 bolts in the order shown in the illustration.
-
Engage the clamp.
-
-
INSTALL MULTI-MEDIA MODULE ASSEMBLY (w/ Navigation System for DVD)
-
Install the multi-media module assembly with the 4 bolts.
-
Connect the 2 connectors.
-
-
INSTALL NO. 3 CONSOLE BOX MOUNTING BRACKET (w/ Navigation System for DVD)
-
Engage the 3 guides.
-
Install the No. 3 console box mounting bracket with the 4 bolts <A>.
-
Engage the clamp.
-
-
INSTALL CONSOLE BOX RH (w/ Navigation System for DVD)
-
Engage the guide and 2 claws.
-
Engage the 3 clips.
-
Install the console box RH with the bolt <A> and clip.
-
-
INSTALL FRONT NO. 2 CONSOLE BOX INSERT (w/ Navigation System for DVD)
-
Engage the 5 claws to install the front No. 2 console box insert.
-
-
INSTALL CONSOLE BOX LH
-
Engage the guide and 2 claws.
-
Engage the 3 clips.
-
Install the console box LH with the bolt <A> and clip.
-
-
INSTALL CONSOLE BOX INSERT
-
Engage the 2 claws and 2 clips to install the console box insert.
-
-
INSTALL INTEGRATION CONTROL AND PANEL ASSEMBLY
-
Connect each connector.
-
Engage the clamp.
-
Engage the 2 guides and 6 claws to install the integration control and panel assembly.
-
-
INSTALL SHIFT LEVER KNOB SUB-ASSEMBLY
-
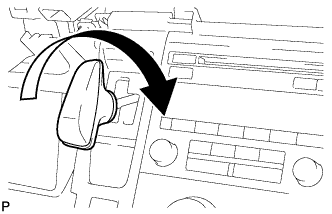
Turn the shift lever knob clockwise and install the shift lever knob sub-assembly.
-
-
INSTALL REAR CONSOLE BOX ASSEMBLY
-
CONNECT CABLE TO NEGATIVE AUXILIARY BATTERY TERMINAL
-
PERFORM YAW RATE AND ACCELERATION SENSOR ZERO POINT CALIBRATION