PERFORMANCE DAMPER INSTALLATION
-
INSTALL SUSPENSION TOWER DAMPER
-
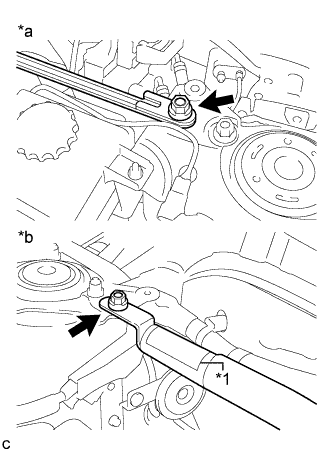
Text in Illustration *1 Label *a LH Side *b RH Side Install the suspension tower damper with the 2 nuts.
- Torque:
- 35 N*m { 357 kgf*cm, 26 ft.*lbf }
Tech Tips
Make sure to install the suspension tower damper with the label facing upright.
-
-
INSTALL OUTER COWL TOP PANEL SUB-ASSEMBLY (for LHD)
-
Install the outer cowl top panel sub-assembly with the 9 bolts.
- Torque:
- 12 N*m { 122 kgf*cm, 9 ft.*lbf }
-
w/ Wiper Deicer:
Engage the 3 clamps to install the wire harness.
-
Engage the clamp to install the wire harness.
-
-
INSTALL OUTER COWL TOP PANEL SUB-ASSEMBLY (for RHD)
-
Install the outer cowl top panel sub-assembly with the 9 bolts.
- Torque:
- 12 N*m { 122 kgf*cm, 9 ft.*lbf }
-
w/ Wiper Deicer:
Engage the 3 clamps to install the wire harness.
-
Engage the clamp to install the wire harness.
-
-
INSTALL COWL BODY MOUNTING REINFORCEMENT LH (for LHD)
-
Install the cowl body mounting reinforcement LH with the 2 bolts.
- Torque:
- 12 N*m { 122 kgf*cm, 9 ft.*lbf }
-
-
INSTALL COWL BODY MOUNTING REINFORCEMENT RH (for RHD)
-
Install the cowl body mounting reinforcement RH with the 2 bolts.
- Torque:
- 12 N*m { 122 kgf*cm, 9 ft.*lbf }
-
-
INSTALL NO. 2 HEATER AIR DUCT SPLASH SHIELD SEAL (for LHD)
-
Engage the claw and guide to install the No. 2 heater air duct splash shield seal.
-
-
INSTALL NO. 2 HEATER AIR DUCT SPLASH SHIELD SEAL (for RHD)
-
Engage the claw and guide to install the No. 2 heater air duct splash shield seal.
-
-
INSTALL NO. 1 HEATER AIR DUCT SPLASH SHIELD SEAL (for LHD)
-
Engage the 2 claws to install the No. 1 heater air duct splash shield seal.
-
-
INSTALL NO. 1 HEATER AIR DUCT SPLASH SHIELD SEAL (for RHD)
-
Engage the 2 claws to install the No. 1 heater air duct splash shield seal.
-
-
INSTALL WINDSHIELD WIPER MOTOR AND LINK ASSEMBLY