DAYTIME RUNNING LIGHT ASSEMBLY REASSEMBLY
-
INSTALL NO. 1 DAYTIME RUNNING LIGHT CORD
-
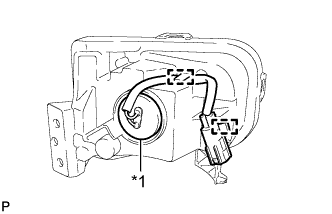
Text in Illustration *1 Grommet Engage the grommet.
-
Engage the 2 clamps to install the No. 1 daytime running light cord.
-
-
INSTALL DAYTIME RUNNING LIGHT GASKET
-
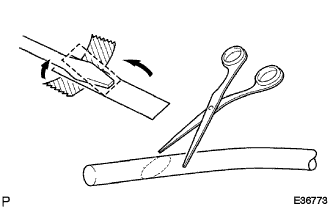
Completely remove the old gasket.
-
Partially remove the release paper attached on the gasket, and cut off a piece of it.
-
Fold the release paper over the tip of a screwdriver and secure it in place with tape.
Note
Use the release paper from the new gasket.
-
Using scissors, cut the end of the gasket at a diagonal (45°).
-
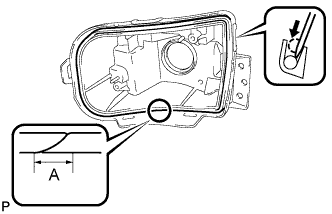
Set the gasket into the groove so that the ends of the gasket are aligned with the bottom of the daytime running light housing, as shown in the illustration
-
Using the screwdriver, completely press the gasket into the daytime running light housing to install the gasket.
-
After pressing the gasket completely, cut the outer end of the gasket at a diagonal (45°) so that the ends overlap for 10 mm (0.394 in.) or more.
Item Dimension A 10 mm (0.394 in.) or more Tech Tips
To install the gasket, place it along the outside surface and press on it with the screwdriver to roll it into place. Stop when the gasket is in the center of the groove.
-
-
INSTALL NO. 2 DAYTIME RUNNING LIGHT CORD
-
Connect the 2 connectors to install the No. 2 daytime running light cord.
-
Connect the connector.
-
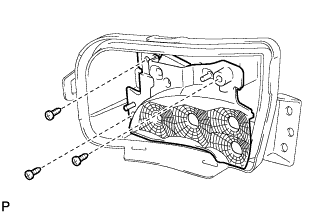
Install the inner daytime running light lens with the 3 screws.
-
-
INSTALL OUTER DAYTIME RUNNING LIGHT LENS
-
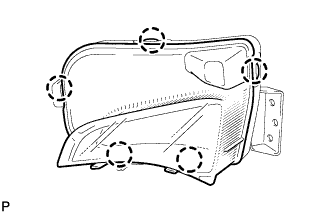
Engage the 5 claws to install the outer daytime running light lens.
Note
-
Wear rubber gloves when handling the lens.
-
Check that all the claws are attached.
-
If there are fingerprints on the back of the outer daytime running light lens, replace the lens.
-
-
-
INSTALL DAYTIME RUNNING LIGHT PROTECTOR
-
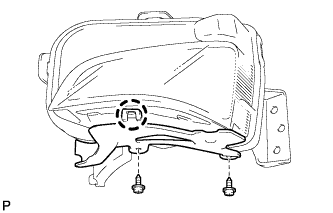
Engage the claw.
-
Install the daytime running light protector with the 2 screws.
-