HOOD LOCK CONTROL CABLE ASSEMBLY INSTALLATION
-
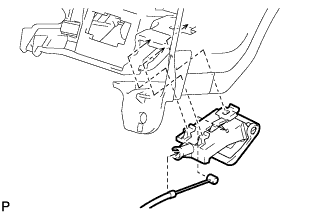
INSTALL HOOD LOCK CONTROL CABLE ASSEMBLY (for LHD)
-
Pass the hood lock control cable assembly into the engine compartment.
-
Pass the cable through the upper radiator support.
-
Connect the clamps.
-
-
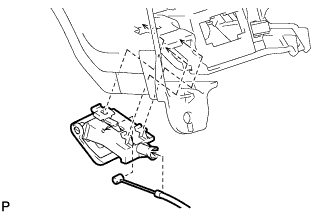
INSTALL HOOD LOCK CONTROL CABLE ASSEMBLY (for RHD)
-
Pass the hood lock control cable assembly into the engine compartment.
-
Pass the cable through the upper radiator support.
-
Connect the clamps.
-
-
INSTALL HOOD LOCK CONTROL LEVER SUB-ASSEMBLY (for LHD)
-
Install the hood lock control lever and connect the hood lock control cable.
-
-
INSTALL HOOD LOCK CONTROL LEVER SUB-ASSEMBLY (for RHD)
-
Install the hood lock control lever and connect the hood lock control cable.
-
-
INSTALL HOOD LOCK ASSEMBLY (w/o Engine Hood Courtesy Switch)
-
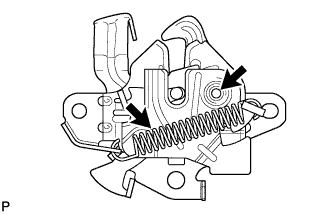
Apply MP grease to the sliding areas of the lock.
-
Install the hood lock assembly with the 3 bolts.
- Torque:
- 7.5 N*m { 77 kgf*cm, 66 in.*lbf }
-
Connect the hood lock control cable.
-
-
INSTALL HOOD LOCK ASSEMBLY (w/ Engine Hood Courtesy Switch)
-
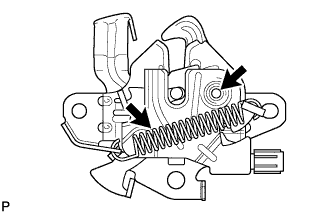
Apply MP grease to the sliding areas of the lock.
-
Install the hood lock assembly with the 3 bolts.
- Torque:
- 7.5 N*m { 77 kgf*cm, 66 in.*lbf }
-
Connect the hood lock control cable.
-
Connect the connector.
-
-
INSPECT HOOD SUB-ASSEMBLY
-
Check that the clearance measurements of areas A through F are within each standard range.
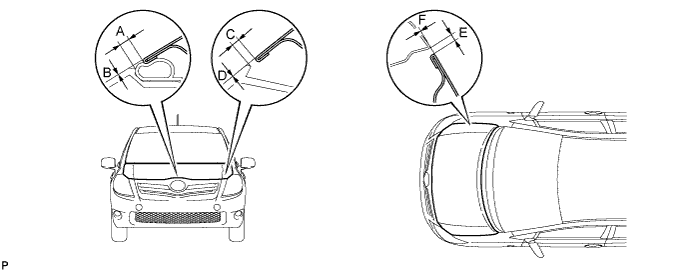
Standard Clearance Area Measurement Area Measurement A 3.1 to 6.1 mm (0.122 to 0.240 in.) D -1.4 to 1.6 mm (-0.0551 to 0.0630 in.) B -1.5 to 1.5 mm (-0.0591 to 0.0591 in.) E 2.3 to 5.3 mm (0.0906 to 0.209 in.) C 1.7 to 4.7 mm (0.0669 to 0.185 in.) F -1.0 to 1.0 mm (-0.0394 to 0.0394 in.)
-
-
ADJUST HOOD SUB-ASSEMBLY
-
Horizontally and vertically adjust the hood.
-
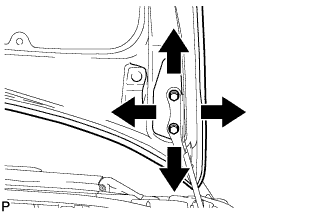
Loosen the 4 hinge bolts of the hood.
-
Adjust the clearance between the hood and front fender by moving the hood.
-
Tighten the 4 hinge bolts after the adjustment.
- Torque:
- 13 N*m { 133 kgf*cm, 10 ft.*lbf }
-
-
Adjust the height of the front end of the hood using the cushion rubber.
-

Adjust the 2 cushion rubbers so that the heights of the hood and fender are aligned.
Tech Tips
Raise or lower the front end of the hood by turning the cushion rubber.
-
-
Adjust the hood lock.
-
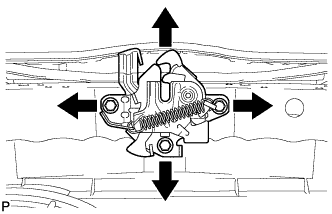
Loosen the 3 bolts.
-
Tighten the bolts after the adjustment.
- Torque:
- 7.5 N*m { 77 kgf*cm, 66 in.*lbf }
-
Check that the striker can engage with the hood lock smoothly.
-
-
-
INSTALL FRONT FENDER LINER (w/o Front Fender Mudguard)
-
Install the front fender liner with 4 new grommets and 6 screws.
-
Install the 8 clips.
-
Install the pin hold clip.
-
-
INSTALL FRONT FENDER LINER (w/ Front Fender Mudguard)
-
Install the front fender liner with 4 new grommets and 4 screws.
-
Install the 8 clips.
-
Install the pin hold clip.
-
-
INSTALL FRONT FENDER MUDGUARD (w/ Front Fender Mudguard)
-
Install the front fender mudguard with the 3 screws.
-
-
INSTALL FRONT WHEEL
- Torque:
- 103 N*m { 1050 kgf*cm, 76 ft.*lbf }