ULTRASONIC SENSOR INSTALLATION
-
INSTALL NO. 1 ULTRASONIC SENSOR RETAINER
-
for Corner Side:
-
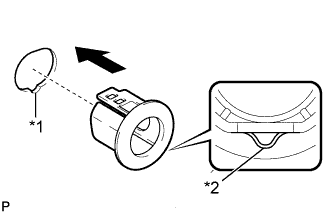
Text in Illustration *1 Keyhole *2 Convex part Install the No. 1 ultrasonic sensor retainer as shown in the illustration.
Note
Do not damage the rear bumper with the convex part when installing the retainer.
Tech Tips
-
When installing the retainer, align the keyhole and convex part as shown in the illustration.
-
The illustration is for the LH side. The RH side is the opposite of the LH side.
-
-
-
for Center Side:
-
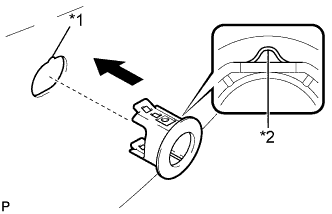
Text in Illustration *1 Keyhole *2 Convex part Install the No. 1 ultrasonic sensor retainer as shown in the illustration.
Note
Do not damage the rear bumper with the convex part when installing the retainer.
Tech Tips
-
When installing the retainer, align the keyhole and convex part as shown in the illustration.
-
Use the same procedure for the RH side and LH side.
-
-
-
-
INSTALL ULTRASONIC SENSOR CLIP
-
for Corner Side:
-
Engage the 2 claws to install the ultrasonic sensor clip.
Tech Tips
The illustration is for the LH side. The RH side is the opposite of the LH side.
-
-
for Center Side:
-
Engage the 2 claws to install the ultrasonic sensor clip.
Tech Tips
Use the same procedure for the RH side and LH side.
-
-
-
INSTALL NO. 1 ULTRASONIC SENSOR
-
for Corner Side:
-
Engage the 2 claws to install the No. 1 ultrasonic sensor.
Tech Tips
The illustration is for the LH side. The RH side is the opposite of the LH side.
-
Connect the connector.
Tech Tips
The illustration is for the LH side. The RH side is the opposite of the LH side.
-
-
for Center Side:
-
Engage the 2 claws to install the No. 1 ultrasonic sensor.
Tech Tips
Use the same procedure for the RH side and LH side.
-
Connect the connector.
Tech Tips
Use the same procedure for the RH side and LH side.
-
Engage the clamp.
Tech Tips
Use the same procedure for the RH side and LH side.
-
-
-
INSTALL REAR BUMPER ASSEMBLY