SECURITY HORN ASSEMBLY (for Built-in Battery type) REMOVAL

-
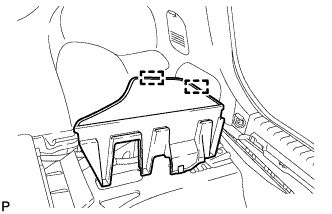
REMOVE REAR NO. 2 FLOOR BOARD
-
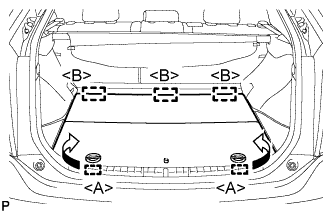
Disengage the 2 guides <A> as shown in the illustration.
-
Disengage the 3 guides <B> and remove the rear No. 2 floor board.
-
-
REMOVE REAR DECK FLOOR BOX
-
Remove the rear deck floor box.
-
-
REMOVE REAR DOOR SCUFF PLATE RH
Tech Tips
Use the same procedure for the RH side and LH side Click here.
-
DISCONNECT REAR DOOR OPENING TRIM WEATHERSTRIP RH
-
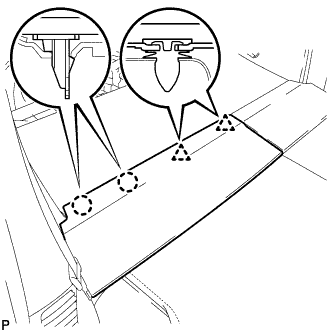
REMOVE REAR SEAT CUSHION ASSEMBLY
-
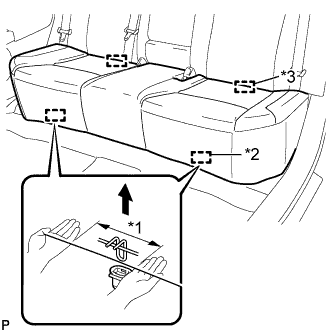
Text in Illustration *1 100 mm (3.94 in.) or less *2 Hook *3 Guide Disengage the 2 front hooks of the seat cushion from the vehicle body as shown in the illustration.
Note
Follow the instructions below carefully as the cushion frame deforms easily.
-
Choose a hook to detach first. Place your hands near the hook as shown in the illustration. Then lift the seat cushion to detach the hook.
-
Repeat the above procedure for the other hook.
-
-
Disengage the 2 guides of the seat cushion from the seatback.
-
Remove the rear seat cushion assembly.
-
-
REMOVE REAR SIDE SEATBACK ASSEMBLY RH
-
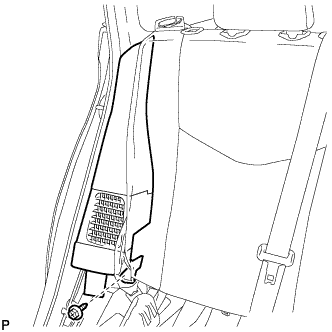
Remove the bolt.
-
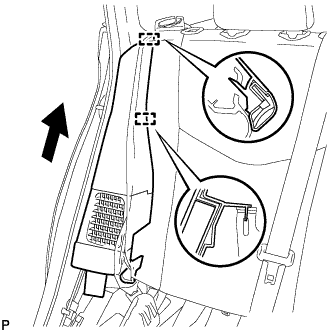
Disengage the 2 guides and remove the rear side seatback assembly RH as shown in the illustration.
-
-
REMOVE TONNEAU COVER ASSEMBLY (w/ Tonneau Cover)
-
Remove the tonneau cover assembly.
-
-
REMOVE REAR NO. 3 FLOOR BOARD
-
Disengage the 2 guides and remove the rear No. 3 floor board.
-
-
REMOVE REAR NO. 1 FLOOR BOARD SUB-ASSEMBLY
-
Disengage the 2 claws and 2 clips, and remove the rear No. 1 floor board sub-assembly.
-
-
REMOVE REAR NO. 2 FLOOR BOARD SUB-ASSEMBLY
-

Disengage the claw and 2 clips, and remove the rear No. 2 floor board sub-assembly.
-
-
REMOVE REAR NO. 1 FLOOR BOARD
-

Remove the bolt.
-
Disengage the 2 claws and 2 clips, and remove the rear No. 1 floor board.
-
-
REMOVE DECK TRIM SERVICE HOLE COVER
-
Disengage the 2 claws and 3 guides, and remove the deck trim service hole cover.
-
-
REMOVE REAR DECK TRIM COVER
-
Disengage the 4 claws and 4 guides, and remove the rear deck trim cover.
-
-
REMOVE LUGGAGE HOLD BELT STRIKER ASSEMBLY
Tech Tips
Use the same procedure for the RH side and LH side Click here.
-
REMOVE TONNEAU COVER HOLDER CAP
Tech Tips
Use the same procedure for the RH side and LH side Click here.
-
REMOVE DECK TRIM SIDE PANEL ASSEMBLY RH
-
Remove the screw.
-
Disengage the 7 claws and 2 clips, and remove the deck trim side panel assembly RH.
-
-
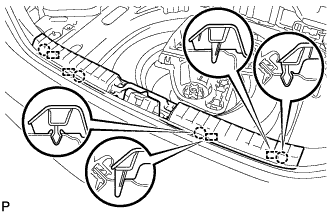
REMOVE ROOF SIDE INNER GARNISH ASSEMBLY RH
Tech Tips
Use the same procedure for the RH side and LH side Click here.
-
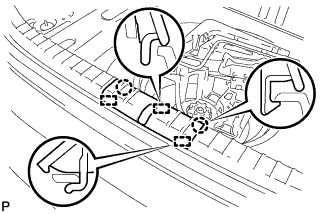
REMOVE THEFT WARNING SIREN ASSEMBLY
-
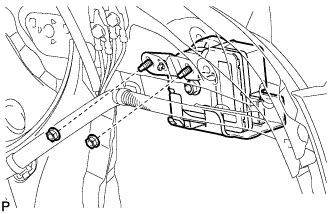
Remove the 2 nuts.
-
Disconnect the connector and remove the theft warning siren assembly.
-