REAR DOOR WINDOW FRAME MOULDING (for Sedan) INSTALLATION

Tech Tips
-
Use the same procedures for the RH side and LH side.
-
The procedures listed below are for the LH side.
-
When installing the rear door window frame moulding, heat the vehicle body and rear door window frame moulding using a heat light.
| Standard | ||||||
|---|---|---|---|---|---|---|
|
Note
Do not heat the vehicle body and rear door window frame moulding excessively.
-
INSTALL REAR DOOR MOULDING SUB-ASSEMBLY OUTSIDE LH
-
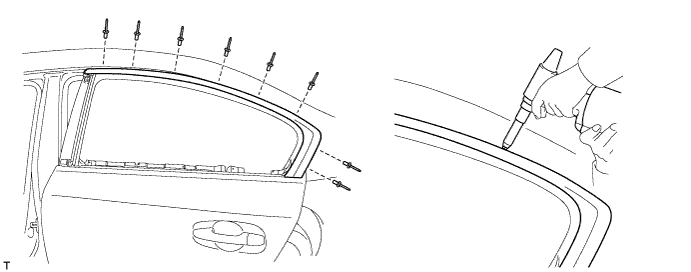
Install a nose piece to an air riveter or hand riveter.
-
Insert the mandrel part of a new rivet into the nose piece.
-
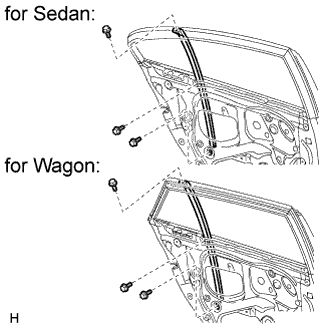
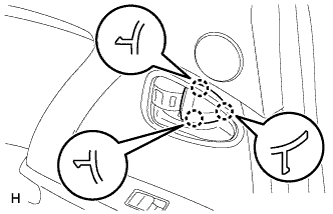
Using the riveter, install the rear door moulding outside as shown in the illustration.
Tech Tips
If the rivet cannot be cut, pull it once and cut it.
Note
-
-
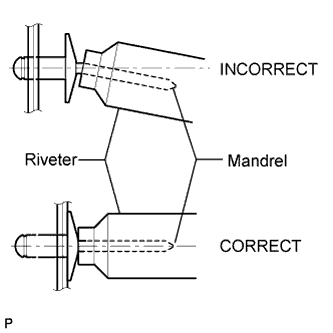
Do not pry the rivet with the riveter, as this will cause damage to the riveter and mandrel.
-
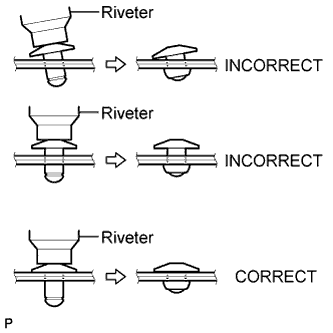
Confirm that the rivets are seated properly against the rear door moulding outside.
-
Do not tilt the riveter when installing the rivet to the rear door moulding outside.
-
Do not leave any space between the rivet head and rear door moulding outside.
-
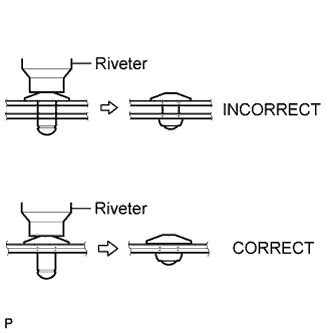
Do not leave any space between the rear door moulding outside and door frame. Firmly hold together the 2 items while installing the rivet.
-
-
-
INSTALL REAR DOOR WINDOW FRAME MOULDING SUB-ASSEMBLY LH
-
Clean the vehicle body surface.
-
Using a heat light, heat the vehicle body surface.
-
Remove the double-sided tape and butyl tape from the vehicle body surface.
-
Wipe off any tape adhesive residue with cleaner.
-
-
Install a new rear door window frame moulding.
-
Using a heat light, heat a new rear door window frame moulding and the vehicle body surface.
-
Remove the peeling paper from the face of the rear door window frame moulding.
Tech Tips
After removing the peeling paper, keep the exposed adhesive free from foreign matter.
-

Text in Illustration *1 Double-sided Tape *2 Butyl Tape Attach the clip, double-sided tape and butyl tape to install the rear door window frame moulding.
Tech Tips
Press the rear door window frame moulding firmly to install it.
-
-
-
INSTALL REAR DOOR WEATHERSTRIP LH
-
Clean the door surface.
-
Wipe off any tape adhesive residue with cleaner.
-
-
If reusing the rear door weatherstrip:
Clean the rear door weatherstrip.
-
Remove the double-sided tape from the rear door weatherstrip.
-
Wipe off any tape adhesive residue with cleaner.
-
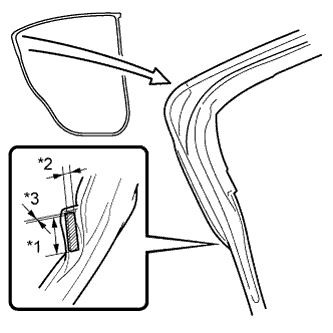
Standard Area Specified Condition *1 Length: 30 mm (1.18 in.) *2 Width: 5.0 mm (0.197 in.) *3 Thickness: 0.8 mm (0.0315 in.) Apply new double-sided tape to the rear door weatherstrip, as shown in the illustration.
Standard Area Specified Condition *1 Length: 30 mm (1.18 in.) *2 Width: 5.0 mm (0.197 in.) *3 Thickness: 0.8 mm (0.0315 in.)
-
-

Area Specified Condition *1 Length: 30 mm (1.18 in.) *2 Width: 5.0 mm (0.197 in.) *3 Thickness: 0.8 mm (0.0315 in.) Install the rear door weatherstrip.
-
Using a heat light, heat the door surface.
-
Remove the peeling paper from the face of the weatherstrip.
Tech Tips
After removing the peeling paper, keep the exposed adhesive free from foreign matter.
-
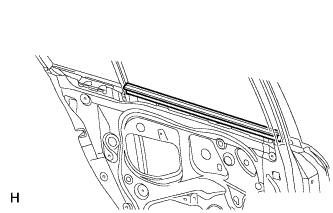
Attach the 3 clips to install the upper part of the rear door weatherstrip.
-
-
-
INSTALL REAR DOOR FRAME GARNISH LH
-
Attach the 2 clips to install the garnish.
-
-
INSTALL REAR DOOR BELT MOULDING LH
-
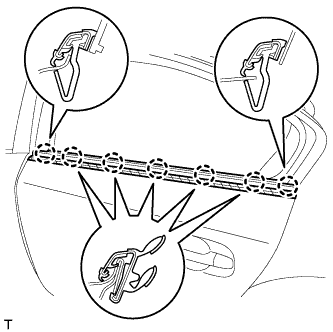
Attach the 7 claws to install the rear door belt moulding.
-
-
INSTALL REAR DOOR GLASS SUB-ASSEMBLY LH
-
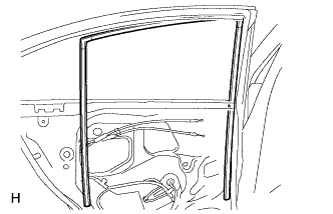
Install the front side of the glass run.
-
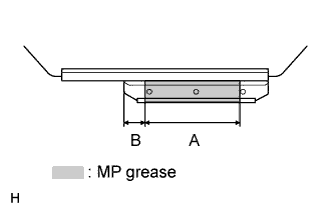
Apply MP grease to the sliding areas of the glass channel as shown in the illustration.
Standard Area Specified Condition A 130 mm (5.12 in.) B 29 mm (1.14 in.) -
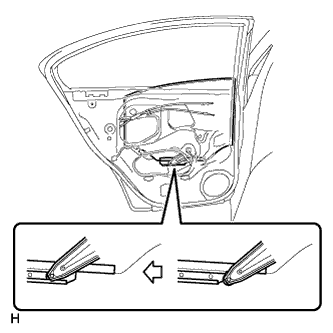
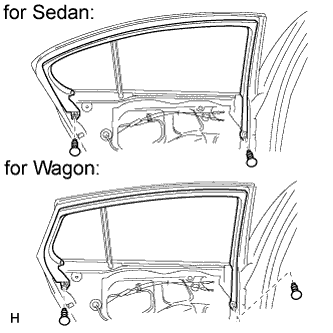
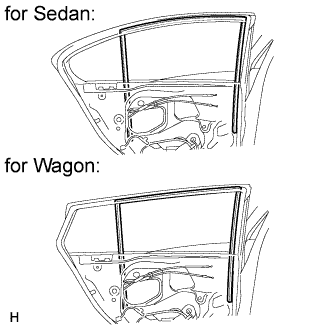
Slide the rear door glass sub-assembly as shown in the illustration to install it.
-
-
INSTALL REAR DOOR QUARTER WINDOW GLASS LH
-
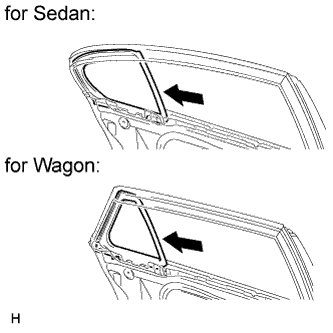
Install the rear door quarter window glass together with the rear door quarter window weatherstrip in the direction indicated by the arrow in the illustration.
-
-
INSTALL REAR DOOR WINDOW DIVISION BAR SUB-ASSEMBLY LH
-
Insert the rear door window division bar sub-assembly from above.
-
Install the rear door window division bar sub-assembly to the glass run.
-
Install the rear door window division bar sub-assembly with the 2 bolts and screw.
- Torque:
- 6.2 N*m { 63 kgf*cm, 55 in.*lbf, for bolt and screw }
-
-
INSTALL REAR DOOR GLASS RUN LH
-
Completely install the glass run.
-
-
INSTALL REAR DOOR SERVICE HOLE COVER LH
-
Apply butyl tape to the door.
-
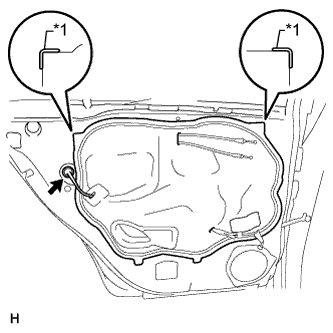
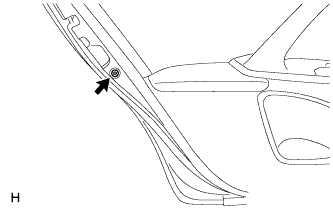
Text in Illustration *1 Reference Point Pass the rear door lock remote control cable and rear door inside locking cable through a new rear door service hole cover.
Note
-
When installing the service hole cover, pull the links and connectors through the service hole cover.
-
There should be no wrinkles or folds after attaching the service hole cover.
-
After attaching the service hole cover, check the seal quality.
-
-
Attach the rear door service hole cover by using the reference points on the rear door panel.
-
Connect the connector.
-
-
INSTALL REAR DOOR INNER GLASS WEATHERSTRIP LH
-
Install the rear door inner glass weatherstrip to the door panel.
-
-
INSTALL REAR DOOR TRIM BOARD SUB-ASSEMBLY LH
-
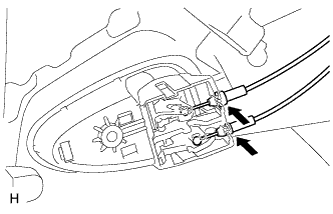
Connect the 2 cables to the inside handle.
-
for 11 Speakers:
Connect the connector.
-
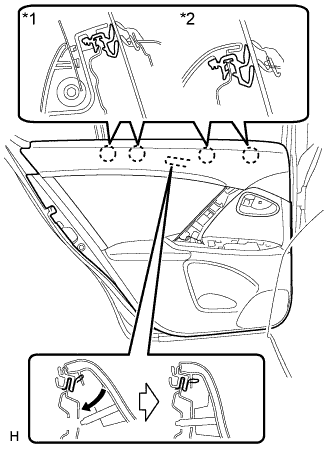
Text in Illustration *1 w/ Rear Door Sunshade *2 w/o Rear Door Sunshade Attach the rear door trim board with the 4 claws on the rear door inner glass weatherstrip.
-
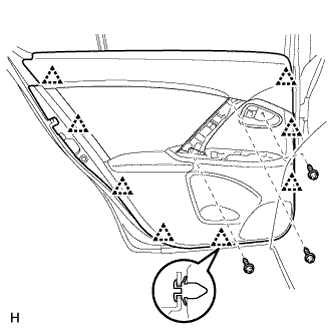
Install the rear door trim board with the 8 clips.
-
Install the 3 screws.
-
-
INSTALL REAR POWER WINDOW REGULATOR SWITCH ASSEMBLY WITH REAR DOOR ARMREST BASE PANEL (w/ Power Window)
-
Connect the connector.
-
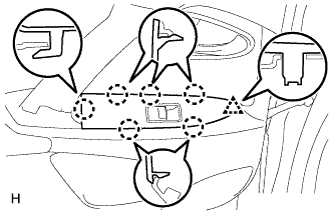
Attach the 6 claws and clip to install the rear power window regulator switch assembly with rear door armrest base panel.
-
-
INSTALL DOOR ASSIST GRIP COVER LH
-

Attach the 10 claws to install the door assist grip cover.
-
-
INSTALL REAR DOOR INSIDE HANDLE BEZEL PLUG LH
-
Attach the 3 claws to install the rear door inside handle bezel plug.
-
-
INSTALL REAR DOOR NO. 1 STIFFENER CUSHION
-
Install the rear door No. 1 stiffener cushion.
-
-
INSTALL REAR DOOR REGULATOR INSIDE HANDLE PLATE (w/o Power Window)
-
Install the rear door regulator inside handle plate.
-
-
INSTALL REAR DOOR WINDOW REGULATOR HANDLE ASSEMBLY (w/o Power Window)
-
Temporarily install the rear door window regulator handle assembly and fully open the window.
-
Install the snap ring to the rear door window regulator handle assembly.
-
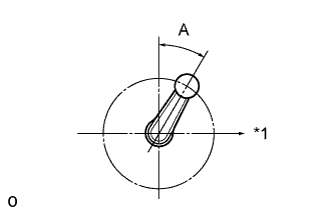
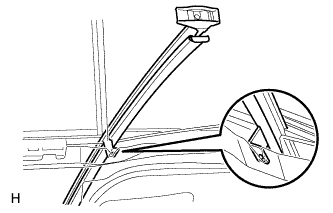
Install the rear door window regulator handle assembly as shown in the illustration.
Standard Area Specified Condition A 2.4° to 22.4° Text in Illustration *1 Front Side
-
-
CONNECT CABLE TO NEGATIVE BATTERY TERMINAL (w/ Power Window)
Note
When disconnecting the cable some systems need to be initialized after the cable is reconnected Click here.