FRONT SEAT ASSEMBLY (for Power Seat) DISASSEMBLY

Note
Wear protective gloves. Sharp areas on the parts may injure your hands.
Tech Tips
-
Use the same procedure for the LH side and RH side.
-
The procedure listed below is for the LH side.
-
REMOVE RECLINING POWER SEAT SWITCH KNOB
-
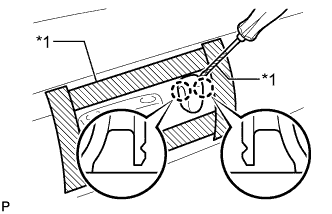
Text in Illustration *1 Protective Tape Apply protective tape around the cushion shield.
-
Using a screwdriver, detach the 2 claws and remove the knob.
Tech Tips
Tape the screwdriver tip before use.
-
-
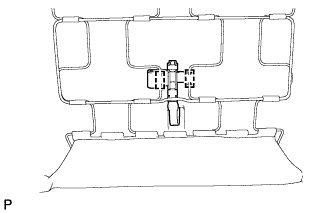
REMOVE SLIDE & VERTICAL POWER SEAT SWITCH KNOB
-
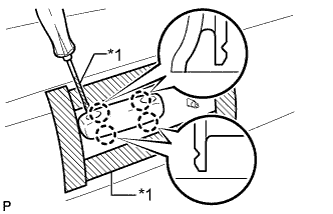
Text in Illustration *1 Protective Tape Using a screwdriver, detach the 4 claws and remove the knob.
Tech Tips
Tape the screwdriver tip before use.
-
-
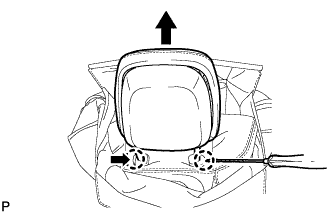
REMOVE FRONT SEAT CUSHION SHIELD LH WITH FRONT SEAT INNER NO. 1 CUSHION SHIELD
-
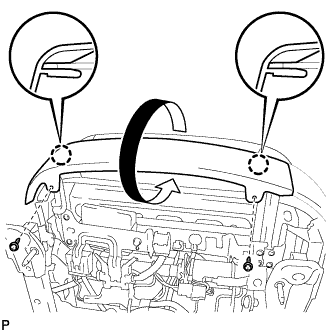
Remove the 2 screws and detach the 2 claws.
-
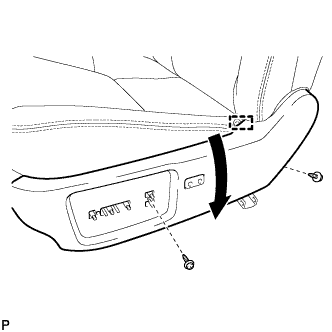
Remove the 2 screws.
-
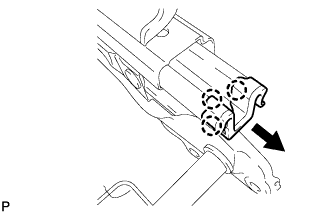
Pull the shield to detach the hook and remove the front seat cushion shield LH with front seat inner No. 1 cushion shield.
-
for Driver Side:
Disconnect the connector.
-
-
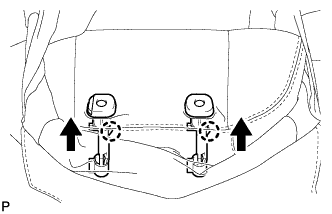
REMOVE FRONT SEAT INNER NO. 1 CUSHION SHIELD LH
-

Detach the 2 claws and remove the shield.
-
-
REMOVE FRONT LUMBAR POWER SEAT SWITCH (for Driver Side)
-
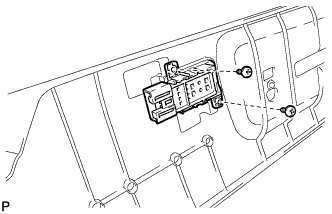
Remove the 2 screws and switch.
-
-
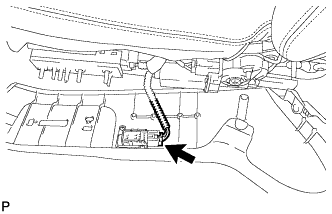
REMOVE FRONT POWER SEAT SWITCH
-
Disconnect the connector.
-
Remove the 3 screws and switch.
-
-
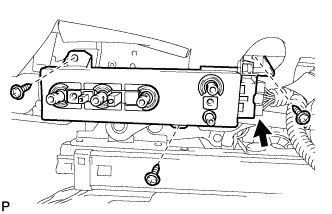
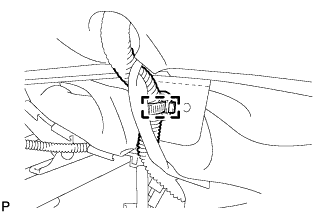
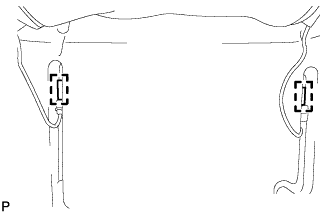
REMOVE FRONT SEAT INNER CUSHION SHIELD LH
-
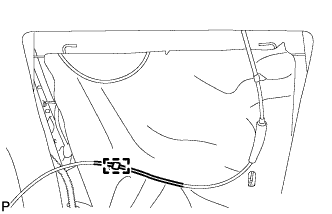
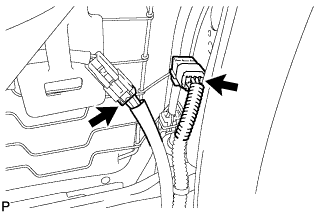
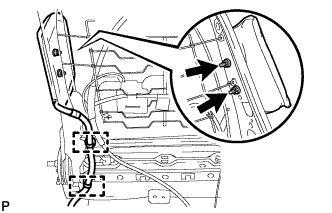
Text in Illustration *1 Hook *2 Wire Harness Clamp Remove the 2 screws.
-
Pull the shield to detach the hook and remove the shield.
-
Detach the wire harness clamp.
-
-
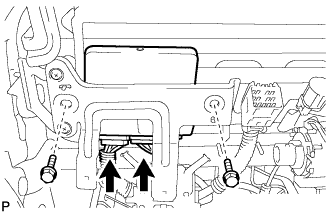
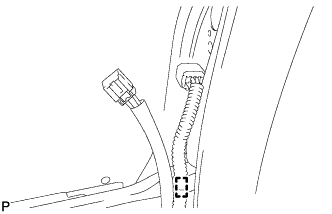
REMOVE FRONT SEAT INNER BELT ASSEMBLY LH
-
for Driver Side:
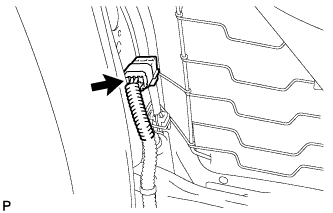
Disconnect the connector and detach the clamps.
-
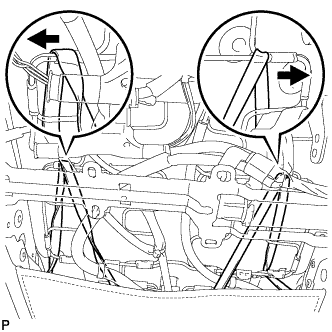
for Passenger Side:
Disconnect the connectors and detach the clamps.
-
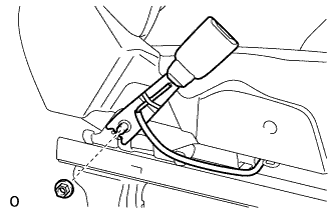
Remove the nut and front seat inner belt.
-
-
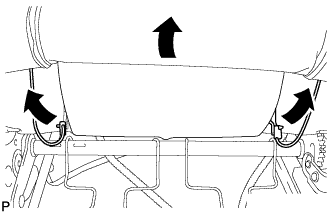
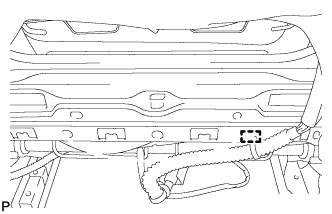
REMOVE SEAT CUSHION COVER WITH PAD
-
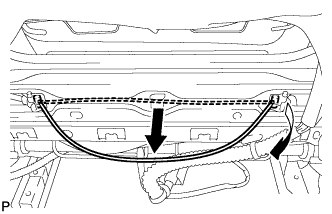
Detach the 2 rubber bands.
-
Disconnect the connector.
-
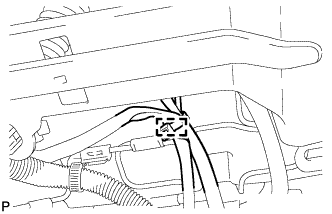
Cut off the cable tie.
-
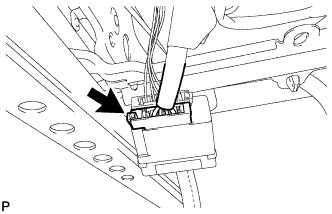
for Passenger Side:
-
Detach the 2 hooks and remove the connector holder.
-
-
for Driver Side:
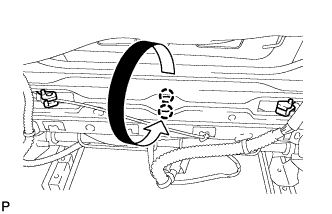
Detach the wire harness clamp.
-
Disconnect the connectors.
-
Detach the hooks and remove the seat cushion cover with pad.
-
-
REMOVE SEPARATE TYPE FRONT SEAT CUSHION COVER
-

Detach the hooks and remove the seat cushion cover.
-
-
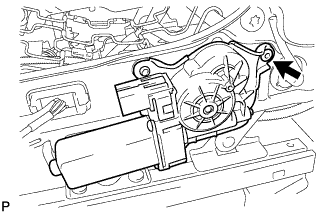
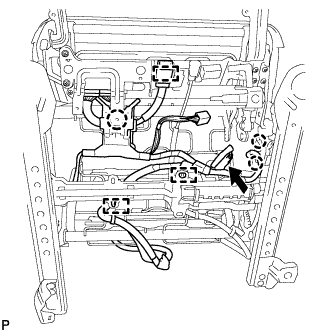
REMOVE POWER SEAT MOTOR ASSEMBLY (for Front Vertical)
-
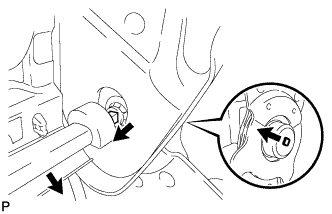
Disconnect the connector.
-
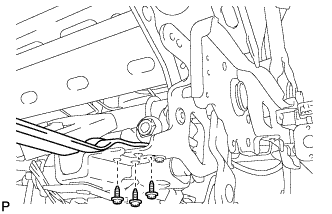
Remove the 3 screws and shield bracket.
-
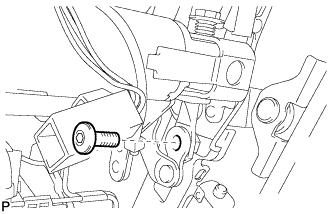
Using a 6 mm socket hexagon wrench, remove the bolt.
-
Put a 4 mm (0.157 in.) drill bit into a drill.
-
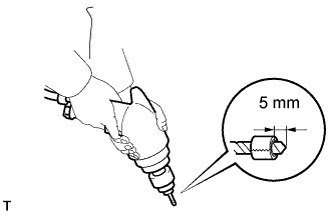
Wind tape around the drill bit approximately 5 mm (0.197 in.) from the tip of the drill, as shown in the illustration.
Tech Tips
Tape the 4 mm (0.157 in.) drill bit to prevent the drill bit from going too deep.
-
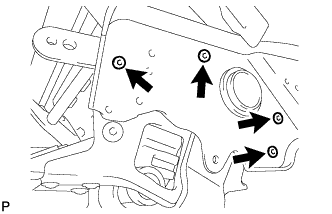
Lightly press the drill against each of the 4 rivets shown in the illustration, and drill off the flange of each rivet.
Note
-
Pressing the drill too firmly will cause the rivet to turn and result in the rivet not being drilled through.
-
Do not pry the rivet with the drill because this may cause damage to the installation holes of the rivet or the drill bit.
-
Be careful of the drilled rivet as it may become hot.
-
-

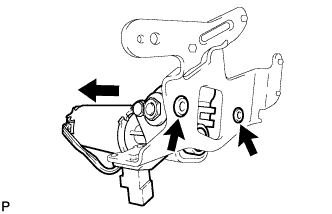
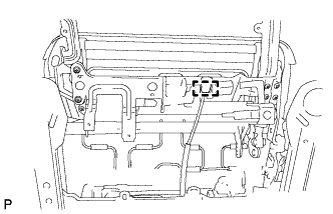
Lightly press the drill against each of the 2 rivets shown in the illustration, and drill off the flange of each rivet.
Note
-
Pressing the drill too firmly will cause the rivet to turn and result in the rivet not being drilled through.
-
Do not pry the rivet with the drill because this may cause damage to the installation holes of the rivet or the drill bit.
-
Be careful of the drilled rivet as it may become hot.
-
-
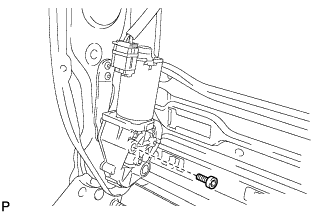
Remove the motor and bracket.
-
Lightly press the drill against each of the 2 rivets shown in the illustration, and drill off the flange of each rivet.
Note
-
Pressing the drill too firmly will cause the rivet to turn and result in the rivet not being drilled through.
-
Do not pry the rivet with the drill because this may cause damage to the installation holes of the rivet or the drill bit.
-
Be careful of the drilled rivet as it may become hot.
-
-
Remove the motor.
-
Using a vacuum cleaner, remove the rivet fragments and shavings from the drilled area.
-
-
REMOVE POWER SEAT MOTOR ASSEMBLY (for Rear Lifter)
-
Put a 4 mm (0.157 in.) drill bit into a drill.
-
Wind tape around the drill bit approximately 5 mm (0.197 in.) from the tip of the drill, as shown in the illustration.
Tech Tips
Tape the 4 mm (0.157 in.) drill bit to prevent the drill bit from going too deep.
-

Lightly press the drill against each of the 2 rivets shown in the illustration, and drill off the flange of each rivet.
Note
-
Pressing the drill too firmly will cause the rivet to turn and result in the rivet not being drilled through.
-
Do not pry the rivet with the drill because this may cause damage to the installation holes of the rivet or the drill bit.
-
Be careful of the drilled rivet as it may become hot.
-
-
Lightly press the drill against the rivet shown in the illustration, and drill off the flange of the rivet.
Note
-
Pressing the drill too firmly will cause the rivet to turn and result in the rivet not being drilled through.
-
Do not pry the rivet with the drill because this may cause damage to the installation holes of the rivet or the drill bit.
-
Be careful of the drilled rivet as it may become hot.
-
-
Remove the motor.
-
Using a vacuum cleaner, remove the rivet fragments and shavings from the drilled area.
-
-
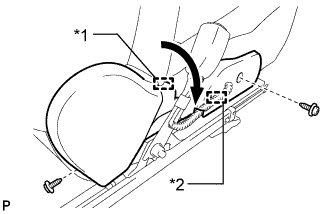
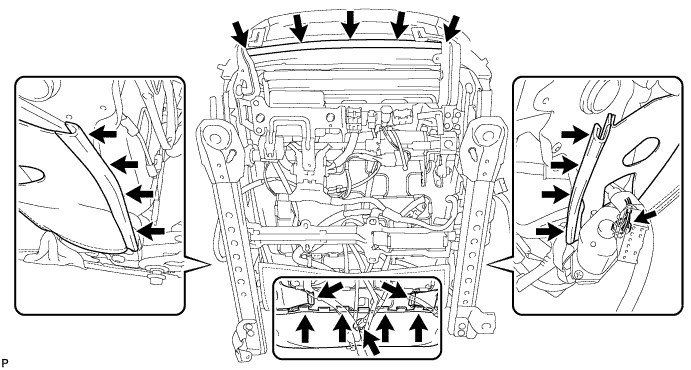
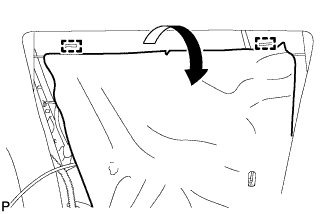
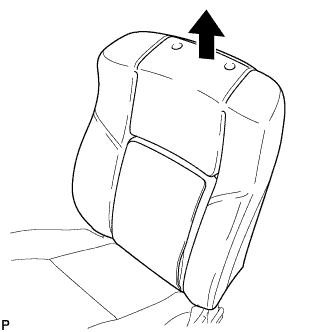
REMOVE SEPARATE TYPE FRONT SEATBACK COVER
-
Detach the 4 hooks.

-

Detach the 2 hooks from the bottom of the seatback cover and roll up the seatback cover.
-

Detach the 2 hooks and remove the 2 straps.
-
Pass the 2 straps through the separate type front seatback pad holes to the surface.
-
Roll up the cover.
-
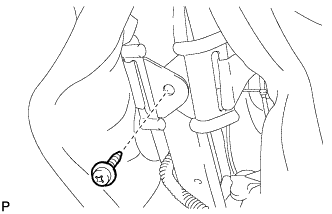
Remove the screw and detach the seatback cover bracket.
-

Text in Illustration *1 Hook *2 Hog Ring Remove the hog rings and detach the 3 hooks from the center of the seatback pad and roll up the seatback cover.
-
Detach the 2 hooks and open the seatback mat.
-
Cut off the cable tie.
-
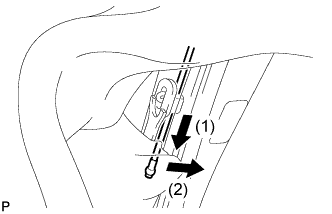
Pull the wire to loosen it, and then disconnect the end of the wire from the active headrest lower unit.
-
Detach the 2 claws and remove the active headrest lower unit.
-

Using a screwdriver, detach the 2 claws and wire.
Tech Tips
Tape the screwdriver tip before use.
-
Remove the wire in the order shown in the illustration.
-
Push the headrest support and detach the claw.
-
Using a screwdriver, detach the claw and remove the front seat headrest.
Tech Tips
Tape the screwdriver tip before use.
-
Detach the 2 claws and remove the 2 headrest supports.
-
Detach the 2 hooks and remove the seatback cover.
-
-
REMOVE POWER SEAT MOTOR ASSEMBLY (for Reclining)
-
Remove the seatback pad.
-
for Driver Side:
Disconnect the connectors.
-
for Passenger Side:
Disconnect the connector.
-

Detach the 8 hooks and remove the seatback spring.
-

Push in the inner reclining rod.
-
Push in the inner reclining rod and remove the reclining rod assembly.
-
Using a 5 mm socket hexagon wrench, remove the bolt and motor.
-
-
REMOVE FRONT SEAT AIRBAG ASSEMBLY
-

Disconnect the connector clamp and detach the 2 harness clamps underside of seat.
-
Detach the 2 harness clamps and remove the 2 nuts and front seat airbag assembly LH.
Note
The nuts must not be reused.
-
-
REMOVE SEAT CLIMATE CONTROL CONTROLLER LH
-

Disconnect the connector.
-
Detach the claw and remove the seat climate control controller.
-
-
REMOVE POSITION CONTROL ECU ASSEMBLY (for Driver Side)
-
Disconnect the connectors and remove the 2 bolts and position control ECU.
-
-
REMOVE FRONT SEAT WIRE LH
-
Detach the wire harness clamp.
-
Detach the wire harness clamp.
-
Disconnect the connector and detach the 2 wire harness clamps.
-
Detach the connector.
-
Detach the 3 claws and remove the front seat wire.
-
-
REMOVE FRONT SEAT ADJUSTER ASSEMBLY LH
-
Detach the connector.
-

Detach the 4 wire harness clamps.
-
Using a T50 "TORX" socket wrench, remove the 4 "TORX" bolts and seat adjuster.
-
-
REMOVE REAR UPPER SEAT TRACK COVER
-
Using a screwdriver, detach the 3 claws and remove the cover.
Tech Tips
Tape the screwdriver tip before use.
-
-
REMOVE NO. 2 REAR UPPER SEAT TRACK COVER
-

Using a screwdriver, detach the 3 claws and remove the cover.
Tech Tips
Tape the screwdriver tip before use.
-