FUEL TANK REMOVAL

-
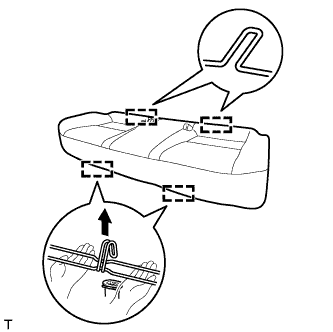
REMOVE REAR BENCH TYPE SEAT CUSHION ASSEMBLY (for Sedan)
-
Detach the 2 front hooks of the seat cushion from the vehicle body.
Note
Follow the instructions below carefully as the cushion frame deforms easily.
-
Choose a hook to detach first. Place your hands near the hook as shown in the illustration. Then lift the seat cushion to detach the hook.
-
Repeat for the other hook.
-
-
Detach the 2 rear hooks of the seat cushion from the seatback.
Note
Be careful not to damage the vehicle body.
-
-
REMOVE REAR BENCH TYPE SEAT CUSHION ASSEMBLY (for Wagon)
-
Detach the 2 front hooks of the seat cushion from the vehicle body.
Note
Follow the instructions below carefully as the cushion frame deforms easily.
-
Choose a hook to detach first. Place your hands near the hook as shown in the illustration. Then lift the seat cushion to detach the hook.
-
Repeat for the other hook.
-
-
Detach the 2 rear hooks of the seat cushion from the seatback.
Note
Be careful not to damage the vehicle body.
-
-
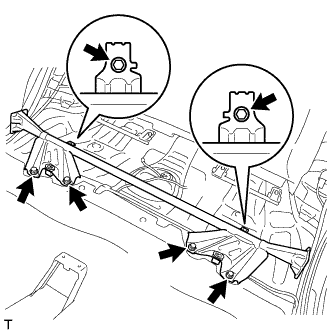
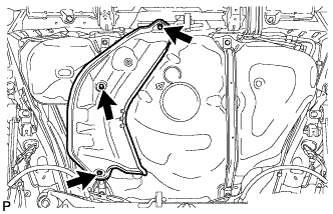
REMOVE NO. 1 QUARTER WHEEL HOUSE GUSSET SUB-ASSEMBLY
-
Remove the 6 bolts and gusset.
-
-
REMOVE REAR FLOOR SERVICE HOLE COVER
-
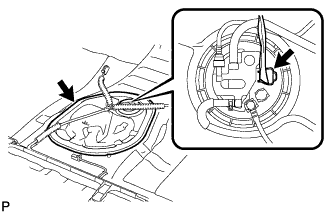
Remove the rear floor service hole cover.
-
Disconnect the connector from the fuel suction with pump assembly.
-
-
DISCHARGE FUEL SYSTEM PRESSURE
-
Discharge fuel system pressure Click here.
-
-
PRECAUTION
Note
After turning the ignition switch off, waiting time may be required before disconnecting the cable from the battery terminal. Therefore, make sure to read the disconnecting the cable from the battery terminal notice before proceeding with work Click here.
-
DISCONNECT CABLE FROM NEGATIVE BATTERY TERMINAL
Note
When disconnecting the cable, some systems need to be initialized after the cable is reconnected Click here.
-
REMOVE FUEL TANK CAP ASSEMBLY
-
DRAIN FUEL
Note
These procedures should be performed with the fuel tank less than 1/4 full Click here.
-
REMOVE TAILPIPE ASSEMBLY
-
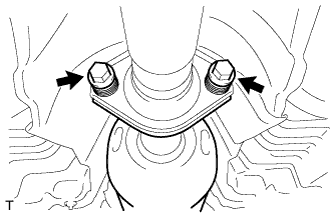
Remove the 2 bolts and 2 compression springs.
-
Remove the 4 exhaust pipe supports and tailpipe assembly.
-
-
REMOVE NO. 1 FUEL TANK PROTECTOR
-
Remove the 3 bolts and No. 1 fuel tank protector.
-
-
DISCONNECT PARKING BRAKE CABLE
-
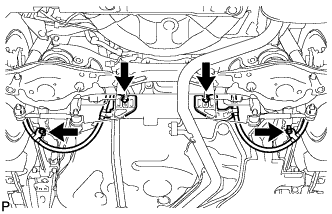
Remove the 2 nuts and 2 bolts, and disconnect the parking brake cable.
-
-
DISCONNECT NO. 1 FUEL EVAPORATION TUBE SUB-ASSEMBLY
-
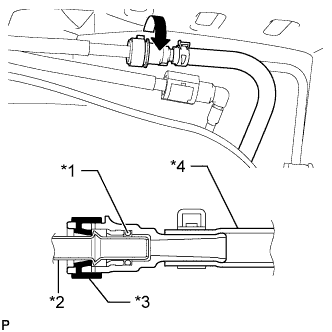
Text in Illustration *1 O-Ring *2 Fuel Pipe *3 Retainer *4 Nylon Tube Pinch the projections of the retainer to detach the lock claws and pull off the tube as shown in the illustration.
Note
-
Remove any dirt and foreign matter on the fuel tube connector before performing this work.
-
It is necessary to prevent mud or dirt from entering the connector. If mud enters the connector, the O-ring may not seal properly.
-
Do not use any tools for this work.
-
Do not bend, kink or twist the nylon tube by force.
-
After disconnecting the tube, cover the connector with a plastic bag.
-
If the connector and pipe are stuck, pinch the tube between your fingers, turn the tube carefully to release it, and then disconnect the tube.
-
-
-
DISCONNECT FUEL TANK MAIN TUBE SUB-ASSEMBLY
-
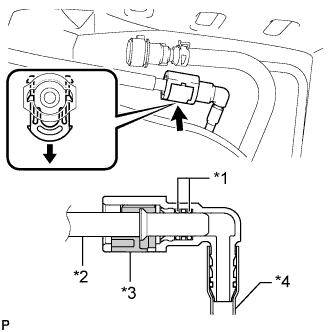
Text in Illustration *1 O-Ring *2 Fuel Pipe *3 Retainer *4 Nylon Tube Disconnect the fuel tank main tube.
Note
-
Check for any dirt and foreign matter contamination in the pipe and around the connector. Clean if necessary. Foreign matter may damage the O-ring or cause leaks in the seal between the pipe and connector.
-
Do not use any tools to separate the pipe and connector.
-
Do not allow any scratches or foreign matter on the parts when disconnecting them, as the fuel tube joint contains the O-rings that seal the plug.
-
Check for any dirt and foreign matter on the pipe seal surface. Clean if necessary.
-
Do not forcibly bend, twist or turn the nylon tube.
-
Protect the disconnected part by covering it with a plastic bag and tape after disconnecting the main tube.
-
If the pipe and connector are stuck together, pinch the tube between your fingers and turn it carefully to free it. Then disconnect the main tube.
-
-
-
DISCONNECT FUEL HOSE
-
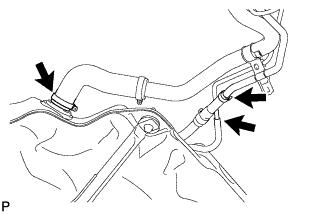
Disconnect the fuel tank to filler pipe hose, fuel tank vent hose and No. 1 charcoal canister outlet hose.
-
-
REMOVE FUEL TANK ASSEMBLY
-
Set a transmission jack underneath the fuel tank.
-
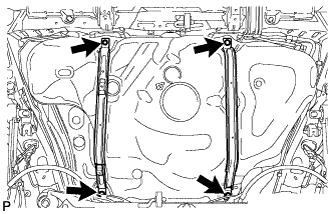
Remove the 4 bolts and 2 fuel tank bands.
-
Slowly lower the transmission jack to remove the fuel tank from the vehicle body.
Note
Be careful not to cut the wiring.
-