TRANSMITTER BATTERY (w/o Entry and Start System) REMOVAL

-
REMOVE TRANSMITTER HOUSING COVER
Note
Take extra care when handling these precision electronic components.
-
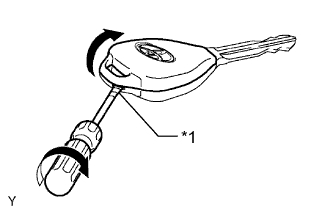
Text in Illustration *1 Protective Tape Twist the screwdriver in the direction of the arrow in the illustration, and open the transmitter housing cover.
Note
Do not forcibly pry open the cover.
Tech Tips
Tape the screwdriver tip before use.
-
-
REMOVE DOOR CONTROL TRANSMITTER MODULE
Note
When replacing the transmitter battery, before starting work, remove static electricity that has built up in the body by touching, for example, the vehicle to prevent the door control transmitter module set from being damaged.
-
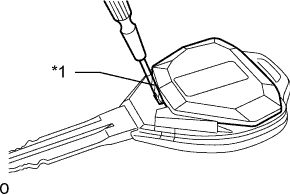
Text in Illustration *1 Protective Tape Using a precision screwdriver, remove the door control transmitter module.
Tech Tips
Tape the screwdriver tip before use.
-
-
REMOVE TRANSMITTER BATTERY
-
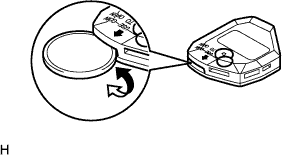
Twist a coin in the direction of the arrow in the illustration and remove the transmitter battery cover.
Note
When replacing the transmitter battery, before starting work, remove static electricity that has built up in the body by touching, for example, the vehicle to prevent the door control transmitter module set from being damaged.
-

Remove the battery (lithium battery: CR2016).
Note
-
When replacing the transmitter battery, before starting work, remove static electricity that has built up in the body by touching, for example, the vehicle to prevent the door control transmitter module set from being damaged.
-
Do not push the terminals with your finger.
-
Do not forcibly pry up the battery. The terminals may become damaged.
-
Do not touch the battery with wet hands. Water may cause rust.
-
Do not touch or move any components inside the transmitter. It may cease to work.
-
-