АВТОМАТИЧЕСКАЯ ТРАНСМИССИЯ В СБОРЕ СНЯТИЕ
-
DISCONNECT CABLE FROM NEGATIVE BATTERY TERMINAL
CAUTION:
Wait at least 90 seconds after disconnecting the cable from the negative (-) battery terminal to prevent airbag and seat belt pretensioner activation.
-
REMOVE SHIFT LEVER KNOB SUB-ASSEMBLY

-
Поверните рукоятку рычага переключения передач в направлении, указанном стрелкой, и снимите рукоятку.
-
-
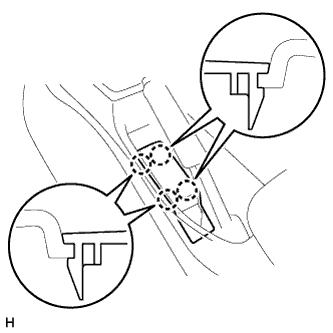
REMOVE PARKING BRAKE HOLE COVER SUB-ASSEMBLY
-
Освободите 4 захватов и снимите крышку отверстия стояночного тормоза.
-
-
REMOVE UPPER CONSOLE PANEL SUB-ASSEMBLY
-
Открепите 12 захватов и снимите верхнюю облицовку панели пола.
Note
Соблюдайте осторожность, чтобы не повредить панель приборов и вещевой ящик в облицовке туннеля пола захватами на верхней облицовке панели пола.
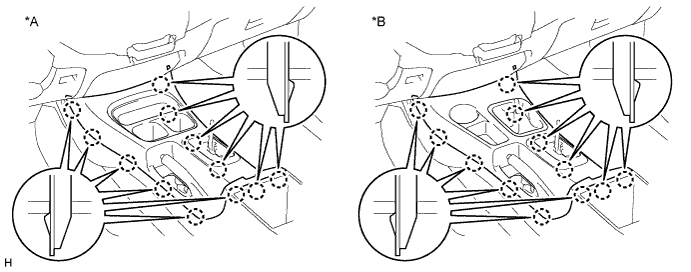
Обозначения на рисунке *A Для моделей с приводом на одну ось *B для моделей с полным приводом
-
-
REMOVE CONSOLE BOX ASSEMBLY
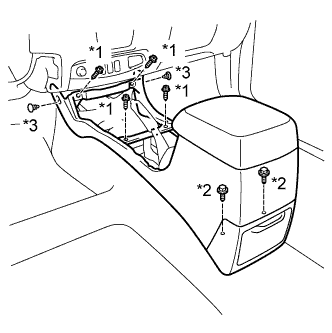
Обозначения на рисунке *1 Винт *2 Болт *3 Фиксатор
-
Выверните 4 винта и 2 болта.
-
С помощью съемника фиксаторов освободите 2 фиксатора и снимите вещевой ящик в облицовке туннеля пола.
-
-
REMOVE SHIFT LEVER BOOT ASSEMBLY
-
Remove the 4 screws and shift lever boot.
-
-
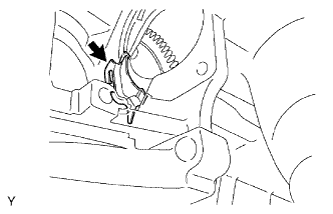
REMOVE TRANSFER HIGH AND LOW SHIFT LEVER ASSEMBLY
-

Fold back the transfer front drive shift boot.
-
Using needle-nose pliers, remove the snap ring and pull out the shift lever.
Tech Tips
Move the transfer shift lever to the H4 position.
-
-
REMOVE NO. 1 ENGINE UNDER COVER
-
REMOVE NO. 2 ENGINE UNDER COVER
-
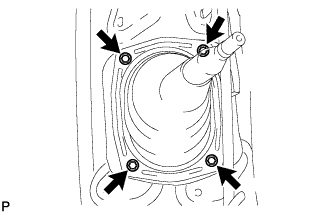
REMOVE TRANSFER CASE LOWER PROTECTOR
-
Remove the 4 bolts and transfer case lower protector.
-
-
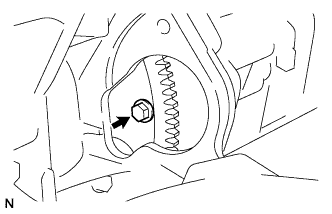
DRAIN AUTOMATIC TRANSMISSION FLUID
-
Remove the drain plug and gasket, and drain ATF.
-
Install a new gasket and the drain plug.
- Torque:
- 28 N*m { 285 kgf*cm, 21 ft.*lbf }
-
-
DRAIN TRANSFER OIL
-
DISCONNECT HEATED OXYGEN SENSOR
-
REMOVE EXHAUST PIPE
-
Remove the exhaust pipe Click here.
-
-
REMOVE FRONT PROPELLER SHAFT ASSEMBLY
-
Remove the front propeller shaft assembly Click here.
-
-
REMOVE REAR PROPELLER SHAFT ASSEMBLY
-
Remove the rear propeller shaft assembly Click here.
-
-
REMOVE MANIFOLD STAY
-
Remove the 3 bolts and manifold stay.
-
-
REMOVE NO. 2 MANIFOLD STAY
-
Remove the 3 bolts and manifold stay.
-
-
REMOVE EXHAUST MANIFOLD SUB-ASSEMBLY LH
-
Remove the 6 nuts, exhaust manifold and gasket.
-
-
REMOVE EXHAUST MANIFOLD SUB-ASSEMBLY RH
-
Remove the 6 nuts, exhaust manifold and gasket.
-
-
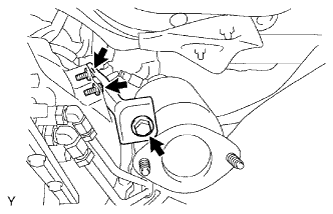
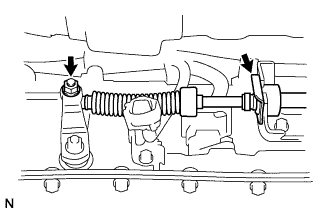
DISCONNECT OIL COOLER TUBE
-
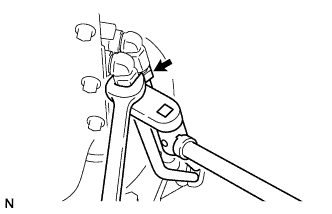
Using a union nut wrench, disconnect the tube outlet and tube inlet.
-

Remove the 2 bolts and 2 clamps.
-
-
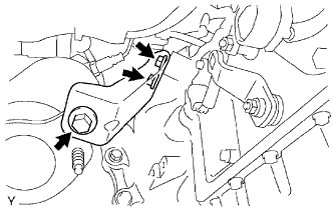
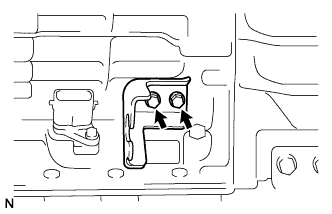
DISCONNECT TRANSMISSION CONTROL CABLE ASSEMBLY
-
Remove the nut and disconnect the control cable.
-
Remove the clip and disconnect the control cable.
-
-
REMOVE NO. 1 TRANSMISSION CONTROL CABLE BRACKET
-
Remove the 2 bolts and control cable bracket from the transmission.
-
-
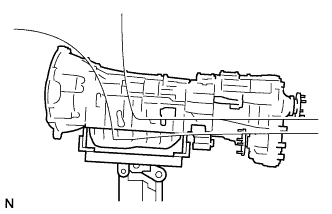
SUPPORT AUTOMATIC TRANSMISSION ASSEMBLY
-
Support the transmission with a transmission jack.
-
-
REMOVE NO. 3 FRAME CROSSMEMBER SUB-ASSEMBLY

-
Remove the 4 set bolts of the No. 1 engine mounting insulator rear.
-
Remove the 4 nuts, 4 bolts and frame crossmember.
-
-
REMOVE NO. 1 ENGINE MOUNTING INSULATOR REAR
-
Remove the 4 bolts and engine mounting insulator rear from the automatic transmission.
-
-
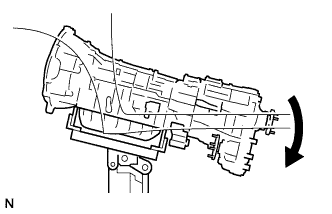
DISCONNECT CONNECTOR
-
Tilt the transmission downward.
Note
Make sure the cooling fan does not contact the fan shroud.
-
Transmission side:
Disconnect the connectors.
-
Disconnect the park/neutral position switch connector.
-
Disconnect the transmission wire connector.
-
Disconnect the 2 speed sensor connectors.
-
-
Transfer side:
Disconnect the connectors.
-
Disconnect the No. 1 indicator switch connector.
-
Disconnect the No. 2 indicator switch connector.
-
Disconnect the speed sensor connector.
-
-
-
DISCONNECT WIRE HARNESS
-
REMOVE STARTER ASSEMBLY
-
Remove the starter assembly Click here.
-
-
REMOVE FLYWHEEL HOUSING SIDE COVER
-
Remove the flywheel housing side cover from the cylinder block.
-
-
REMOVE AUTOMATIC TRANSMISSION ASSEMBLY
-
Turn the crankshaft to gain access to each bolt.
-
Hold the crankshaft pulley bolt with a wrench and remove the 6 torque converter clutch mounting bolts.
-

Remove the 9 bolts.
-
Separate and remove the automatic transmission assembly.
-
-
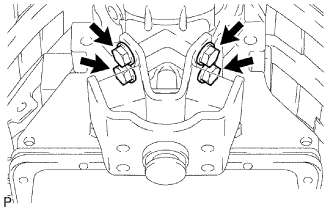
REMOVE TRANSFER ASSEMBLY
-
Выверните 8 болтов и снимите 2 зажима.
-
Отсоедините раздаточную коробку от трансмиссии.
-
-
REMOVE TORQUE CONVERTER CLUTCH ASSEMBLY