HEADLIGHT ASSEMBLY INSTALLATION
Tech Tips
-
Use the same procedure for the RH and LH sides.
-
The procedure described below is for the LH side.
-
INSTALL HEADLIGHT ASSEMBLY
-
Connect each connector.
-
Engage the clamp.
-
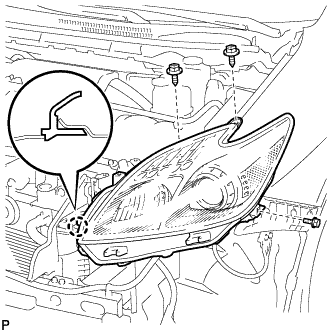
Engage the claw.
-
Install the headlight assembly with the bolt and 2 screws.
- Torque:
- 5.4 N*m { 55 kgf*cm, 48 in.*lbf }
-
-
INSTALL FRONT BUMPER ASSEMBLY
-
CONNECT CABLE TO NEGATIVE AUXILIARY BATTERY TERMINAL
Note
When disconnecting the cable, some systems need to be initialized after the cable is reconnected Click here.
-
INSTALL REAR NO. 3 FLOOR BOARD UPPER PLATE
-
Engage the 2 claws to install the rear No. 3 floor board upper plate.
-
-
INSTALL DECK FLOOR BOX RH
-
Install the deck floor box RH Click here.
-
Install the rear No. 2 floor board.
-
-
INSTALL REAR NO. 3 FLOOR BOARD
-
Install the rear No. 3 floor board.
-
-
ADJUST HEADLIGHT AIMING
-
ADJUST FOG LIGHT AIMING